The ability to manipulate curves is a fundamental skill in the world of parametric design. By understanding how to divide curves and create points on a curve, you unlock the real potential of Grasshopper for Rhino. In this post, we will learn everything there is to know about how to divide a curve in Grasshopper!
Let’s get started!
How to Use the Curve Division Components
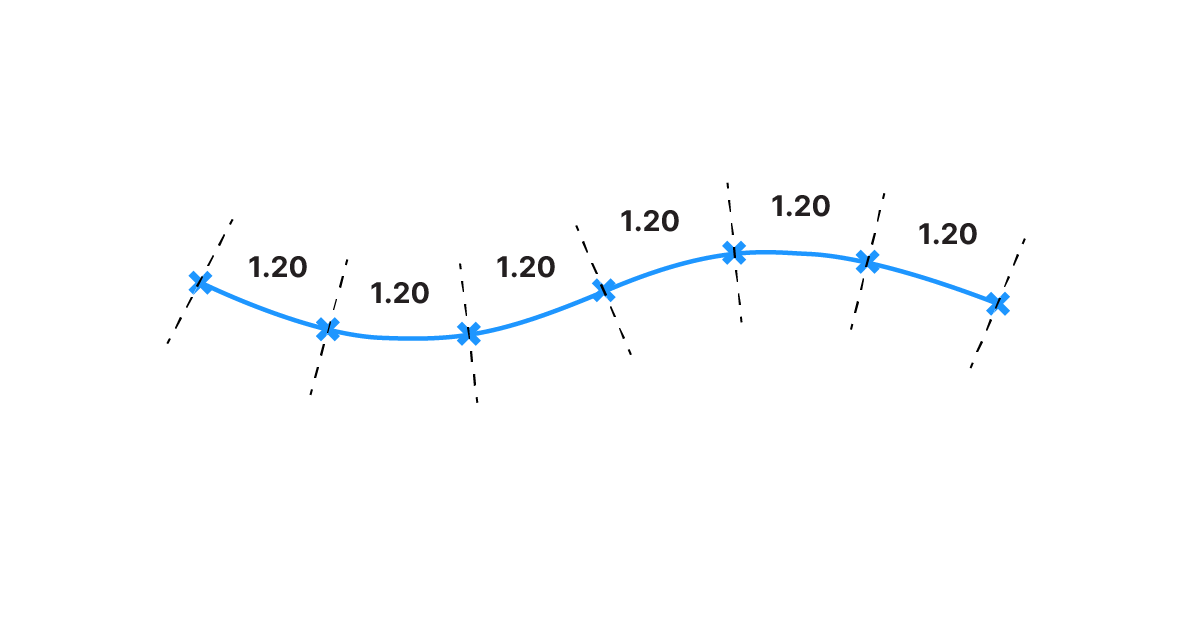
Dividing a curve in Grasshopper refers to creating points on a curve at certain intervals. You can find the curve division components in the ‘Curve‘ component tab, under the group named ‘Division‘.
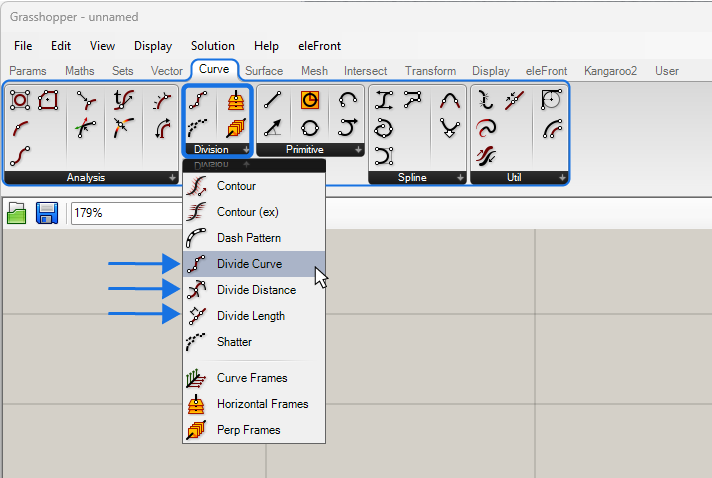
There are three main curve division components available in Grasshopper:
- Divide Curve (Divide)
- Divide Distance (DivDist)
- Divide Length (DivLength)
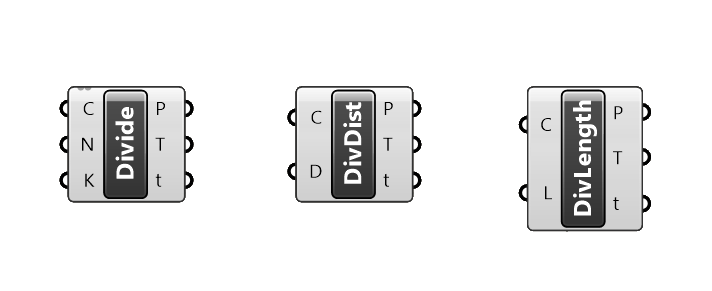
These three components differ in the way the spacing of the points is calculated. Before we go over each one in detail, let’s look at what they have in common.
Curve Division Component Outputs
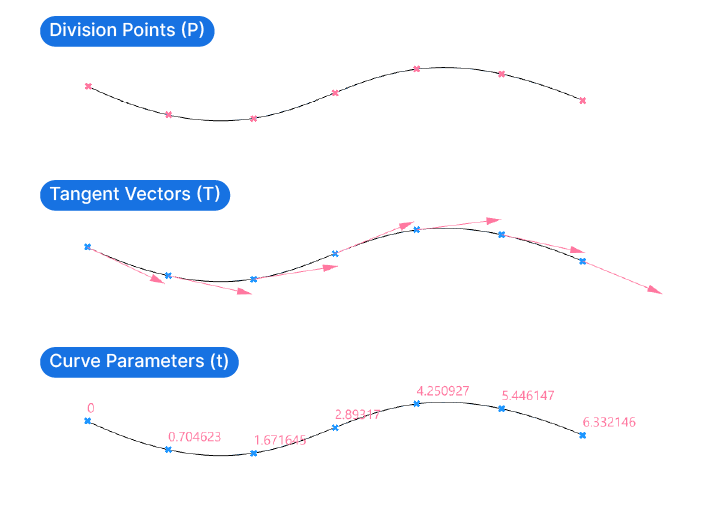
All three components have the following three outputs:
- Points (P) The Points output is self-explanatory – it contains a list of all the division points created by the component.
- Tangents (T) The Tangents output contains the tangent vectors of the curve at each of the points it created. We can use the tangents to, for instance, create an array of objects perpendicular to the curve.
- Parameters (t) The Parameters output represents a list of numbers, so called ‘Curve Parameters’. These numbers are Grasshopper’s way of describing the location of the point along the Curve.
Splitting a Curve at its Division Points
These components won’t actually ‘divide’ the curve. But it gets us one step closer: with the Parameters (t) output we have the exact locations where we want to split the curve. You probably notices that there is no component called ‘Split’ in Grasshopper. In Grasshopper some commands go by a different name than in Rhino, although the commands are the same. The equivalent of the ‘Split‘ command in Rhino is the ‘Shatter‘ component in Grasshopper.
How to Divide a Curve into Equal Parts in Grasshopper
The most common way of subdividing a curve is to divide it into segments of equal length. The ‘Divide Curve‘ component does just that.
To get it to run, we first need to connect the curve we want to divide to the first input named ‘C‘, which stands for Curve. In the example below, it is a curve referenced from the Rhino document.
The next input ‘N‘ allows us to specify the count of divisions we want to create on the curve. Keep in mind that the number refers to the resulting curve segments, not the number of points! If we specify 6 as the division count, we will get 7 Points as the output.
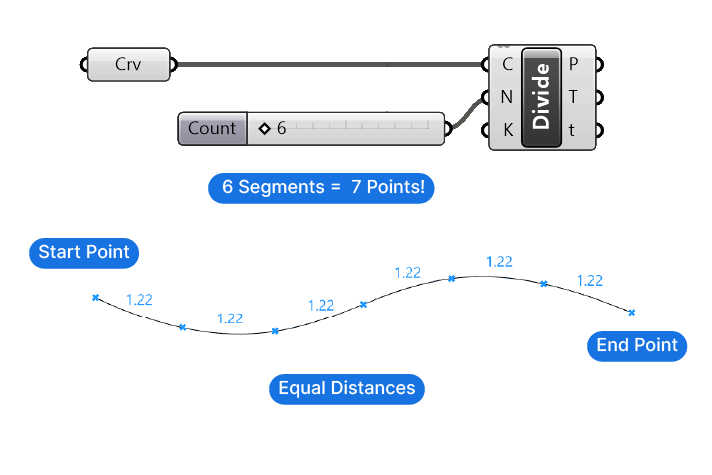
The main benefit of this division component is that the points are spaced equally along the curve, with a point at the beginning and at the end.
The drawback of this way of dividing a curve in Grasshopper is that unless the curve has a length that is divisible by the number of segments we specify, we are going to end up with distances between the points that are not round numbers. In a production scenario this will lead to inaccuracies.
If we want to control the distance between the points precisely, we have to use one of the following two components.
How to Divide a Curve by Length
The Divide Distance and Divide Length components may appear to do same at first glance, but there is an important difference. Let’s start with the Divide Length component.
The Divide Length component allows us to specify the exact length of the curve segments between the division points.
Besides the Curve input C, we only need to define the Length (L) in the second input.
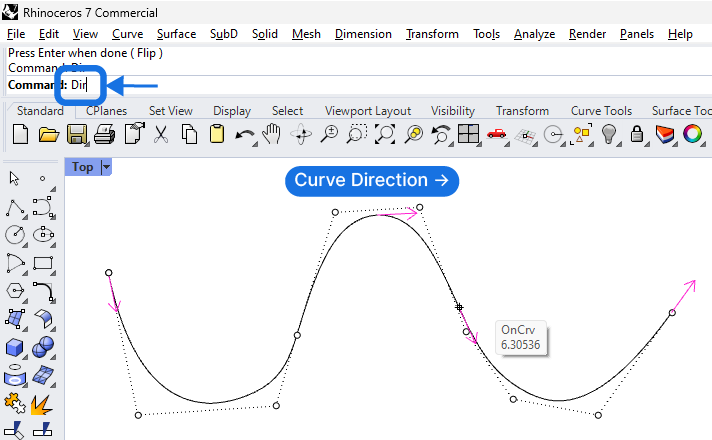
Unlike the Divide Curve component, in this case the curve direction becomes relevant. This is because the length will be calculated starting from the ‘start‘ of the curve.
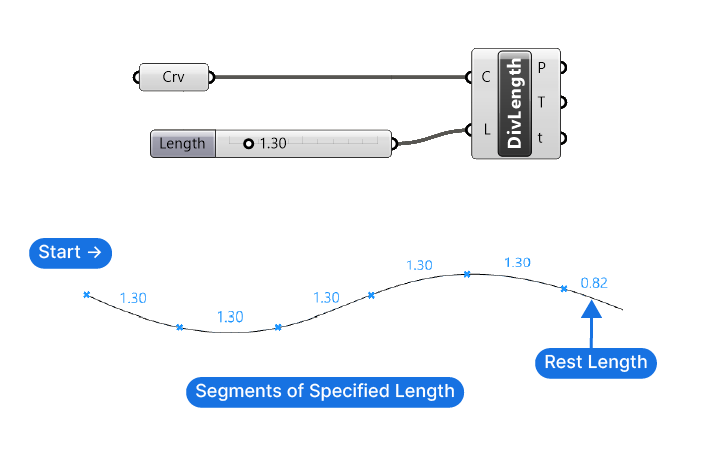
Every curve in Grasshopper has a start and end point, which is determined by the way the curve was created. If the curve was drawn in Rhino, the first control point would mark the start of the curve, and the last, the end point.
Even if the curve is closed, the curve will have a point that Rhino considers the start point.
Since the division is determined by a specified length of the segments, unless the curve has exactly a length of a multiple of the division length, there will be a ‘rest length‘ at the end of the curve.
The component will not create a point at the end of the curve, the point marking the last full segment length will be the last point.
Tip: To visualize the direction of a curve created in Rhino, select the curve and type ‘Dir‘ into the command bar, and hit ‘Enter’. Small arrows will appear on the curve, showing the direction. While the command is running, you can flip the direction of the curve by clicking on the curve. The arrows will flip direction accordingly. Once you confirm with a right-click or ‘Enter’, the direction of the curve will be set.
How to Divide a Curve by Distance
While at first glance the ‘Divide Distance’ and ‘Divide Length’ components may seem to have the same output, they are actually quite different. Each has its unique operation and application.
Let’s start with the in-and-outputs. Similar to the Divide Length component, the Divide Distance component needs a Curve (C) input and a second, numerical input named ‘Distance‘ (D).
This Distance value will determine the distance between the points, irrespective of the length of the curve segment between the points!
This is best explained with an illustration:
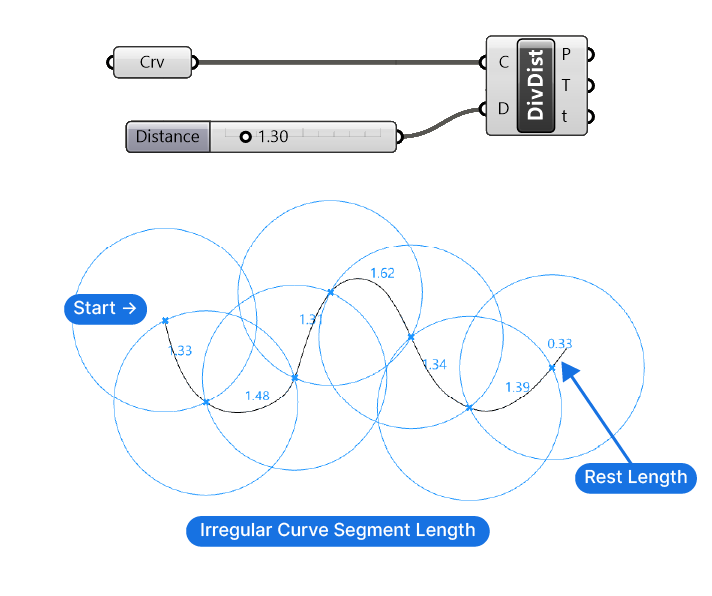
The component starts calculating the points at the beginning of the curve, just like the Divide Length component. Imagine a circle drawn at the start point of the curve. Wherever the circle will intersect with the curve, the next division point will be created. If there are multiple intersections between this imagined circle and the curve, the next point in the curve direction will be returned.
Since this component must calculate each step one after the other, it takes some time to calculate the division points. Depending on the number of divisions to create it can be many times slower than other division components!
Now you may wonder in what scenario this component can be used?
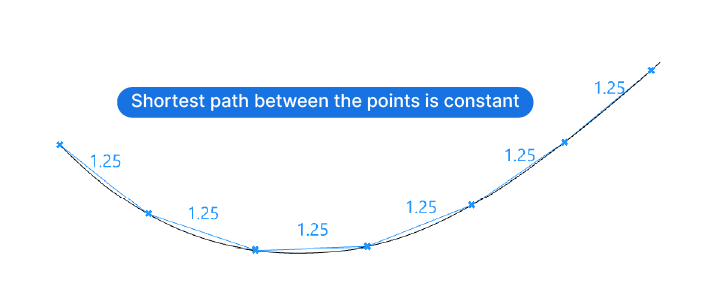
An example would be the following: Imagine a curvilinear architectural façade design made of identical, flat panels. By using the Divide Distance component we can draw a series of linear panels of identical width (due to the constant distance between the division points) along the curve, effectively rationalizing and panelizing the curvature.
The Bottom Curve Line
I hope that this comprehensive guide has shed light on the essentials of curve division in Grasshopper. Understanding the nuances between the ‘Divide Curve’, ‘Divide Distance’, and ‘Divide Length’ components can significantly enhance your ability to manipulate and utilize curves in your designs. These tools offer different ways to control the division of a curve opening up a wide range of design possibilities.
Now you know how to divide a curve in Grasshopper, but the journey doesn’t have to stop here, it’s also possible to divide a curve into segments of non-uniform length!
If you are an architect and you want to fast-track your Grasshopper journey, check out our online course: Grasshopper Pro. You’ll learn real-world architectural techniques used in the world’s leading architecture firms.
Keep exploring, keep learning, and most importantly, keep creating!

