The ability to precisely trim curves is an indispensable skill for designers who want to create polished and professional models. While it is an intuitive command in Rhino, in Grasshopper trimming curves is a bit more complex. But worry not! In this article we’ll go in-depth on how to trim a curve in Grasshopper. We’ll break down the steps, and provide expert insights to elevate your design workflow.
Let’s get started!
Understanding How Rhino Trims a Curve
Before we dive into the components to use to trim a curve, let’s understand how the ‘Trim’ command works in Rhino to better understand how to trim in Grasshopper.
In Rhino, trimming a curve as as simple as selecting the trimming geometry, and then clicking on the curve we want to trim, on the side we want to trim it.
While this is very intuitive for any Rhino modeler, there is actually a number of things going on.
First, Rhino automatically calculates the location on the curve where the splitting will takes place. The intersection point between the curve and the intersecting geometry is solved on-the-fly, without the need to intervene.
Second, by clicking on the side of the curve we want to remove, Rhino performs two actions at once: it splits the curve at the intersection point and then removes the segment of the curve we clicked on.
To trim a curve in Grasshopper, we’ll need to follow the same three steps:
- Determine the intersection point
- Split the curve at the intersection point
- Delete the resulting curve segments we don’t want
Let’s go through the process of trimming a curve step-by-step, using an example to illustrate how it works.
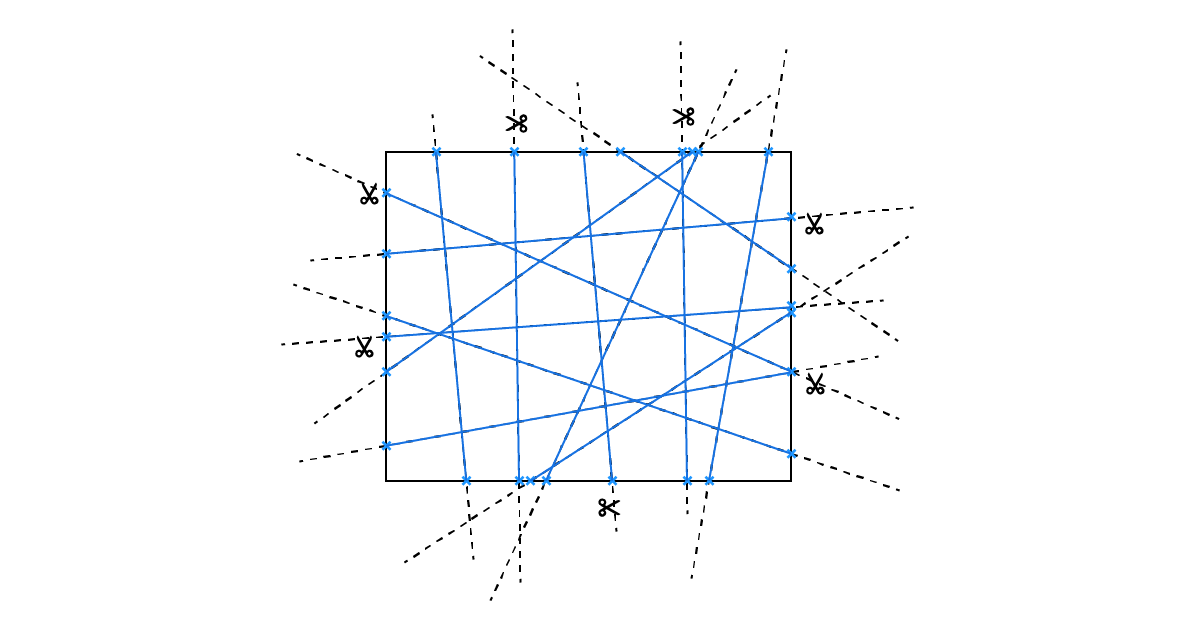
In our example script, we’ll be trimming a list of randomly rotated curves, with a rectangular curve. (Loosely inspired by Herzog & de Meuron’s ‘Bird Nest’ Stadium for the 2008 Olympic Games in Beijing, China.)
Describing Locations on a Curve
The first step is to find the exact location on the curves, where the curves will be split.
In Grasshopper, we can’t directly split a curve with another. Instead, we need to describe the location along the curve where we want to split it.
The way to describe the location of a point on a curve in Grasshopper, is through the Curve Parameter.
The Curve Parameter is a (often arbitrary) number that mathematically describes a precise location on the curve.
Let’s back up a little: Every Curve in Grasshopper has a direction and a curve domain. The direction is defined at the time of the creation of the curve. If the curve is modeled in Rhino, the first control point would be the starting point, and the last the end point of the curve. So far, so good.
Grasshopper then assigns the number 0.00 to the start of the curve, and (unfortunately) an arbitrary number to the end of the curve. This range is called the Curve Domain.
As a result, every point on the curve can be described with a value that’s within this range, called the Curve Parameter (t).
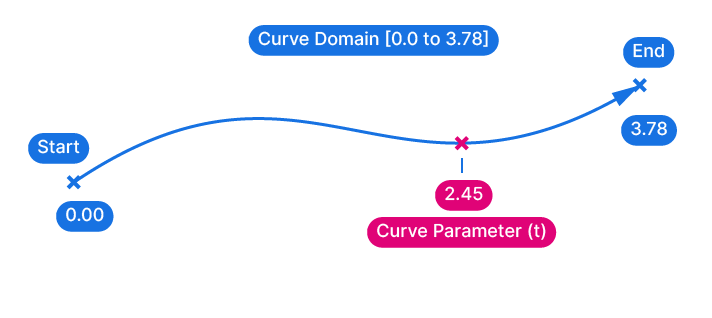
Since these numbers are hard to interpret, Grasshopper allows us to reset the Curve Domain, or start and end value of the curve, to 0.00 to 1.00. This domain ‘normalization’ is called ‘reparameterizing‘ a curve.
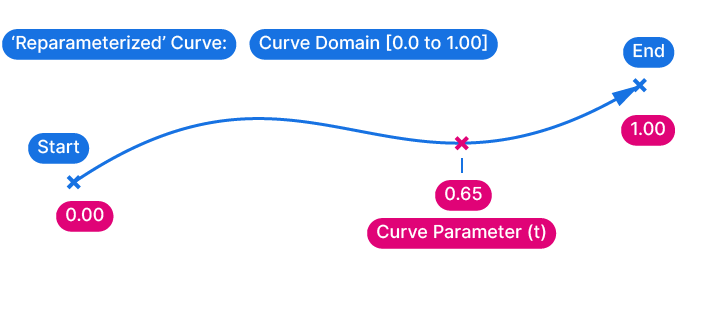
The reason why this is useful, is that now we can gauge the location of a point on a curve by the number. A Curve Parameter of 0.90 will describe a point close to the end of the curve, and 0.20 one close to the start.
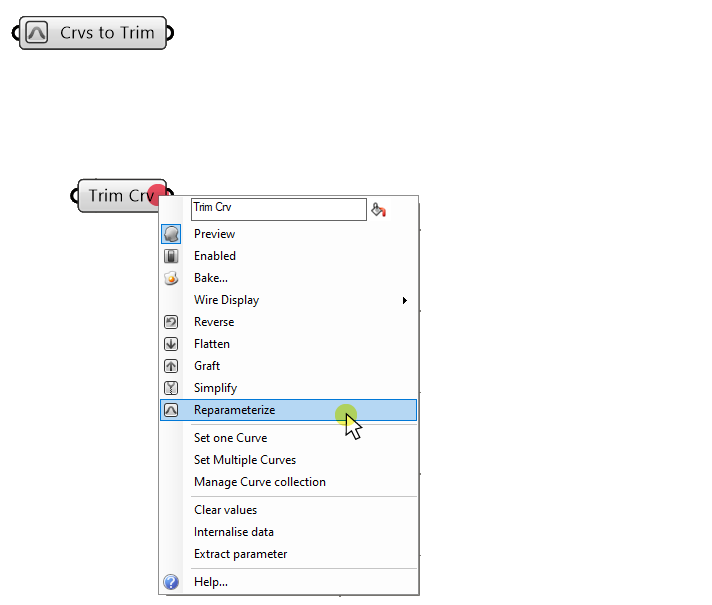
To reparameterize a Curve, right-click on the Curve Container and select ‘Reparameterize‘.
Equipped with this knowledge, let’s dive into our script.
How to Trim a Curve – Step-by-Step Tutorial
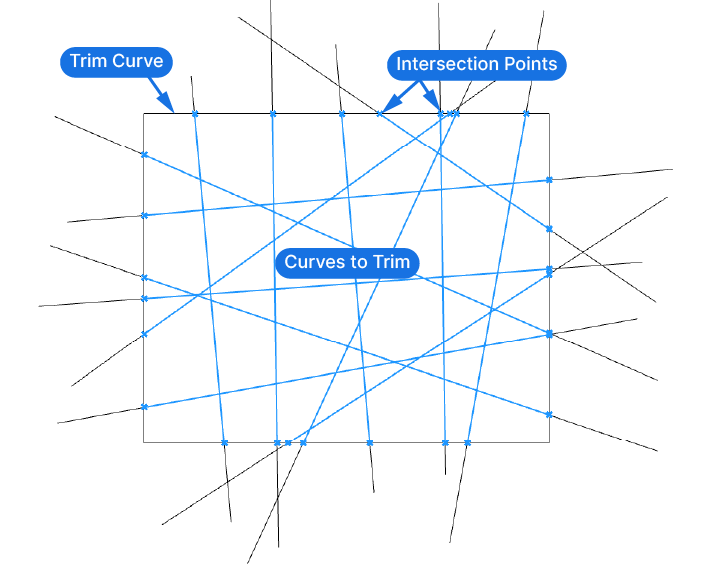
We’ll kick things off by placing two Curve Container components on the canvas. Reference all the lines you wish to trim in the first container, and the rectangle to be used for trimming in the second.
Although not strictly necessary, let’s reparametrize both Curve inputs to get more predictable Curve Domains.
Time to get trimming!
Now, the way to find the Curve Parameter at the location we want to split the curve at, is to use Grasshopper’s intersection components.
Finding Intersections in Grasshopper
To trim a curve in Grasshopper, finding the intersection between the curves is an essential step. Let’s find the correct intersection component for the job.
All intersection components are located in the ‘Intersect‘ component tab.
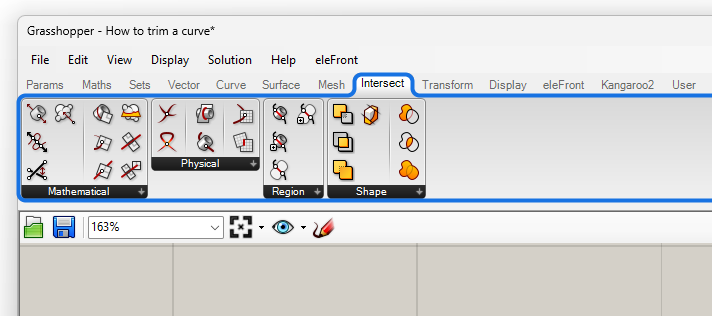
Grasshopper separates intersection components into two groups: ‘Mathematical‘ and ‘Physical‘ intersections.
Mathematical intersection are intersections where one of the two elements is a line or a plane – these geometries are mathematically ‘infinite’, think infinite ray for a line or infinite ground plane for the plane. Physical intersections on the other hand, happen when two actual geometries intersect, for example two curves, or two surfaces.
Intersecting Two Curves
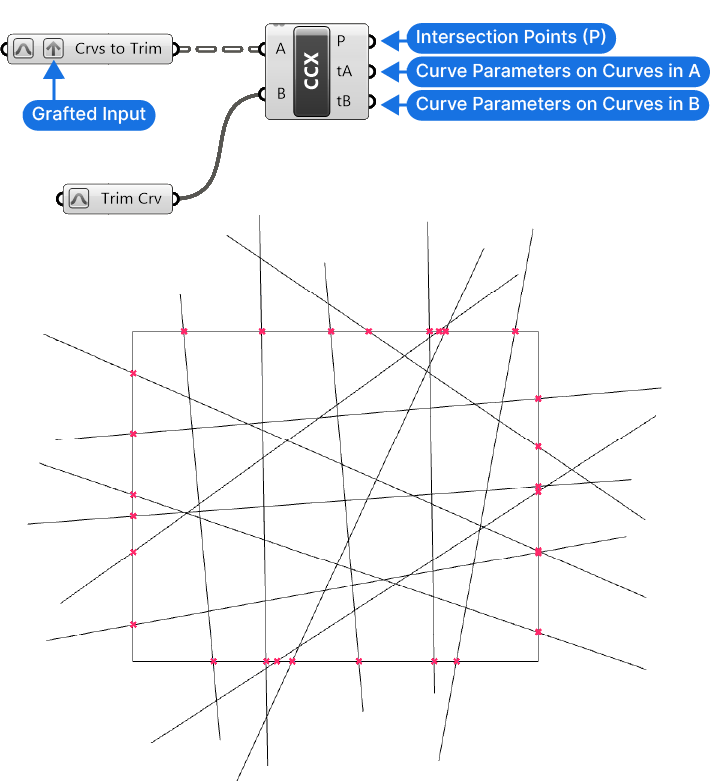
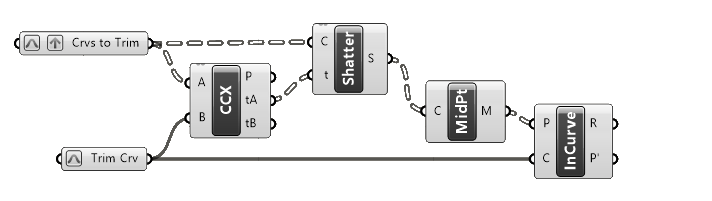
For our example we are going to find the intersections between two curves. The component we’ll used is the ‘Curve | Curve‘ Intersection.
You can also add it to the canvas by double-clicking onto an empty spot on the Grasshopper canvas and typing ‘CCX‘ (Curve – Curve, Intersection (X)). Click on the name to add it to your script.
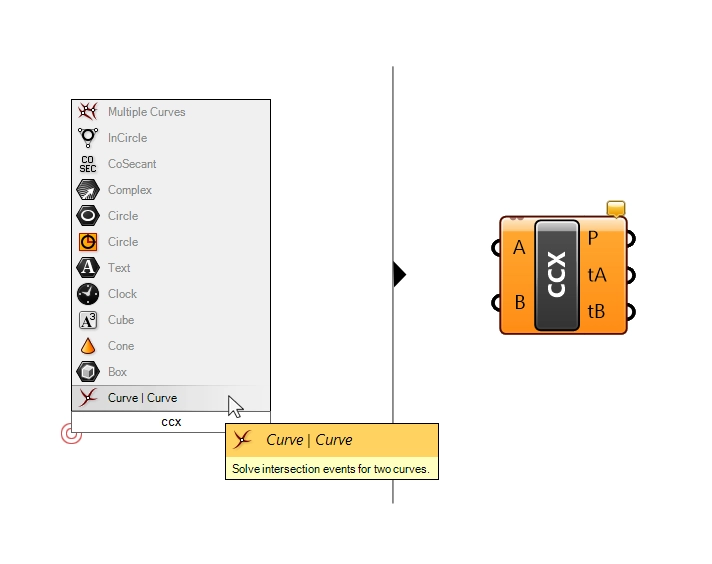
This component not only outputs the actual intersection points of two curves, but also, and more importantly, the Curve Parameters of the curves at those intersection points!
This component will only intersect two curves at a time. Curve A with Curve B. Since we have a list of curves in our first Curve Container, let’s right-click on it and select ‘Graft‘. By doing so, each curve in the list will be intersected with the second curve in a separate, dedicated data branch.
Since we are intersecting two curves, the component outputs the Curve Parameters (t) of the intersection location for both the A and the B input curve. After all, both curves have their own Curve Domains!
The process is very similar with other intersection components. As long as we are intersecting a Curve with another geometry, one of the outputs will always be the Curve Parameter (t).
Alright! We’ve found the exact location of the intersection, expressed as a Curve Parameter (t). We can now go on to the next step: Splitting the Curve at those points.
How to Split a Curve in Grasshopper
While most components in Grasshopper have the same name as their counterparts in Rhino, ‘Split’ is not one of them, and it goes by a different name. It is called ‘Shatter‘.
You’ll find it in the Curve component tab, under the ‘Division‘ group.
Alternatively, add it to the canvas by typing ‘Shatter‘ into the search bar.
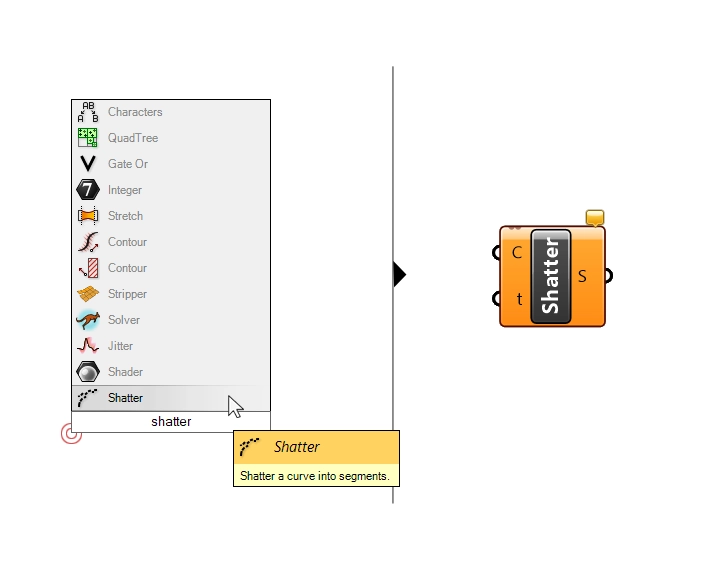
The component is quite straight-forward. The first input is the Curve (C) to split or ‘shatter’, and the second input are the Curve Parameters (t) at which to split the curve! This is where the (t) output of the intersection component will come in.
Continuing our example, since we want to split the curves in the first Curve Container, let’s connect them to the Curve (C) input of the Shatter component.
The curves we want to split are the A input, so we’ll need the Curve Parameters (tA) – in other words the Curve Parameters describing the location of the intersection point along the Curve Domain of Curve A. Let’s go ahead connect these values to the t input of the Shatter component.
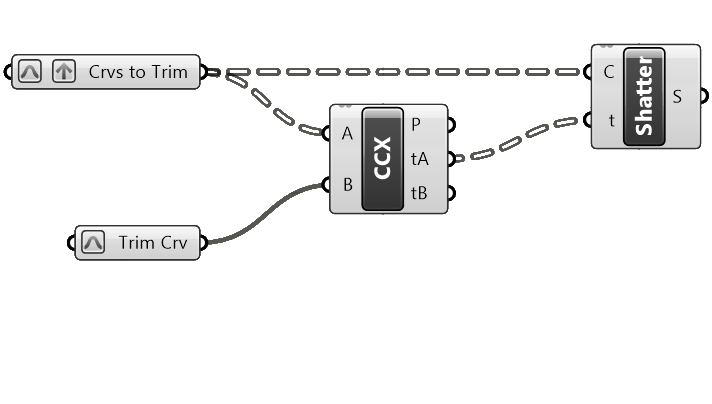
We can’t see whether the split was successful in the viewport, since all curve segments are still there. But by hovering over the output we can see that each branch (representing each curve) has three elements. Which means the split was successful!
Now that the curves are split, we’ll go on to the next step: Deleting the curve segments we want to remove.
How to Select the Curve Segments to Keep
When we trim a curve in Grasshopper, selecting the curve segments we want to keep is just as important as splitting the curve.
Here is where things get a little tricky. Selecting objects in Grasshopper is an entirely different process compared to the object selection in Rhino.
The exact selection method will differ depending on the kind of objects you are trimming the curve with. But the core selection principle will be the same:
First we’ll use an analysis component to which will test each curve for a condition. The output will be a list of True or False values. Then, we’ll use these boolean values to process the list of curves with the Cull Pattern component. This will delete the curve for which the test condition is ‘True’.
In our example, since we are trimming simple lines that all intersect the rectangle in two points, we could simple use the ‘List Item’ component and select the second item in the list. But if our input curves were to change and a curve a curve ends up having more than two intersection points, our script would fail.
It’s always best write algorithms that are as robust as possible, meaning that they will work for as different scenarios as possible.
To that end, let’s use a more robust method:
Selecting Curves Located Inside Another Curve
We are going to use the fact that our trim curve is a closed rectangle to our advantage, and simply remove all the segments that lie outside the rectangle.
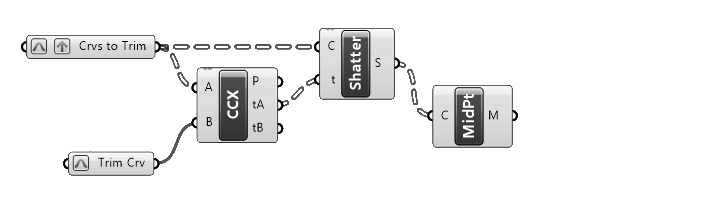
To do that, we’ll get the midpoints of each split curve segment, find out whether they are inside or outside the curve, and finally delete the ones that are outside.
Let’s go step by step:
First, we’ll get the midpoints of the segments by adding the ‘Curve Middle‘ component. The input will be our split curves (the output of the Shatter component), and the output, the midpoints.
Next, we want to know whether the points are inside the trim curve or not. Let’s add the ‘Point in Curve‘ component. This component will tell us whether the points we provide to the input P are contained in the curve input C, or not.
Let’s connect the Midpoints to the P input, and our trim curve (in the second curve container) to the C input.
The point to curve relationship output is either 0 (outside), 1 (on the containment curve) or 2 (inside the containment curve). In our case, we only have the cases 0 and 2.
Thanks to Grasshopper’s automatic data type conversion, we can use these 0s and 2s as boolean values (True or False values). The 0s will be considered ‘True‘ and any number larger than 0 as ‘False‘.
Finally, we’ll use this output to select the curves to remove. The component we need is called ‘Cull Pattern‘. This component will process a list of values (L) deleting all those for which the corresponding list of boolean values in (P) are ‘True’.
Let’s connect our shattered curves to the L input and the R output of the ‘Point in Curve’ component to the P input.
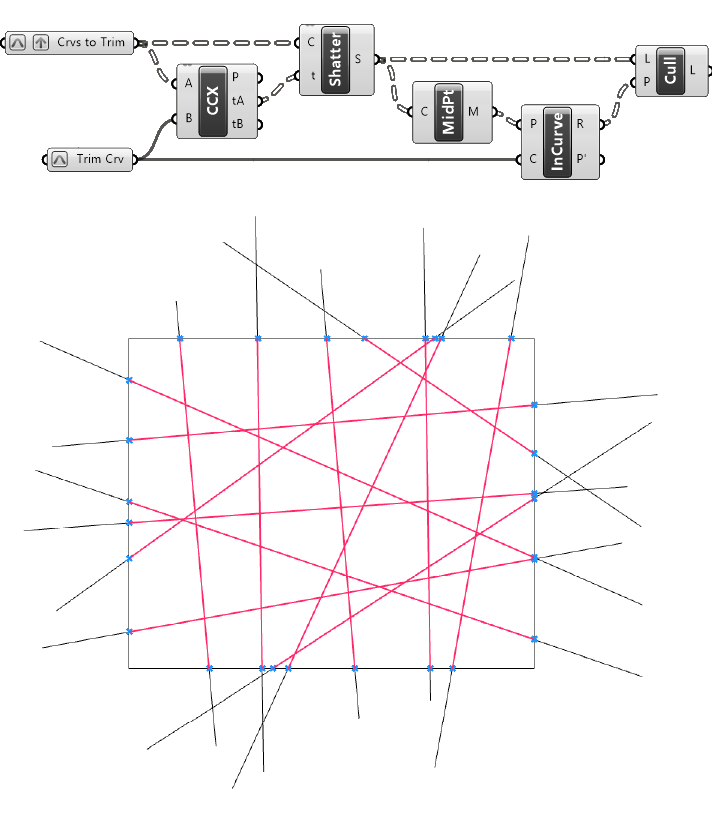
By selecting the component we can see the preview in the viewport.
We successfully trimmed all curves with our rectangle!
Concluding thoughts
As we wrap up this detailed guide on how to trim a curve in Grasshopper, it’s evident that this process, albeit slightly more complex than in Rhino, offers a wealth of control and precision. Through understanding the underlying mechanics, such as finding intersections and manipulating curve parameters, you gain the ability to achieve clean and efficient trims. This not only enhances the aesthetic quality of your models but also optimizes them for further manipulation and analysis.
So, moving forward, don’t shy away from using and experimenting with these techniques to trim curves in Grasshopper.
Happy designing!