Starting with Grasshopper can feel like a mix of excitement and a bit of “what have I gotten myself into?” That was me, not too long ago. I got the hang of the basics pretty quickly and then decided it was time to create my first script. “Let’s keep it simple to start,” I thought, “Let me connect a few points in Grasshopper.”
Sounds basic, right?
But when I actually tried to find out how, I hit a wall. It left me wondering, why is something that sounds so simple, so hard to figure out?
Turns out, I wasn’t alone in this. Connecting points in Grasshopper is straightforward, but only if you know the steps. That’s exactly what we’re diving into today. I’m going to show you how to link two or more points with lines or curves and navigate any tricky spots along the way.
Ready to get started? Let’s jump in.
Basics of Connecting Points in Grasshopper
If you are new to Grasshopper, you might be tempted to look for components such as ‘connect’ to create a curve through points. But alas, there is no such component!
While Grasshopper looks completely different from Rhino, it’s built on the exact same modelling core. This means that when creating geometry in Grasshopper, we can think of how we would create it in Rhino, and then try and find the components of the same name in Grasshopper.
And how do you connect points in Rhino?
You don’t.
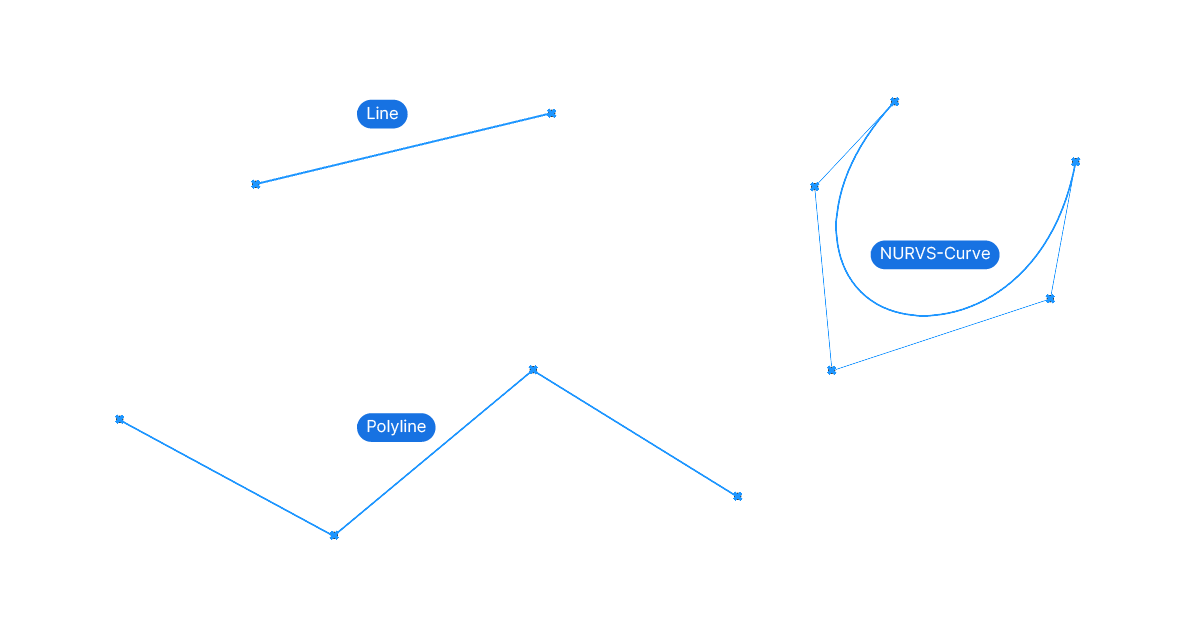
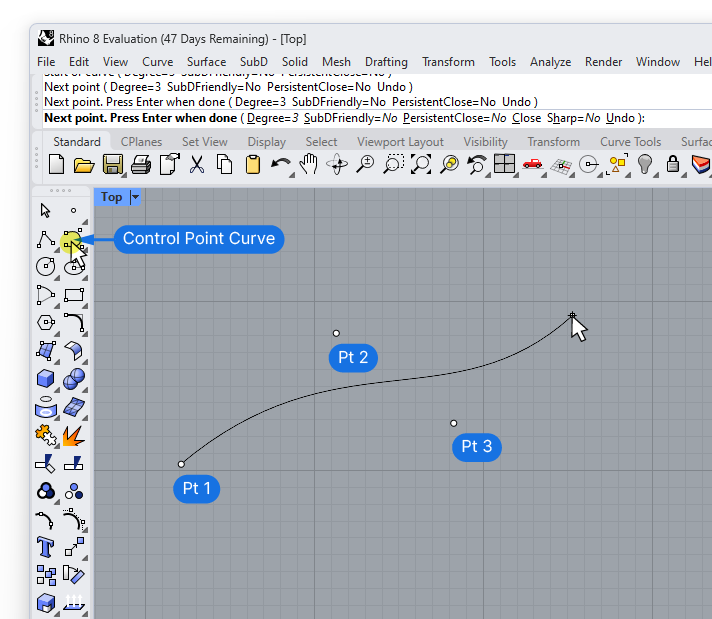
Instead, you use commands like ‘Polyline‘ or ‘Control-Point-Curve‘ to define curves through selected points.
There is a simple reason why they set the system up this way:
Anytime you want to connect points, the order in which you want to connect them is crucial. And the only way to ensure the curve runs exactly as you want it, is to have you click through the points in sequence.
In a way, we are not ‘connecting’ points, but in fact creating the curve interactively, point by point.
Now let’s see what this means inside Grasshopper. To connect points in Grasshopper, we need to use the same commands (or components in Grasshopper’s case) we would use in Rhino: Line, Polyline, or NURBS-Curve.
But we can’t go point by point in Grasshopper, we need to provide all the points upfront, in a list.
The tricky part is to control the order in which the points are going to be connected. We’ll get to that in a second.
Let’s see how each of these curve-generating components work in Grasshopper, starting with the simplest: a line.
How to Connect Two Points in Grasshopper
Let’s start with the basics. To connect two points in Grasshopper, we can use the ‘Line’ component. You can find it in the ‘Curve‘ component tab, in the ‘Primitive‘ group.
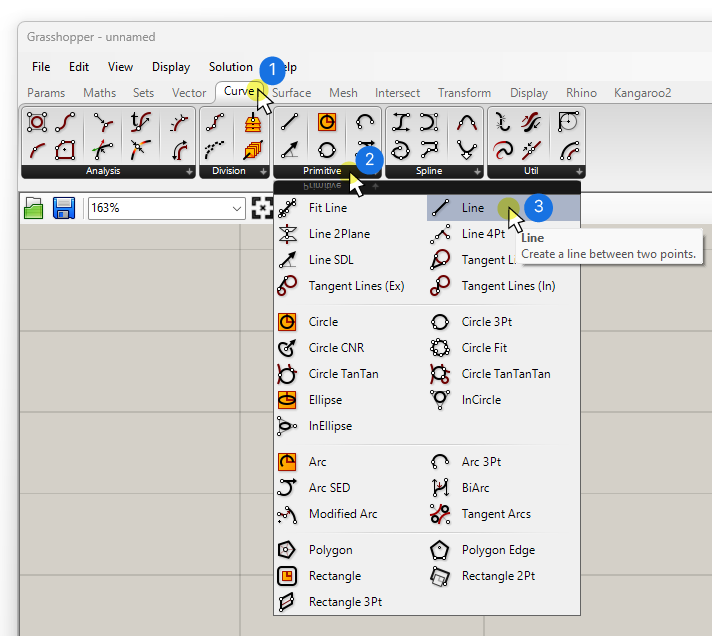
This simple component has two inputs: Point A and Point B. The output is simply the line connecting the two points.

This component only works for two single points. If you want to connect multiple points with straight lines to create a polyline, you’ll need to use a NURBS Curve – more on that later.
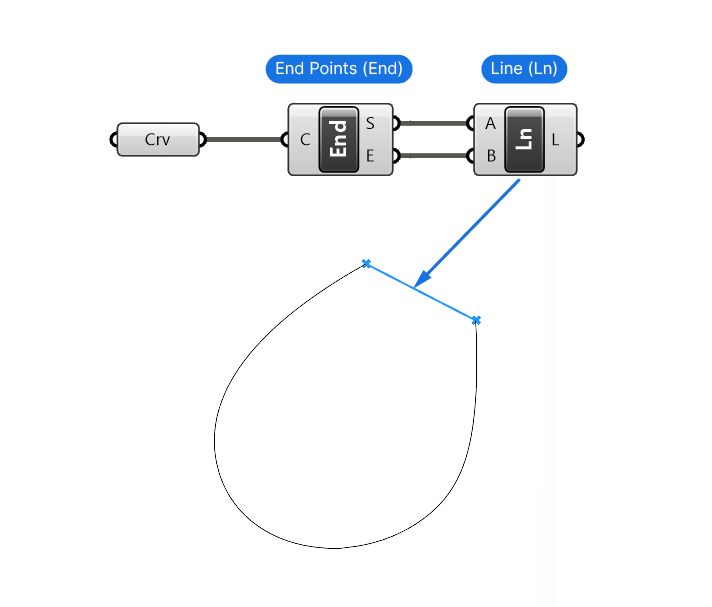
The ‘Line‘ component is commonly used to close open curves, or to create a vector from one point to another.
Here is an example of how you might use the Line component. In the example below, I use the ‘Line‘ component to close an open curve. I referenced an open curve, used the ‘EndPoints‘ component to get the ends of the open curve, and finally closed the gap with the ‘Line‘ component. The Start and End outputs both connect to the A and B inputs of the ‘Line‘ component.
But what if we want to connect several points and create a smooth NURBS Curve from them?
How to Connect Multiple Points in Grasshopper
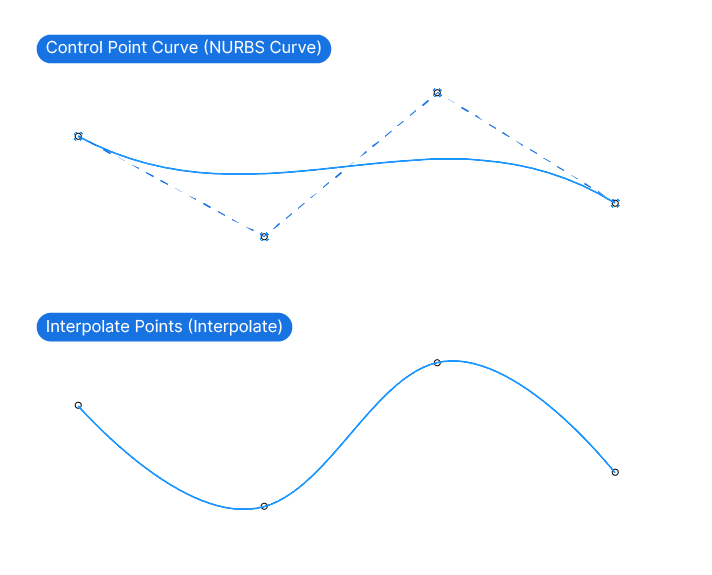
Before we jump into the components, let’s consider how Rhino creates curves. In Rhino, there are multiple ways to create curves. The two main ones are the Control Point Curve and the Interpolate Points command. While they both create curves by using controlpoints, the Interpolated curve actually runs through each point we define, whereas the Control Point Curve only uses them as control points.
Both components are available in Grasshopper, but under a slightly different name:
- Control Point Curve becomes the ‘NURBS Curve‘ component.
- Interpolate Points becomes the ‘Interpolate‘ component.
Let’s take a closer look at the ‘NURBS Curve’ component first.
Using the NURBS Curve Component to Connect Points in Grasshopper
Let’s add the NURBS Curve component to our canvas. You can find it in the Curve tab inside the Spline Group.
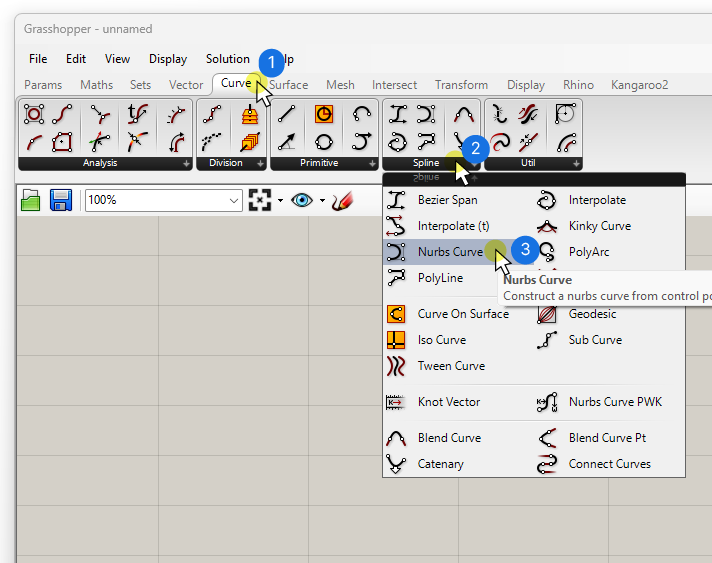
Alternatively you can double-click onto the canvas, or hit the Space key on your keyboard and type ‘NURBS‘. Select the NURBS Curve component to drop it onto the canvas.
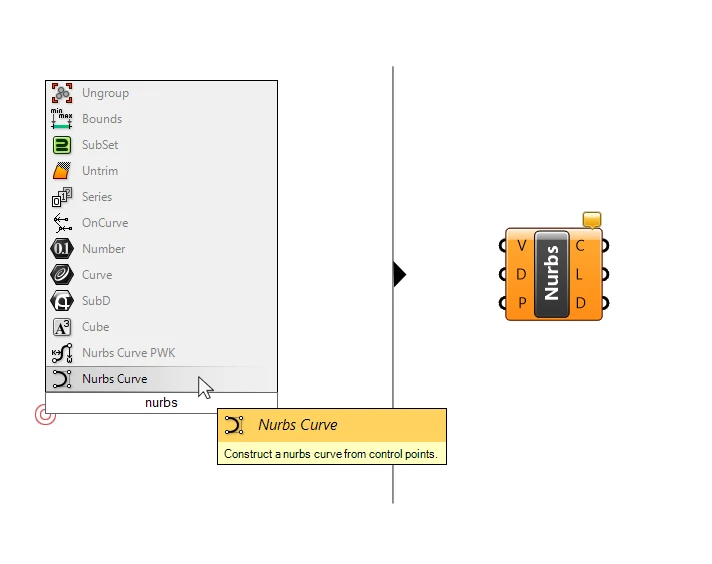
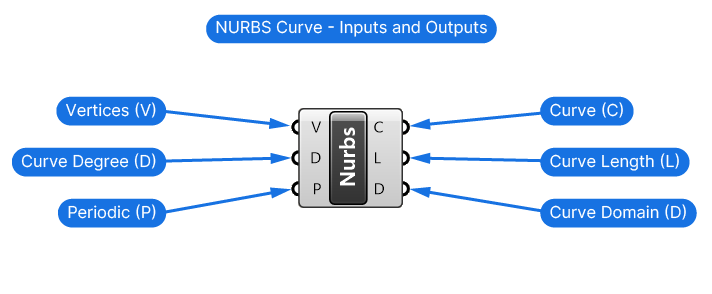
NURBS curves are essentially made of three components that are reflected by the three inputs. The first input are the Vertices ‘V’ of the NURBS Curve. Vertices are simply the points used to define the NURBS Curve. This is where we are going to feed in the points we want to use.
Understanding Curve Degrees of NURBS Curves
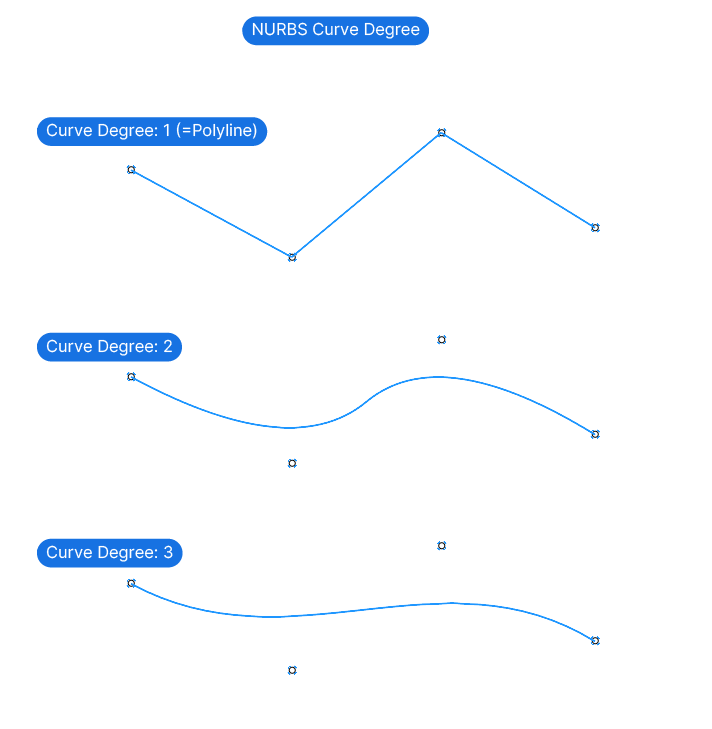
The second input is the Curve Degree ‘D’ of the NURBS Curve. The degree defines the ‘smoothness‘ of the curve it starts at 1 and becomes smoother with every increment.
See below how the Curve Degree of a NURBS Curve influences its appearance:
We can set the degree by either adding a Number Slider with the desired degree number, or by entering the number inside the component directly.
The default curve degree for NURBS Curves in Grasshopper is 3. A degree of 2 will still create a smooth curve. A curve degree of 1 will generate a polyline.
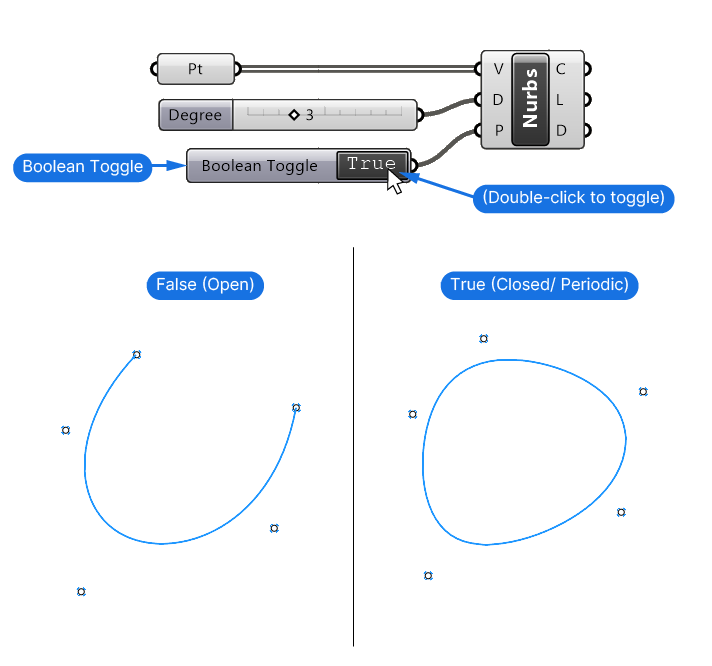
The last input Periodic (P) controls whether the resulting NURBS Curve should form a closed loop or whether it should remain open. We can control this setting with a True or False value. The default is set to ‘False’ meaning that unless we specify it, the resulting curve will be open.
You can find the Boolean Toggle in the Params tab, in the Input Group.
The Importance of the Point Order for NURBS Curves
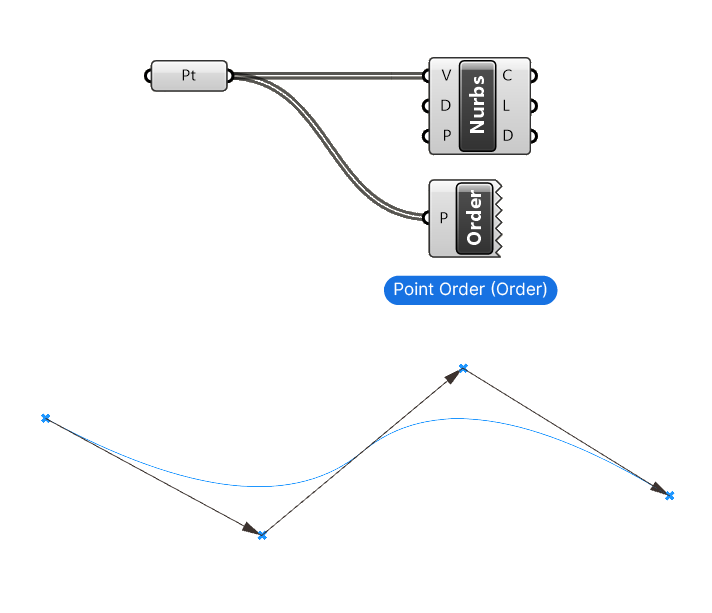
Now when connecting points to create a curve in Grasshopper, it’s crucial to have control over the order of the points we connect to the Vertices ‘V’ input. The points are going to be supplied in the form of a list, and the curve will connect the points in the order they come in that list.
If we are referencing points from Rhino to a Point container component, to then connect them with a NURBS component, we can define the order. To do so, we need to right-click on the Point container component, go to ‘Set multiple points’ and then select the points – one by one – in the order we want them to be.
Tip: When referencing multiple points from Rhino, you may be tempted to select several points with a selection rectangle. But in doing so Rhino will reference them in an unpredictable order, so avoid it if the order is important.
If we generated the points parametrically, we can still control the point order with the Sort List component.
Visualizing the Point Order of a Point List
Sometimes it can be helpful to visualize the point order of a point list before connecting it to a NURBS Curve. The ‘Point Order‘ component does just that. It visualizes the point order by adding black arrows from point to point in the Rhino viewport.
You can find the Point Order component in the ‘Display’ tab, under ‘Vector’.
Connecting Points with the Interpolate Curve Grasshopper Component
To actually connect points in Grasshopper with a curve, and not just use them as control points, as the NURBS Curve component does, we need to ‘interpolate‘ the points. The ‘Interpolate‘ component does just that. The result is still a NURBS Curve, but one that runs through each of the input points we provide. In many cases, interpolating will give you more control over the curve.
You can find the Interpolate component in the ‘Curve‘ tab in the ‘Spline’ group.

To quick-add it, double-click wherever on the canvas you want to place the component, type ‘Interpolate‘ and selecting the first result.
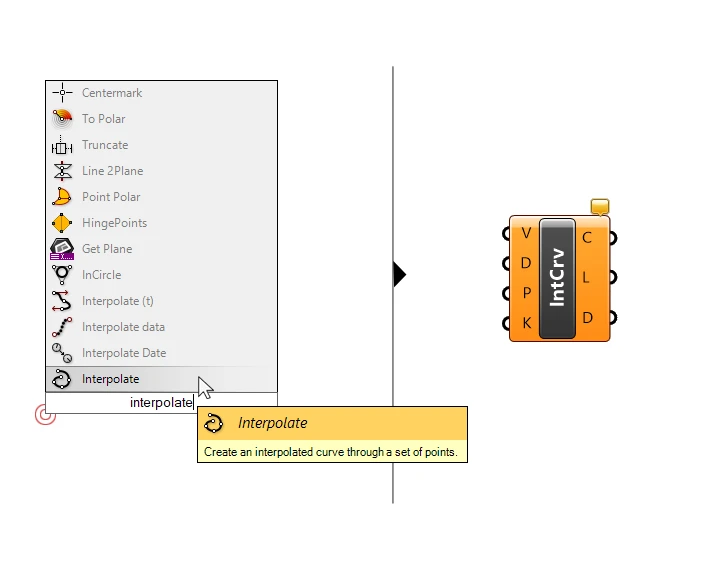
The inputs and the output are exactly the same as the NURBS Curve component. (With the exception of the KnotStyle (K) input, which is a technical setting that’s rarely ever used.)
Common Problem: Insufficient Interpolation Points
Sometimes when using either the NURBS Curve or the Interpolate component, the component will turn orange, and we’ll get the error message saying ‘The degree must be less than the number of control points.’. What this means is that the number of points we provided is not sufficient given the curve degree we specified for the component.
In practical terms this means that you’ll either have to:
- provide more points in the Vertices ‘V’ input
- lower the Curve Degree ‘D’
Final Tips on Connecting Points in Grasshopper
Wrapping up, mastering the art of connecting points in Grasshopper all boils down to understanding the power of NURBS curves, a cornerstone of Rhino’s modeling capabilities. By harnessing NURBS properties, virtually any curve or line you imagine is at your fingertips. With the insights you’ve gained today, you’re well on your way to crafting precise parametric models that can transform your designs.
If today’s guide sparked your interest and you’re eager to dive deeper, I’ve got something special for you. My course, ‘Grasshopper Pro,’ is designed specifically for architects looking to elevate their Grasshopper skills. Whether you’re aiming to streamline your workflow or bring more complex visions to life, this course is tailored to help you master Grasshopper inside and out.
Happy Designing!