Add. Slide. Transform. The Number Slider is perhaps the most iconic Grasshopper component – it encapsulates all of Grasshopper’s parametric flexibility. You use it, but have you truly unlocked all its potentialities? Buckle in, because you’re about to discover the world behind that smooth slide of numbers!
Simply sliding the number slider can add several floors to a design, adjust the rotation angle of hundreds of objects or simply control the location of a point on a curve. Yet, beyond its apparent simplicity lie layers of untapped functionalities just waiting to amplify your design workflow.
Let’s dive in!
How to Add the Number Slider
Let’s make sure to cover the basics: how to add the component. As with all Grasshopper components, there are two ways to add the Number Slider to a script:
- Using the component tabs
- Using the component search bar.
Adding the Number Slider From the Component Tab
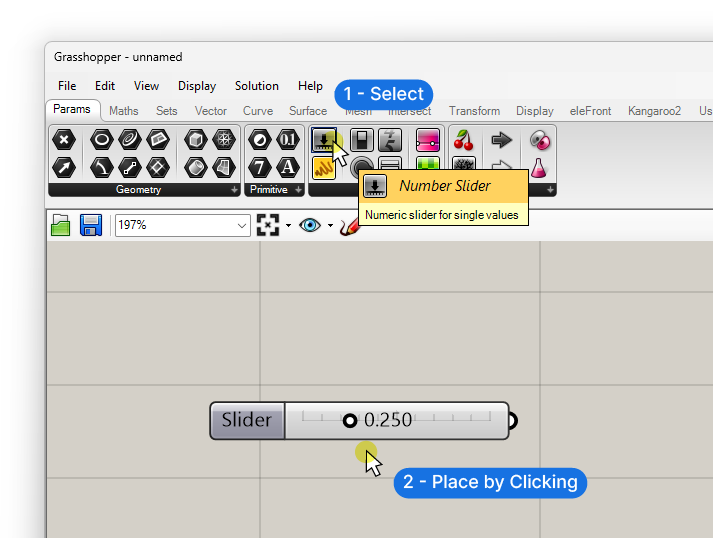
Being one of the most important components in Grasshopper, the Number Slider is aptly located in the main ‘Params‘ component tab. You can find it in the ‘Input‘ group, together with other input components.
To add it this way, select it and click onto the canvas where you want to place the component. Done!
Adding the Number Slider With the Component Search Bar (Recommended)
An alternative way to add the component, is to double-click onto an empty spot on the Grasshopper canvas, and typing “Number slider” into the component search bar, and select the component to add it. The component will appear wherever you double-clicked to open the search bar.
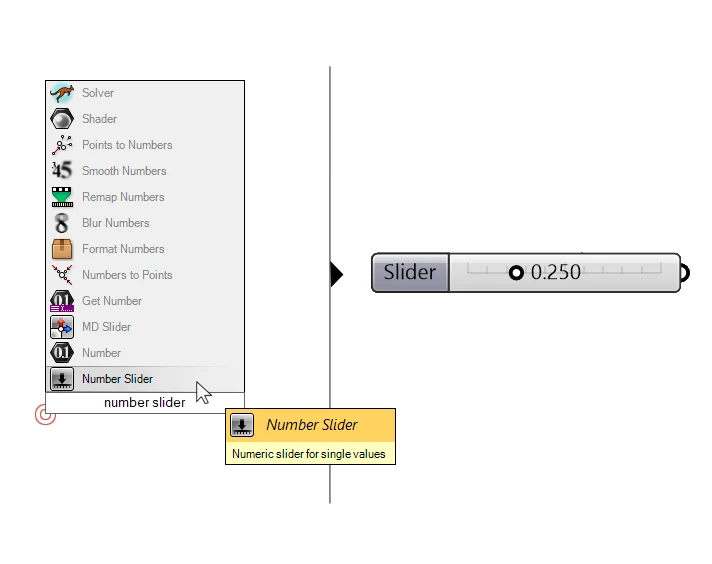
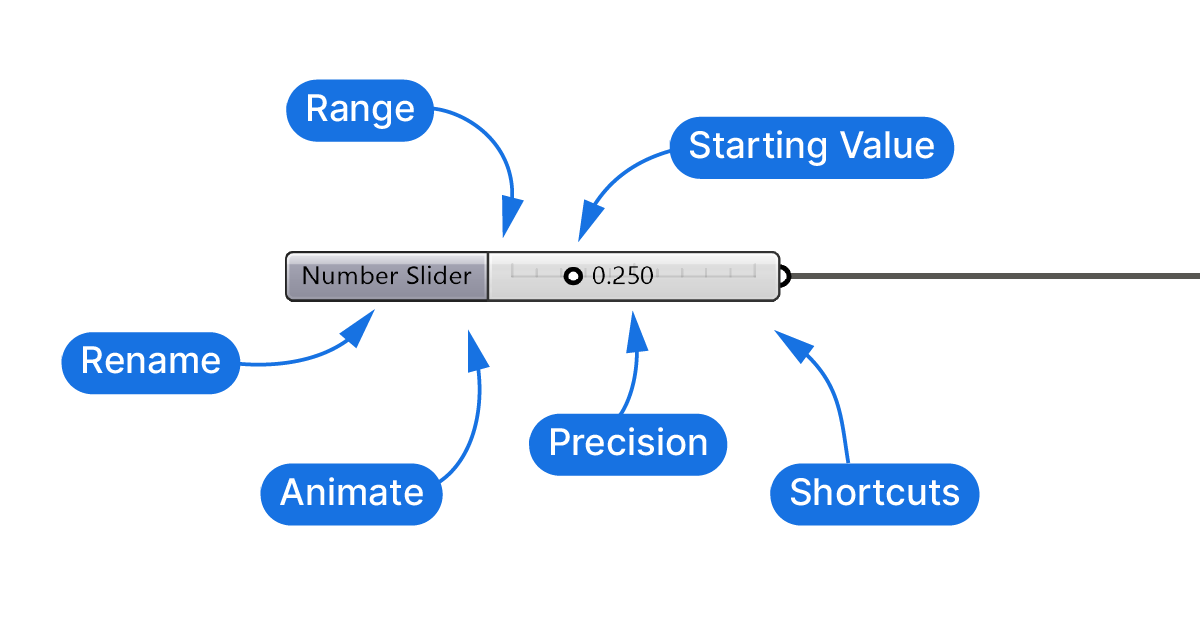
The Number Slider has a very simple anatomy: it has the name field to the left, followed by the slider area, and a single output on the right. The current number is shown in the slider area, next to the dot.
How to Adjust the Value: Two Methods and When to Use Them
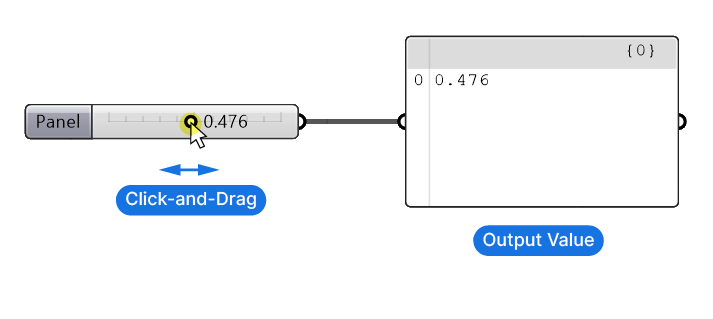
Let’s start with the obvious: by clicking and dragging on the dot, we can change the value the Number Slider will output. This is the most intuitive method to alter the value and it has the benefit that the script will be updated on the fly, giving us a fine control over the output.
Yet, there are cases when this isn’t the best way to change values. As your script gets more advanced, the computational steps required to calculate the final solution and show the result in the Rhino viewport may take up to a few seconds or longer!
If you try to simply slide the values in that case, Grasshopper is likely to freeze and fine-tuning the values will be difficult. That’s because Grasshopper will try to calculate every numerical step from where you first clicked on the slider to where it ended up, but it will take several seconds for each step.
Changing values on heavy scripts by entering values
In those cases, it’s recommended to change the value by double-clicking into the slider area. When you do, the slider disappears and turns into a text field. You can now change the value and hit enter. This way, Grasshopper will only recompute the script for the single value that you set!

How to Adjust the Range of the Number Slider
When we add the Number Slider to the canvas, it will come with a preset value of 0.250 and a preset range of 0 and 1. This means that if the dot is slid to the far left the value will be 0 and on far right, 1.
The default slider also comes with a predefined precision of 0.000. This means that when we slide the value we’ll get numbers of that precision, like for example 0.415.
We can change the range and precision of the Number Slider by double-clicking onto the left, dark gray part of the component that says “Slider”.
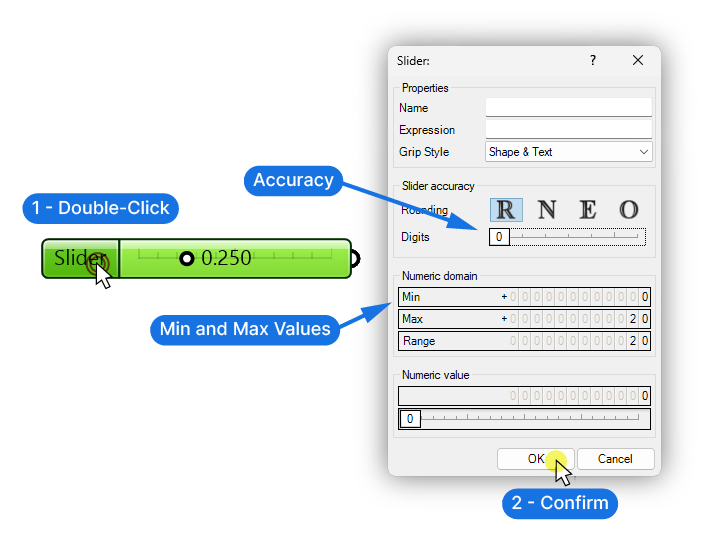
In the menu that pops up, we can define the Numeric domain or minimum and maximum value of our slider. Change the values by double-clicking into the “Min” and “Max” fields and typing a number. In the example above I changed the minimum to 0, and the maximum to 20.
Above, we can adjust the Slider accuracy. The four letters “R N E O” may seem random at first, but by hovering over them the tooltip reveals what they mean:
- R … Floating Point Numbers (numbers with 1 or more decimal places, from ‘Real numbers’)
- N … Integer Numbers (the ‘N’ comes from the mathematical term ‘Natural numbers’)
- E … Even Numbers
- O … Odd Numbers
If we choose ‘R’ – a floating point number – we can specify the number of digits after the comma. Setting it to 0 results in integer numbers.
On the bottom, under ‘Numeric value’ we get the chance to directly set the numeric value within the range we just defined.
Once you’re happy with the settings, hit OK to confirm. The slider range and precision will update accordingly.
Adjusting the Name of a Number Slider (Recommended)
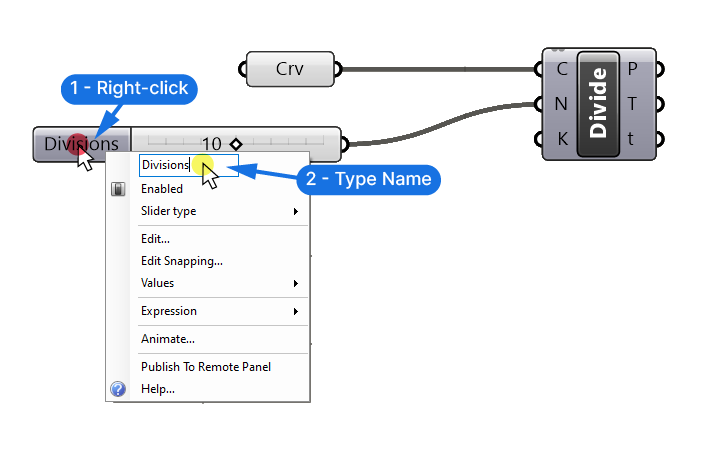
Since your Grasshopper script is very likely to contain more than one Number Slider (often dozens!) it’s best to give each number slider a descriptive name. This ensures you and anyone else using the script will always know what the value controls.
To give the Number Slider a name, right-click onto the left part that says ‘Slider’. The popup window seems to show an empty white space at the top, but when you move your mouse over it, it shows that there is a text field. Type a descriptive name for the component and click anywhere to confirm.
Tips for advanced users:
Shorthand notation when adding the Number Slider
If you add the Number Slider with the component search bar, Grasshopper allows you to specify the starting value as well as the precision and even the range of the resulting Number Slider! This can be a real time saver.
Grasshopper offers two short-hand notations.
Automatic ranges
Sometimes you want to add a Number Slider, but you already know exactly which number you need. If that’s the case, simply type the desired number into the component search bar. In the example below I simply type ‘4’, and as a result Grasshopper creates a number slider with the value ‘4’.
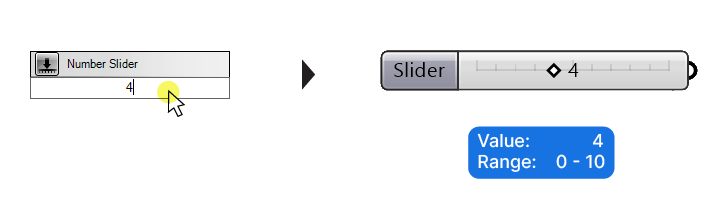
Depending on the number we type, Grasshopper will generate a range, or minimum and maximum value. This range depends on the value we enter. By typing 4 for example: you’ll get a slider between 0 and 10.
The range will always start with 0 and end with 10, 100, 1000 depending on the number you entered. An input of 25 would give you a range of 0 to 100, and the number 441 a range of 0 to 1000.
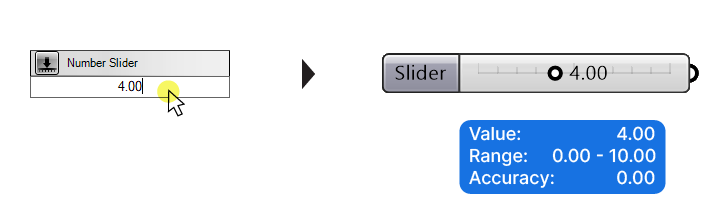
Here’s the good news: we are not limited to integer or whole numbers. By adding a dot (“.”) and adding decimal numbers, the resulting Number Slider will have the precision matching the number of decimal numbers we typed.
This way, we can define the precision of the Number Slider.
If we type “4.00”, the slider will be between 0 and 10 and have a precision of 2 digits after the comma.
Setting the range, value and precision within the search panel
If you want to not just control the starting value and the precision, but also the range, you can do so by using the following short-hand notation in the component search bar:
0..1.60..5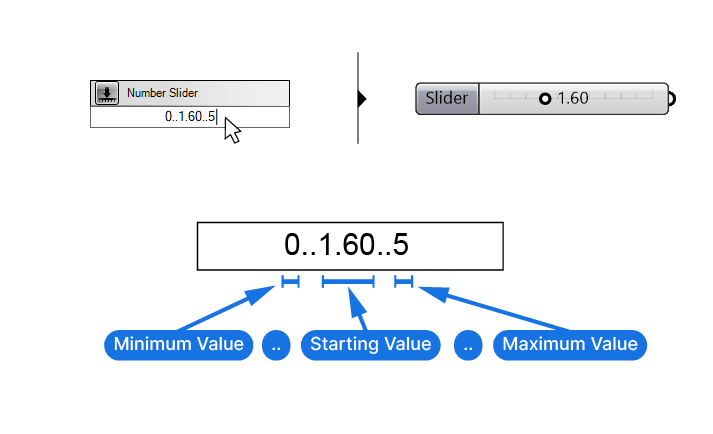
Minimum Value + two dots (“..”) + Starting Value + two dots (“..”) + Maximum Value
Alternatively you can use the following notation:
0<1.60<5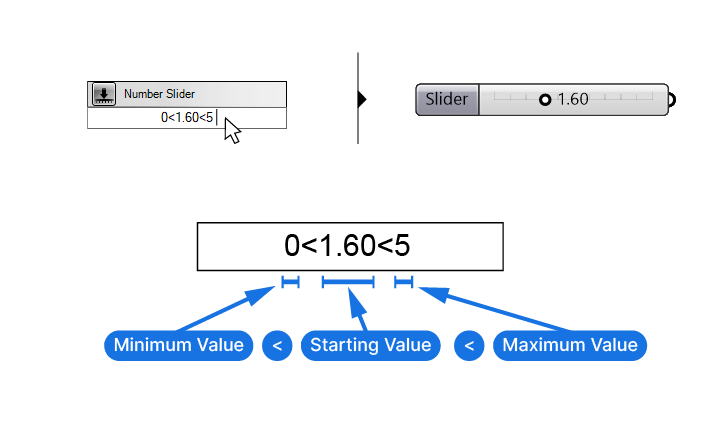
Minimum Value + smaller than sign (“<“) + Starting Value + smaller than sign (“<“) + Maximum Value
In both cases we can specify the precision of the Number Slider by adding a dot and decimal numbers to the starting value.
Using this notation can significantly speed up the process of adding Number Sliders.
Using the Number Slider to Create Animations
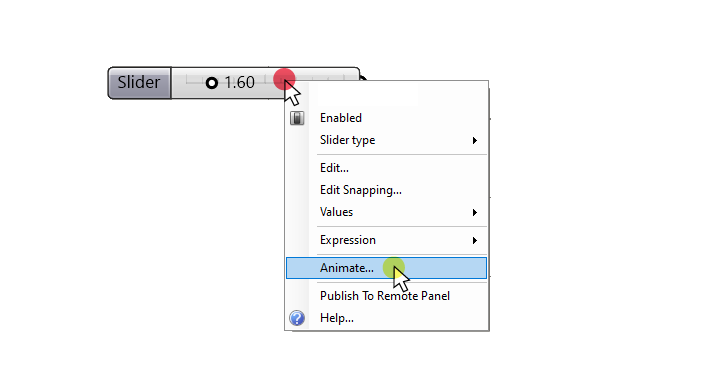
When we think of Number Sliders we don’t expect much else than outputting a number, but did you know you can create animations with them? Yes, you read that right!
By right-clicking onto a Number Slider and selecting ‘Animate’, you can access a properties window that allows you to specify your animation output.
Now what’s being animated you may wonder? Animating a Number Slider means that Grasshopper will take a picture for every value in the range and take a screenshot of the selected viewport showing the computed solution.
This is a great way to evaluate fine tweaks to a design or even generate a wide range of variations!
You’ll get an image for each value in a folder and you can then simply click through them to decide on which value works best for your design, or use video editing software like Adobe Premiere to create a video from them!
Configuring the Animation Output Options
Let’s take a closer look at the output options:
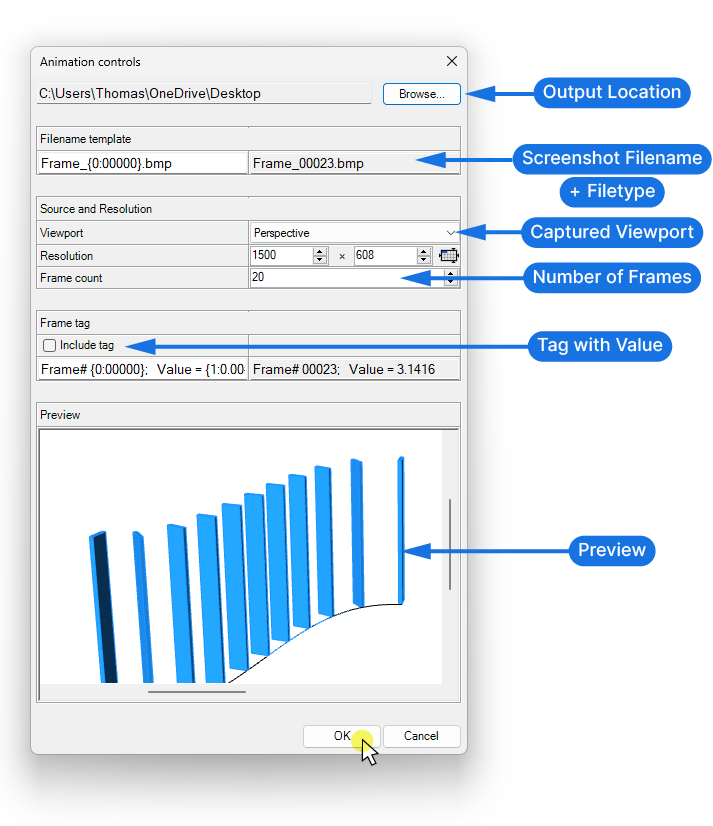
Let’s start from the top: The first step is to browse to a folder, where Grasshopper will save all the screenshots. Make sure to create a separate folder, because you may be creating hundreds of images.
The filename template allows you to specify the filename format and the filetype (!) of the screenshots. Change the default ‘.bmp’ to ‘.png’ or ‘jpeg’ to keep the files small.
In the following section you can specify which viewport will be captured and the resolution. You can select any of your Rhino viewports as the source. Pick the one you want from the drop-down menu. Specify the resolution below it.
Tip: The resolution can be bigger than the viewport resolution too!
Now the important part: The frame count. Here you are defining the number of images you want Grasshopper to produce. If you leave the default of ’20’, Grasshopper will divide the range of the Number Slider by 20 and take a screenshot for each of the resulting values.
This means that if your range is 0 to 1.00, you’ll get screenshots for the values: 0.00, 0.05, 0.10 … 0.95, 1.00.
To make it easier to review which value creates which output, you have the option to include a ‘Frame tag‘ – a bar of text on the bottom of the image that will tell you which frame the image is, and what the value was for that specific output.
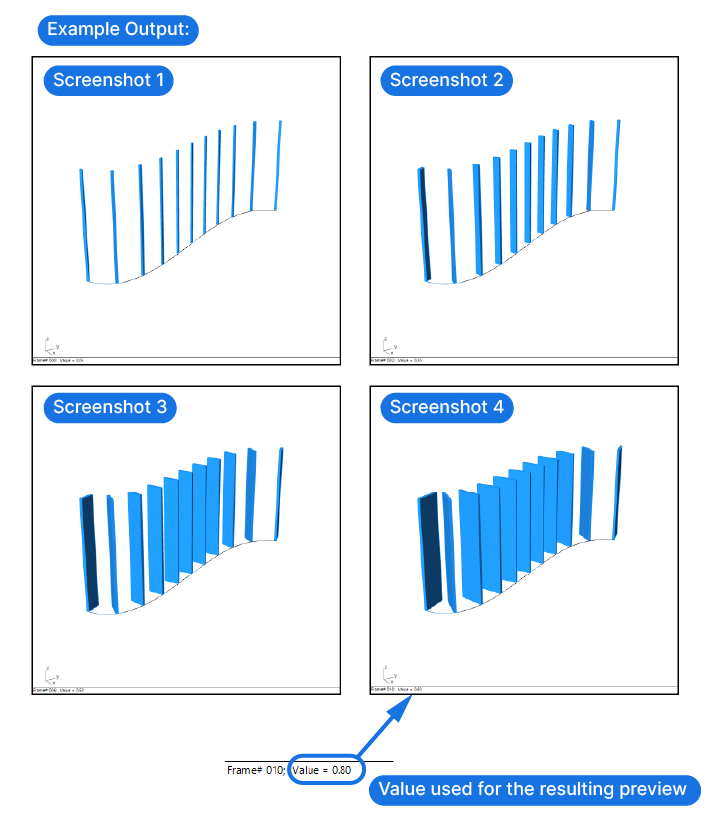
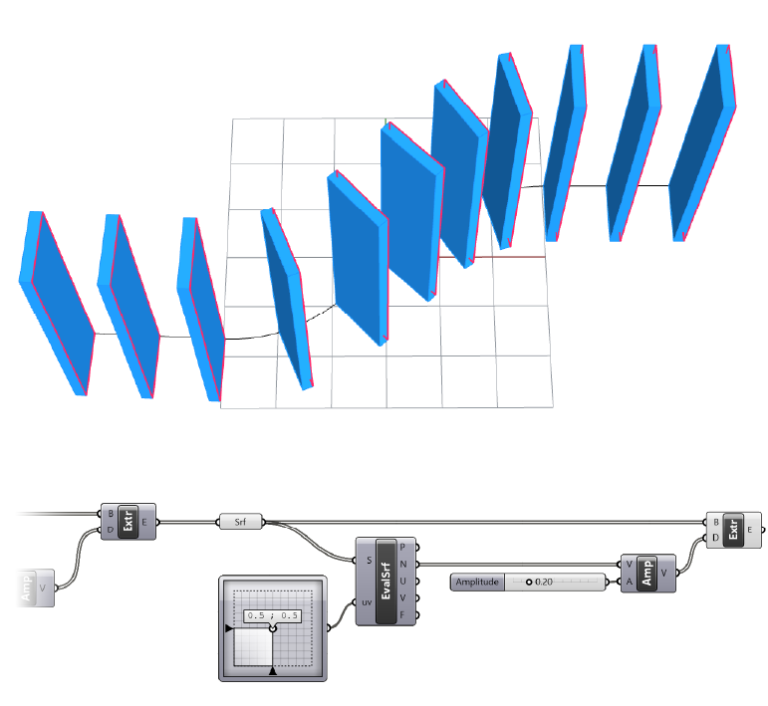
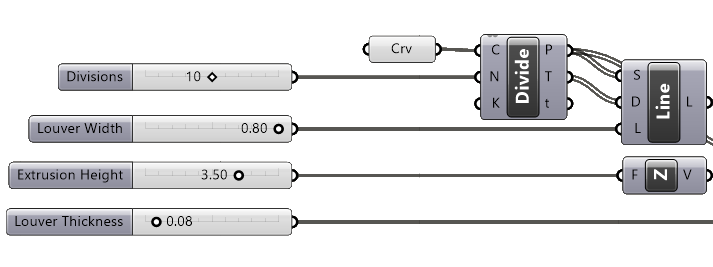
In the example above, I animated the Number Slider that controlled the depth of the louvers in this simple model. If this was a design study, I could evaluate the one that works best, check the value that corresponds to that output, and set that value in the Number Slider to continue my design.
Publishing Number Sliders to the Remote Control Panel
Once there are many Number Sliders in a script, it become tedious to move to different places in the script to change parameters. One way to keep the script organized is to keep the relevant sliders grouped, so related parameters can all be accessed from the same place.
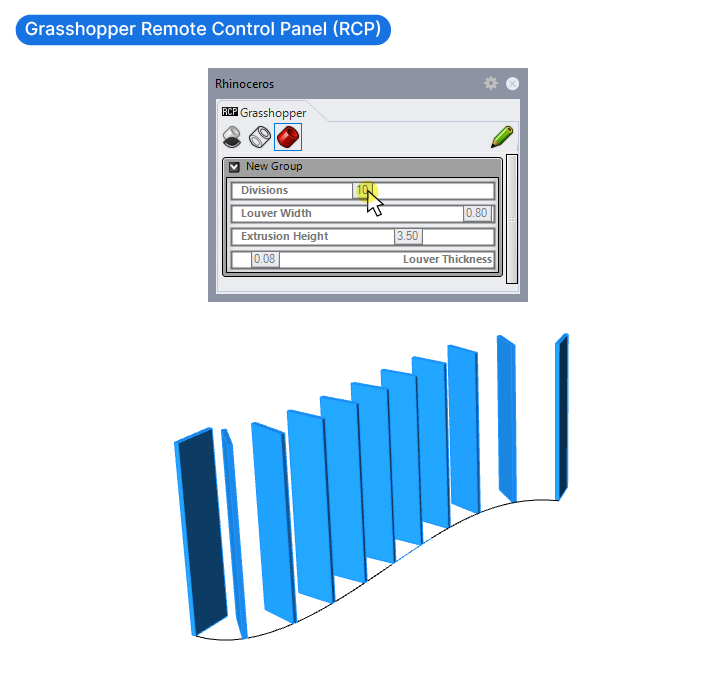
But there is another option if you prefer to have all the relevant parameters for your design in one place: the Remote Control Panel. The idea of it is to combine the Number Sliders in an extra window that just contains those parameters that you want.
To add a Number Slider to the Remote Control Panel, right-click on it and select ‘Publish to Remote Control Panel’.
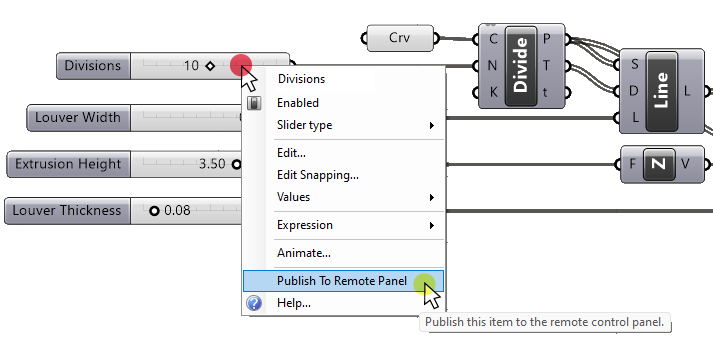
To open the Remote Control Panel, go to View>Remote Control Panel. The Remote Control Panel will pop up in a separate window.

You can now minimize the Grasshopper window, and you’ll be able to adjust the parameters you published to the Remote Control Panel from here.
Concluding thoughts
Exploring the Number Slider has given us a small, yet significant, peek into the immense world of parametric design through Grasshopper. We’ve seen how even a single tool, when leveraged effectively, can open up an array of design possibilities, enabling architects to create more adaptive, responsive, and innovative designs.
If you found the insights from the Number Slider useful and are keen to explore further, check out Grasshopper Pro – our online course tailor-made for architects keen to dive deeper into parametric design. The course takes you through advanced scripting techniques, real-world design applications, and offers you practical insights. It’s your pathway to mastering advanced architectural design.
Happy designing!