You are a designer and you are using Rhino in your work. You’ve seen what’s possible to create in Grasshopper and you want to know the best way to learn it as quickly as possible. In this post I will go through different learning paths you can take, depending on your goal and your individual situation. And offer a detailed learning roadmap of how to learn Grasshopper for Rhino from scratch.
Step 1: Get motivated
Before you start, make sure that you have the right reasons to start learning it. Grasshopper can be an incredibly valuable design tool, but it takes time and effort to learn. You are going to need to stay motivated as you learn and having a clear ‘why’ will help you do that.
Imagine what your life will look like after you mastered Grasshopper. How does it feel? Do you feel confident? Appreciated? Will you earn more?
Create a positive image in your mind that you can go back to, to keep yourself going if you run into hurdles or feel a lack of motivation along the way.
Here are a few strong motivators:
- Grasshopper opens whole new ways of design expression to your formal portfolio – if you can imagine it, you can model it.
- Learning Grasshopper will open up many more career opportunities as a design architect. It is a sought-after skill in world-class design offices.
- Using Grasshopper will multiply(!) your productivity – you will be able to model design variations and iterations much quicker.
- Any designer dreads last minute design changes – by setting up parametric models you can make sure you can get the work done without doing late hours.
Whatever your motivation may be, the most important thing is to get started!
So the next step is to pick a learning format.
Step 2: Pick a learning format
How much time can you invest in learning Grasshopper?
Are you a student? A busy professional architect? Looking for work?
Everyone’s situation is different, and there is no one-size fits all – depending on your situation different learning formats may make more sense for you.
In general there are three main ways, here are the pro’s and con’s for each as they relate to Grasshopper specifically:
Self-taught learning
I learned how to use Grasshopper for Rhino on my own during my time as an architecture student more a decade ago. Back then I didn’t mind spending time tinkering and exploring with the then still WIP version of Grasshopper. If you have enough time on your hands and you are very self-motivated, this route might be for you.
But go in with the right expectations, this route will take you the longest and cost you a lot of time, frustration and headaches. At the same time it will also be the most rewarding! I don’t regret the 500+ hours I spent learning it on my own, but it’s not for everyone!
If you choose to go down this road make sure that you have a clear learning roadmap. You want to make sure that you have an overview of what you should be able to do to use Grasshopper at a professional level.
We’ll cover a detailed learning roadmap in a later section.
Grasshopper Bootcamps
Grasshopper for Rhino bootcamps are usually 1 -3 day intensive programs where you go through the learning material in a small group, led by a trainer. These training programs are most popular among professionals, with firms often covering the training fee as they see it as an investment.
The trainers are usually advanced Grasshopper users and they certainly know what they are doing.
In my experience this format works best as a kind of ‘kick-starting’ process. You get a nice and focused boost to get started. The main drawback is that the information covered is just too much to absorb in such a short period of time. After the bootcamp is over and you start to try and do something on your own, you often don’t know where to start. You go from a flood of information to being left to your own devices and you’ll often start over from scratch by yourself.
The bootcamp format works best if you get started with using Grasshopper right after and if you have access to experienced Grasshopper users afterwards so you can ask for help if you get stuck.
Grasshopper Online Courses
Self-paced online courses are a viable option for anyone who prefers to learn at their own pace, any time, from wherever they are. If you are busy throughout the day but you can invest half an hour every other evening, you can space out the training to fit your schedule.
The drawback is that you need hold yourself accountable and make sure that you stick to your training. If you are a self-motivated individual online courses might be a good choice for you.
I believe a well-structured Grasshopper for Rhino training is the next best thing to getting 1-on-1 training. It doesn’t overload you with information like a bootcamp does, it provides you with bite-sized lessons that you work through at your own pace. Spaced repetition learning has been proven to be the most effective way to learn. Spacing out the learning process over a few weeks instead of two afternoons means what you learn will stay with you for years to come instead of forgetting it after a week.
Consider your specialization!
Regardless of which learning format or learning materials you pick, it’s important to consider your specialization.
Are you a product designer? An architect? A jewelry designer? An engineer?
Although all these professions use Grasshopper, they all use it for different purposes and they use very different techniques. If you buy the wrong course you might pick up the wrong habits or leave you wondering how to fill the gap between what you learned and what you actually want to use Grasshopper for.
Learning the basics is one thing, but learning the core command sequences and algorithms that are relevant for your profession is what’s really going to get you ahead of the curve.
So when you choose an online course or bootcamp, avoid the generalist courses and make sure to pick one that’s tailored to your profession, so you don’t just learn Grasshopper, you learn how to use Grasshopper to get the most out of it for your field.
Step 3: Follow a Learning Roadmap
Grasshopper is a multi-faceted, complex software. If you want to learn it efficiently, you need a clear learning roadmap to guide your learning process.
In my experience teaching Grasshopper I’ve found that the order in which you learn about the different concepts and components makes all the difference when it comes to how quickly it ‘all starts to make sense’.
Building a solid foundation of the core concepts of visual programming and building up your understanding, and learning about additional concepts layer by layer is the best way to stay motivated and build your confidence without feeling overwhelmed.
I put together a recommended learning roadmap below that is structured in different learning stages and that introduces you to the different Grasshopper concepts in an order that makes it easy to learn.
I describe the main learning goals for each learning stage and mention core components you should familiarize yourself with.
Follow this sequence if you want to learn Grasshopper and grow your skills in the most streamlined way possible, without getting sidetracked.
I myself am a design architect, so I can only speak on how to best learn Grasshopper for Rhino for architectural design, but the roadmap will give you a good direction for other fields as well.
Stage 1: Get familiar with the interface
The first step is to open Grasshopper and get familiar with the interface.
Learn how to add and remove components, and how to connect and disconnect them. Understand the anatomy of a Grasshopper script: from referencing geometry from the Rhino document, creating a basic parametric model in Grasshopper to baking (exporting) it back to the Rhino document.
Get an overview of the kinds of components that exist within Grasshopper even if you won’t be using them all just yet. They will be the building blocks for assembling all your scripts.
Learn how to use tooltips by hovering over inputs and outputs to understand their contents and requirements. Using this built-in documentation is extremely helpful especially when starting out.
When it comes to components, begin by learning how to use the core transformation components, like the move, rotate and scale components as well as geometry containers.
Find them in the component tabs or by double-clicking on the canvas and typing their name.
Stage 2: Learn to think in data
Data handling is the big elephant in the room when it comes to learning Grasshopper for Rhino. Every component in every single script can be thought of as a database and you will run into lists and data trees even with the most basic scripts.
While many students new to Grasshopper will try to avoid it, you can make a big leap in your learning curve by facing it straight on. Once you understand the basics of data management in Grasshopper everything moving forward will make so much more sense.
Learn how everything in Grasshopper is stored in Lists, and how items can be picked from a list, how lists can be reversed, sorted and items identified.
Then learn how multiple lists can be stored inside one and the same component, and what that looks like. Understand the concept of data trees, data paths, and how they are created and modified.
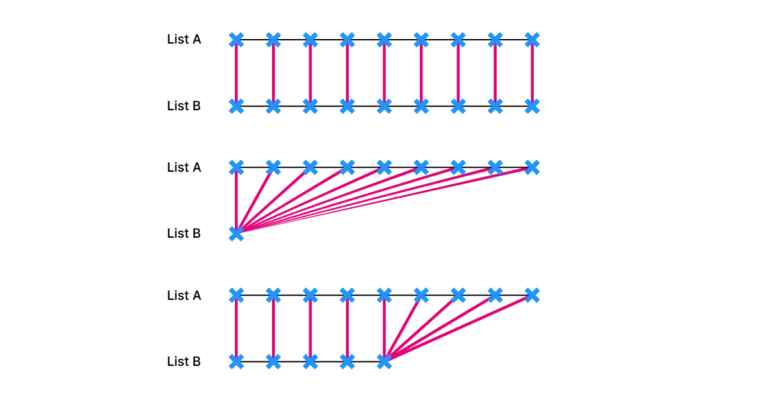
Finally learn how to match data – to be in control of which elements of one list are processed with which elements of another, especially when processing multiple lists at once (which makes Grasshopper so powerful to begin with!).
Stage 3: Learn about the core geometries
Once you know how to handle data in your script, it’s time to learn about the core geometric building blocks within Grasshopper. Learn how curves, surfaces and volumes are defined geometrically in Rhino and learn all the ways to create, modify, subdivide each of them.
Get familiar with the different ways of extracting geometric properties, like length, area, tangents, surface normals, and evaluation points and learn how you can use them to inform other design elements.
Everything you’ll create in Grasshopper will be constructed with these core geometry types. Knowing them inside out means you’ll have full creative control over what you’re designing, you’ll be able to create and manipulate them at will.
Stage 4: Learn the algorithms relevant for your field
Once you know the interface inside out, you have a good grasp of data structures and you know how to construct the core geometries, you know everything you need to get to work and create your own geometric component sequences, or algorithms.
Depending on your field and your design style you’ll want to learn how to create those advanced effects that are hard to create when modeling manually.
If you are in the architecture field, you might learn how to generate and control randomness in a design, and how to randomly populate geometries with objects.
You may want to learn about how to create gradient effects, where a field of items experiences a gradual geometric transformation.
Other effects include the dissolution effect and using attractors to influence geometry.
At this stage you’ll also want to learn how to extract quantitative data from your designs to evaluate them, perhaps also in regard to their performance.
Stage 5: Develop your own projects!
At this point you know everything you need to know and you’ll be able to create a parametric model of anything you can think of. Each project and script poses its unique challenge – no two scripts will be same! By using Grasshopper frequently, figuring out the correct algorithms to use and implementing them in your scripts will become second nature. As you develop your scripts you will learn tricks and nuances along the way – all of that comes with experience.
If you want to know how long it will take to become proficient in Grasshopper, you can read more about it here.
Conclusion
I hope I could help you get a clearer idea on how to learn Grasshopper for Rhino. In summary: get motivated, find the learning format that best fits your individual situation and build your skill without getting sidetracked by following a focused learning roadmap.
Learning Grasshopper has had a profound effect on my own career, so if you are considering learning it, I can only recommend it!
If you want to fast-track your Grasshopper journey, check out my course Grasshopper Pro. This course is made specifically for professional architecture practice and covers everything from the basics to advanced algorithms.
I wish you success no matter what you decide!

