A single curve pointing in the wrong direction can mess up your entire Grasshopper script. To stay on top of curve direction in Grasshopper it’s essential to understand how direction is assigned upon creation, and how we can align and flip curves.
In this post I’ll cover everything you’ve ever wanted to know about curve direction in Grasshopper – if you are serious about Grasshopper, grab a coffee and keep reading!
Let’s dive in!
What’s a Curve Direction?
In Rhino, every curve we create has a direction. That’s because the NURBS technology behind Rhino is based on control points that are connected in sequence. For this reason Rhino keeps track of the origin of the curve, and naturally, its end – the curve direction is born.
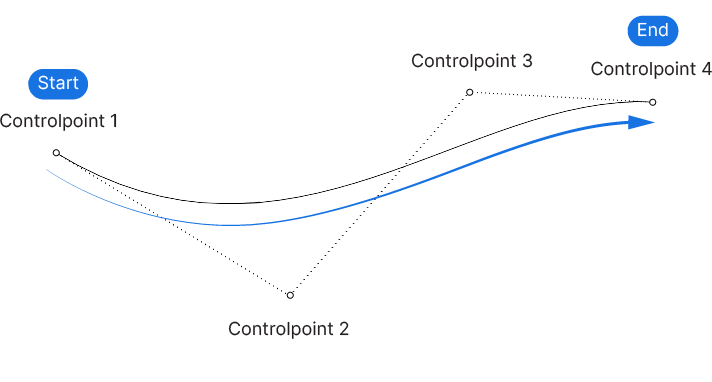
Rhino assigns numbers (so-called Curve Parameters) to the start and end of the curve and any position along the curve can be precisely described using a number within the Curve’s Domain, or start and end value.
Why Curve Direction is Important in Grasshopper
Curve direction is important, because any geometry we derive from the curve, for example points, is based on it.
Here’s a few examples of how curve direction can impact our scripts:
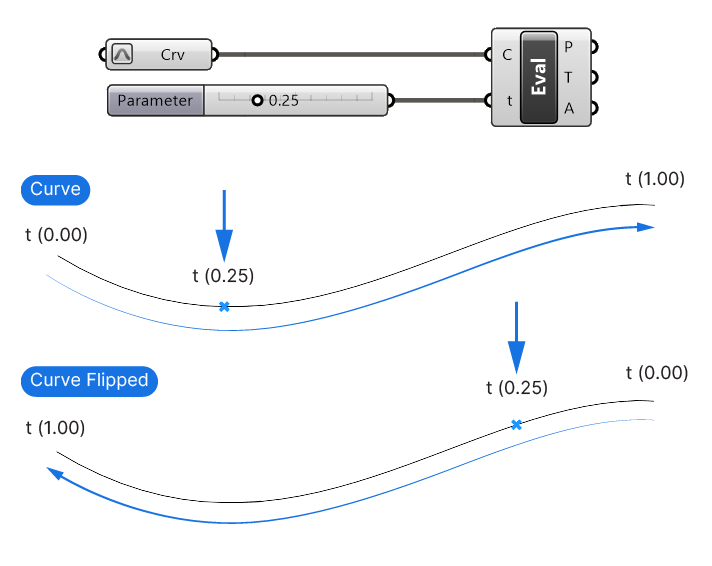
Curve Evaluation
Let’s say we use the Evaluate Curve component to extract a point at a specific Curve Parameter on the curve, for example 0.25.
If the curve is reparametrized, the point will be located at approximately the first quarter of the curve. But if the curve is flipped, the point will be on the other end!
Curve Division
The problem becomes even more evident when generating points along a curve. Let’s say we have two curves that we divide into the same number of segments to then draw lines between them. Once more, if the curves are not pointing in the same direction, the output can look vastly different:
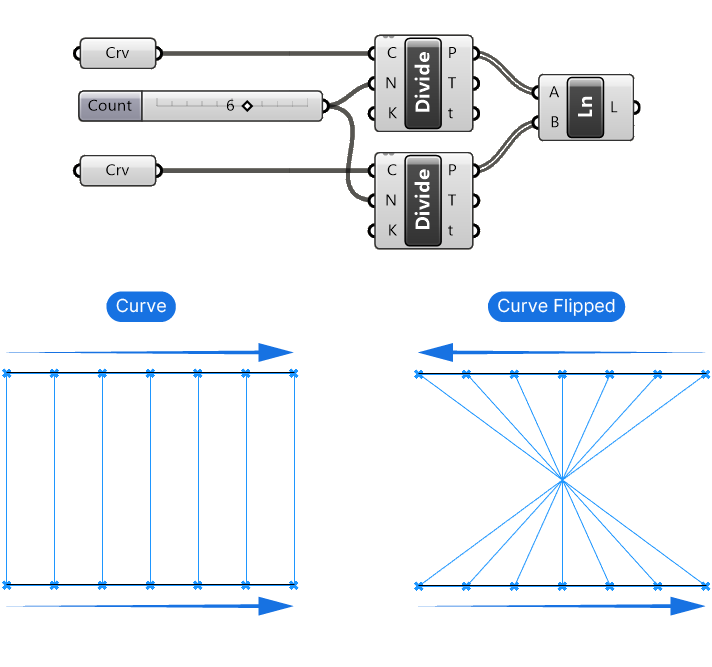
The curve direction influences the order of the division points.
Lofts
Lofts are also sensitive to curve direction – unless the input curves are aligned, you might end up with unwanted twists in your final surface.
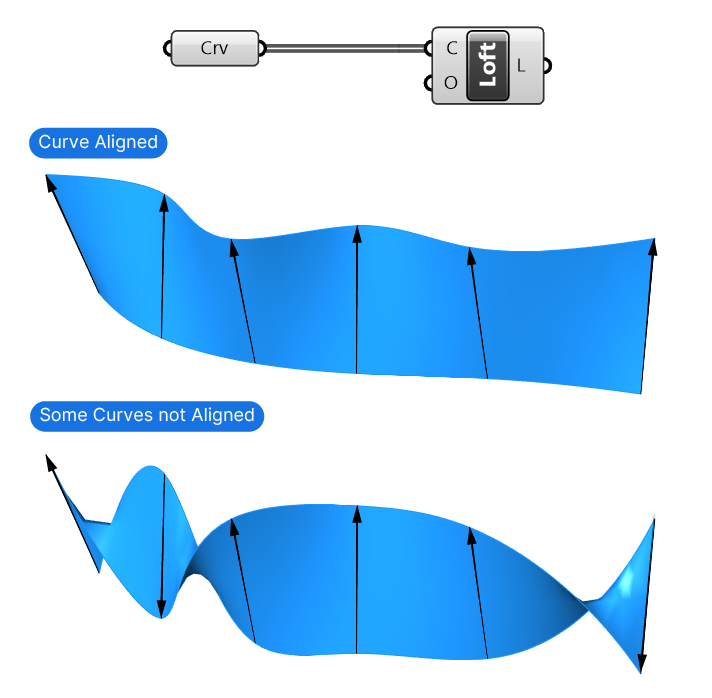
While there is an option within the Loft Grasshopper component itself to align the section curves, it’s not always reliable and making sure the curves are pointing in the right direction beforehand is a better approach.
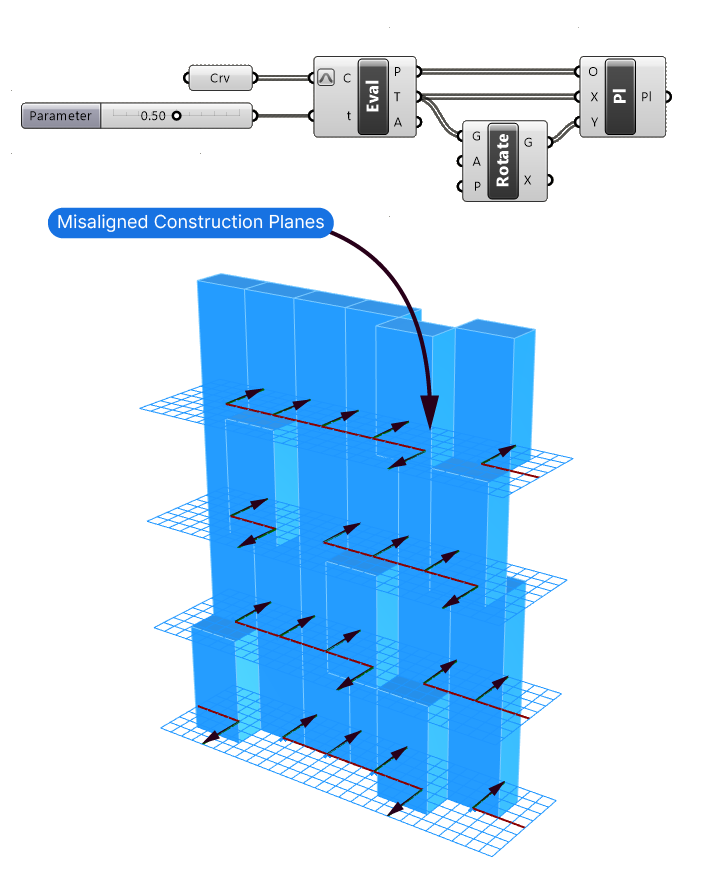
Construction Planes based on Tangents
The curve direction also influences the Tangents at specific points along the curve. This can become a problem if you are using Tangent Vectors to construct Construction Planes, for example to generate Rectangles or to orient geometry. Nothing is more frustrating than a set of elements that for no apparent reason point in the opposite direction!
To avoid running into these problems, it’s important to understand that how we create a curve impacts its direction, as well as to know the methods to flip and unify the direction of several curves.
How Rhino Assigns a Direction to a Curve
Sometimes the issue in your Grasshopper script starts way back in Rhino. If you reference curves from Rhino, Grasshopper will inherit their curve direction.
When you draw a curve in Rhino, the direction is dependent on the order of the control points you pick. The first control point will mark the start of the curve.
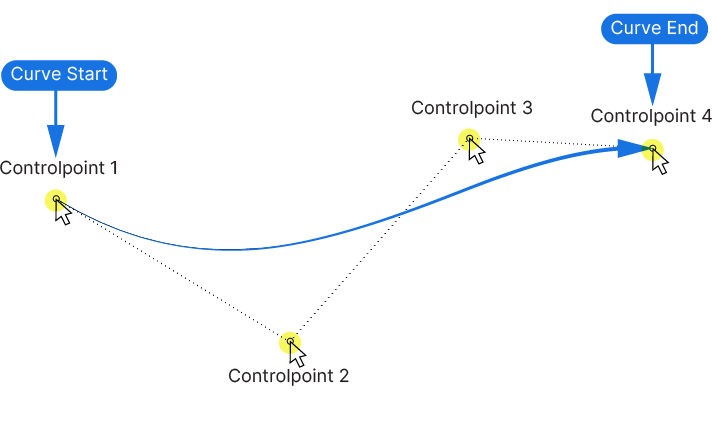
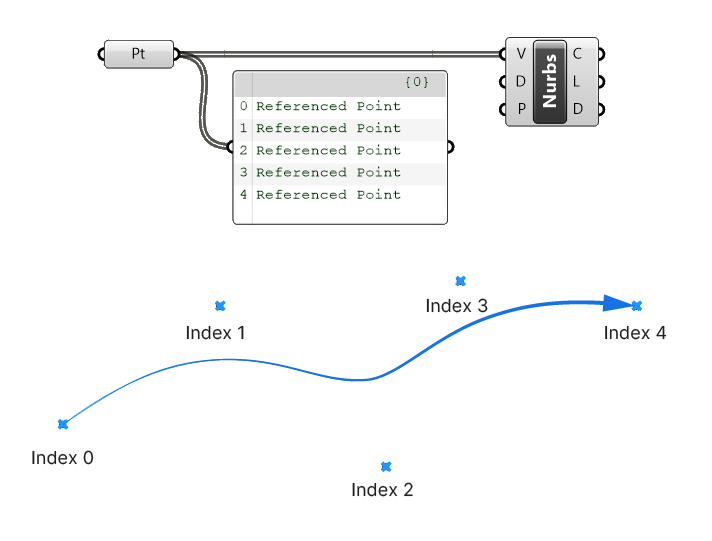
Curves created within Grasshopper are the same way: The order of the input points will determine its direction.
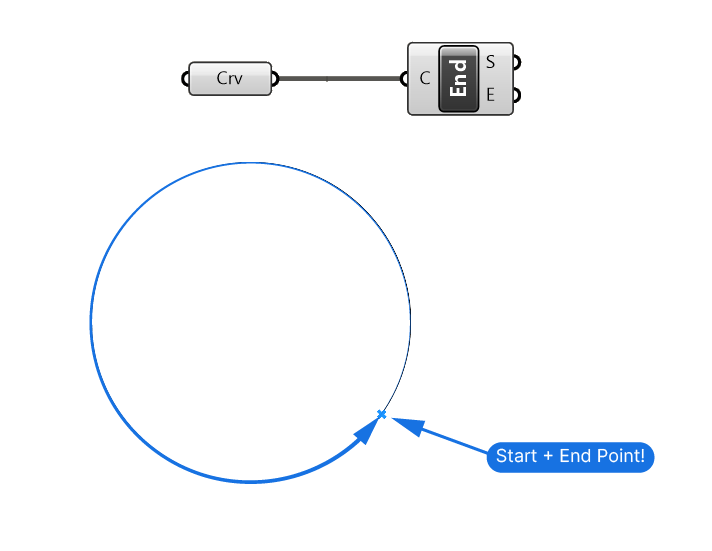
Now you may wonder, what about closed curves? For example a circle?
Yes, even closed curves have a start and end point in Rhino – they just happen to overlap. If you extract the start and endpoint of a closed curve you will actually get two overlapping points. If you generate closed curve primitives, like a circle or rectangle, the direction will generally be counter-clockwise to the viewport they were created in.
In short: how you create a curve will determine its direction. Be mindful about the sequence of control points if curve direction is relevant in your script.
But what if you are working with existing curves? How can you check their direction?
How to Check the Curve Direction
Oftentimes you are working with existing curves in your Grasshopper script that you don’t know the direction of. The first step of trouble-shooting curve direction issues, is to check the direction of the curves.
You can check the direction of curves you referenced from Rhino, but also of those you created in Grasshopper.
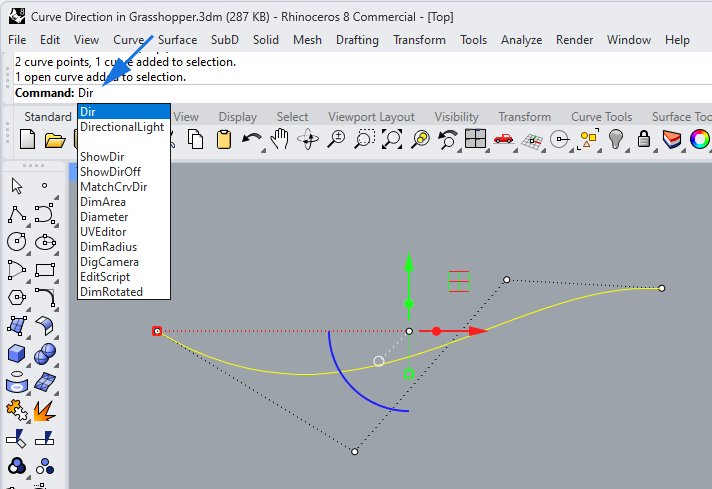
In Rhino
To check the direction of a curve referenced from Rhino, select one or more curves and type the command ‘Dir’ into the command line. It’s short for ‘Direction’. Rhino will then highlight all the selected curves and display arrows on the curve that reveal the curve’s direction.
Changing the Direction of a Curve in Rhino
The ‘Dir’ command includes a very useful feature: we can flip a curve‘s direction by simply clicking on it. The arrows will instantly flip.
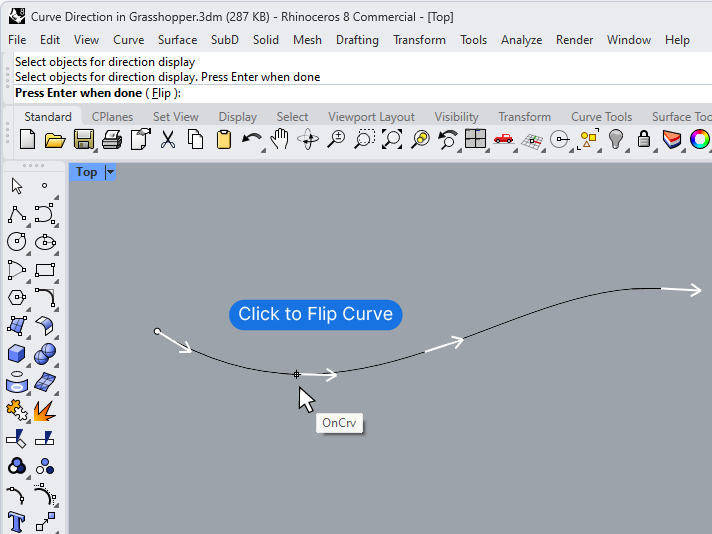
Use this technique to align curves manually. Once you are happy with the result, confirm with ‘Enter‘ or a right-click.
The arrows will disappear, and while the curve’s shape is entirely unchanged, its direction is flipped.
In Grasshopper
There are two ways to check a curve’s direction in Grasshopper:
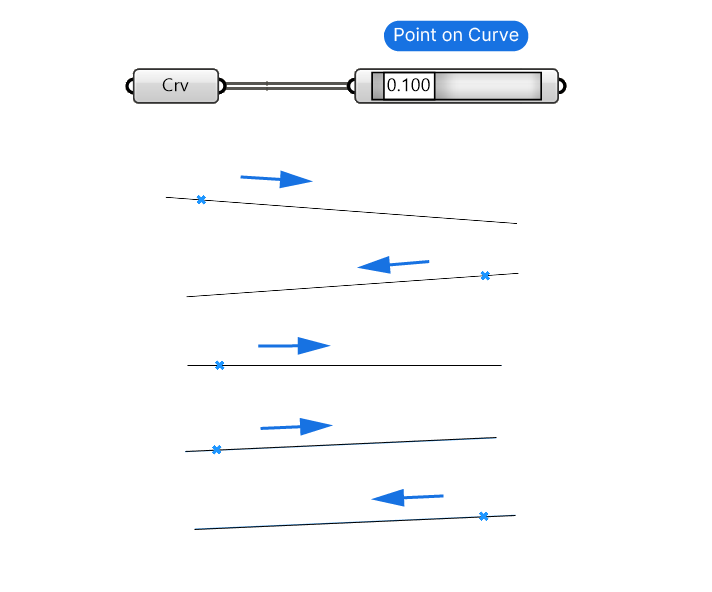
Visual Check Using a Curve Parameter
Checking the direction of curves in Grasshopper can be most easily done using the ‘Point on Curve‘ component. The idea is to evaluate a point next to the start of the curve, (a value of 0.10 for example). Since the Point on Curve component automatically reparametrizes the input curve, the point will be located near the beginning of the curve.
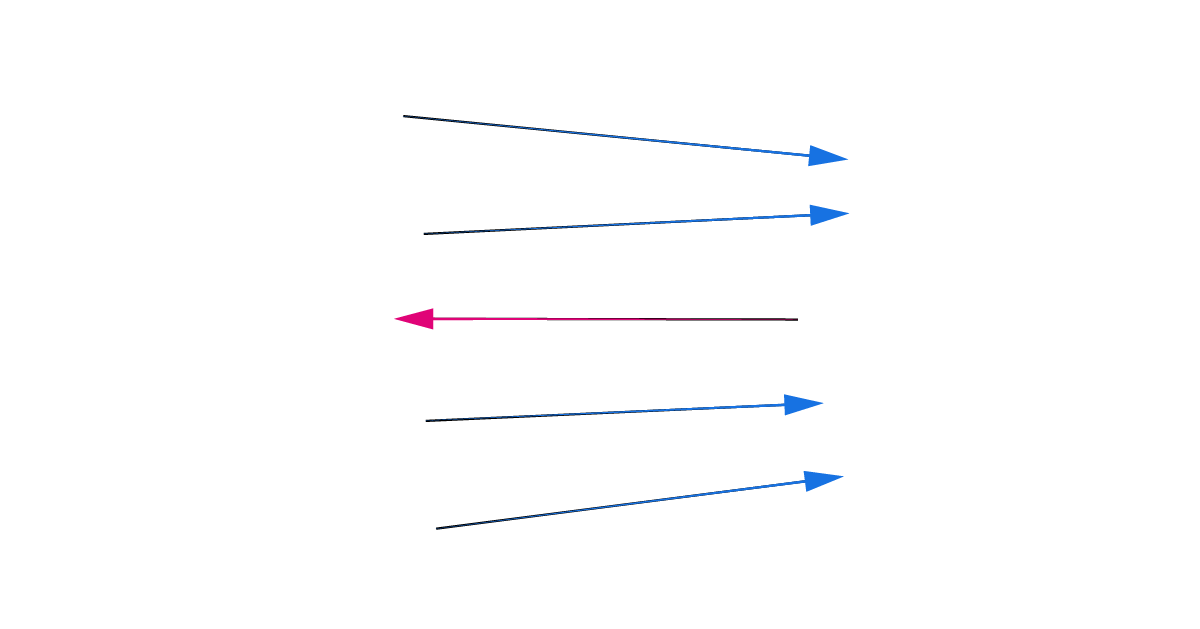
Especially if you are checking several curves in a row, any curves that are not aligned will jump out:
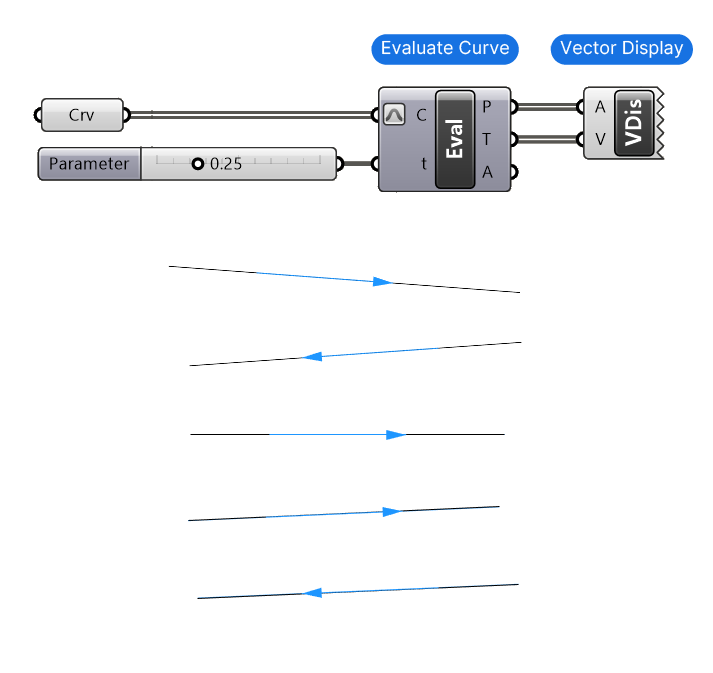
Displaying the Curve Direction with Arrows
To display the curve direction with actual arrows in Grasshopper, you can use the Vector Display component. Vector Display will display an arrow using just a base point and a vector input.
Here’s how you would set it up:
- Add an Evaluate Curve component
- Right-click on the ‘Curve‘ input and select ‘Reparametrize‘ to reset the domain to go from 0 to 1.
- Turn off the preview by selecting the component and hitting Ctrl+Q.
- Add a Number Slider with a value between 0 and 1, for example 0.50, and connect it to the Curve Parameter (t) input.
- Then connect the Point (P) and Tangent (T) outputs to the Anchor (A) and Vector (V) inputs of the Vector Display component.
How to Flip the Direction of a Curve in Grasshopper
To flip the direction of a curve in Grasshopper, add the ‘Flip Curve‘ component and connect the curve you want to flip. Double-click on the Grasshopper canvas and type “flip” to find the component. Click on it to drop it to the canvas.
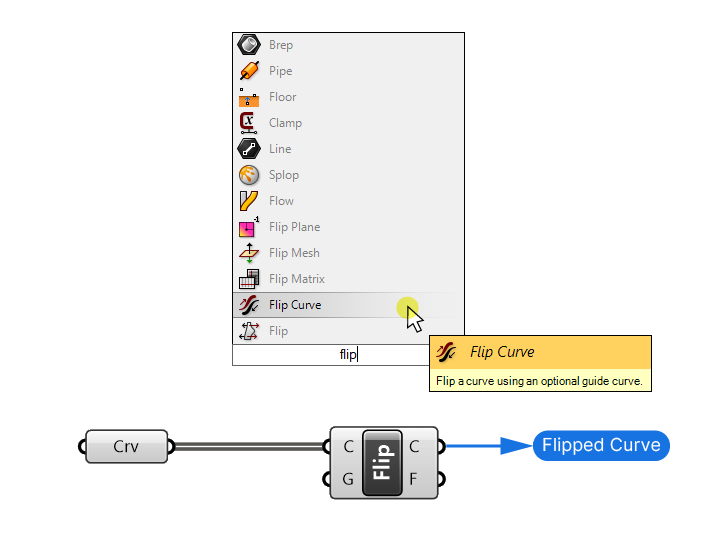
Using the Flip Curve component you can invert the direction of a single curve, but also of several input curves at once.
How to Align the Direction of Several Curves in Grasshopper
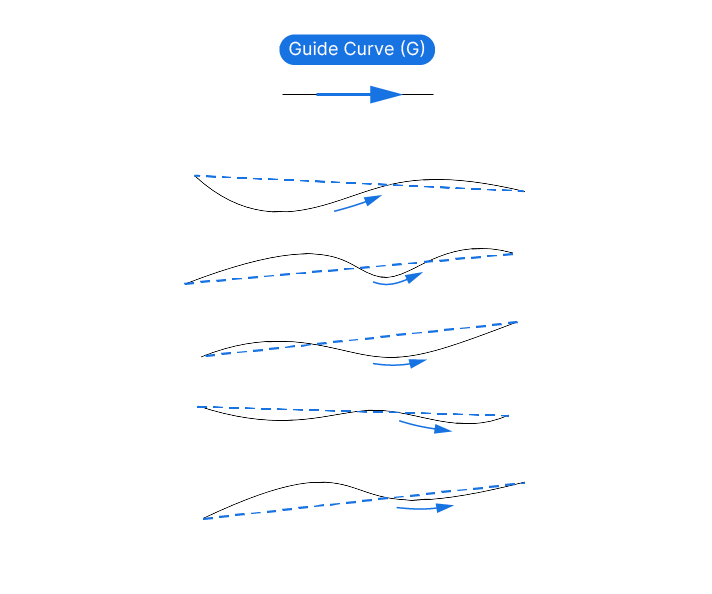
The Flip Curve component comes with a powerful optional input: a Guide Curve. If we provide a guide curve, the component will align all the input curves with that curve. This means that all curves that are at an angle greater than 90 degrees to the guide curve will be flipped – and only those!
This is a super-powerful feature if we want to align curves that are parallel.
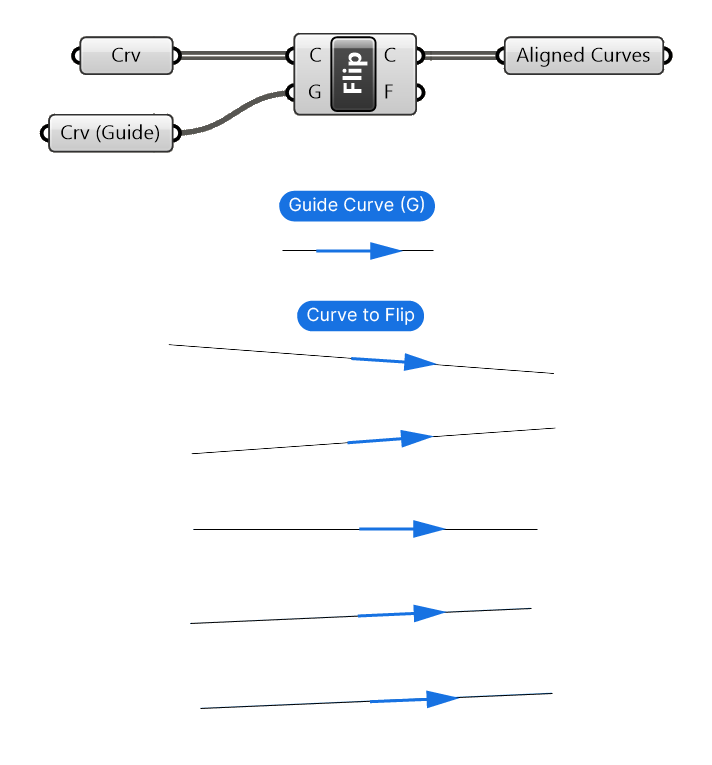
If you are using the guide curve feature with non-linear curves, the Flip Curve component will create a vector that connects the start point to the end point, and calculate the angle that way.
Concluding Thoughts
Controlling curve direction in your Grasshopper scripts can be tricky sometimes. Especially when starting out, misaligned curves can cause a lot of headaches.
I hope this guide helped you gain a better understanding of how curve direction is created and how to change it both within Rhino and within Grasshopper.
Happy designing!