Baking geometry is an essential part of the Grasshopper workflow. No matter what we create in Grasshopper, at the end of the day we want to be able to turn this result into good old static Rhino geometry. Whether we are looking to refine the Grasshopper output manually, or to 3D-Print, export or render, we need to turn the Grasshopper preview into solid geometry – in Grasshopper this process is called ‘baking geometry’.
This post will cover everything from the basic ‘baking’ process to advanced baking techniques, no oven required! Let’s get started!
How do you bake in Grasshopper?
Before we dive into the process of baking objects, we need to be clear about what objects CAN be baked. We can only ‘bake’ objects and geometries that we could also model and create within Rhino itself. This means that Curves, Surfaces, Polysurfaces (Breps), even Text can easily be turned into static Rhino geometry, but object types that only exist within the domain of Grasshopper, like vectors, data trees etc. cannot be baked.
To bake any geometry from within Grasshopper, select the object you intend to bake, right-click on it and select ‘Bake’.

A popup menu will appear that allows us to specify which layer the objects should be baked to. Every object in Rhino is neatly stored in a layer, it may have a name, a color etc., so as we transfer or ‘bake’ the geometry from Grasshopper, we need to make sure we adhere to Rhino’s system.
The most important option is the layer the objects should be ‘baked’ to.
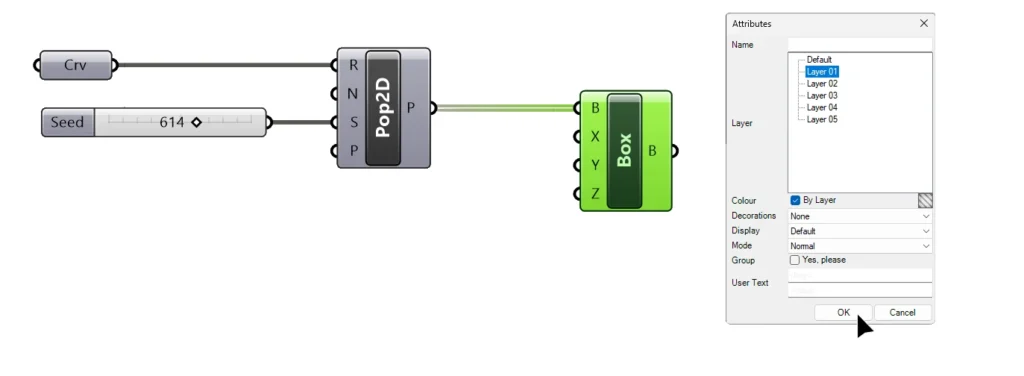
When baking multiple objects contained in a single component, consider toggling the ‘group’ option, that way selecting then entire group in Rhino will be much easier.
Once we bake an object, that object is a completely static object that is no longer dynamically connected to our Grasshopper script. If we change parameters in our script, the preview in Rhino will change, but our baked objects will not. Altering the baked objects in no way interferes or influences the Grasshopper script.
Quick-bake
Right-clicking and going through the popup menu to bake objects can be a bit cumbersome, especially when baking many different components. A faster way to do it, is to use a quick-bake shortcut.
Here is how it works:
Select one or several components you intend to bake the contents of, and hit ‘Insert’ on your keyboard. All the selected objects will be immediately baked to the Rhino file.
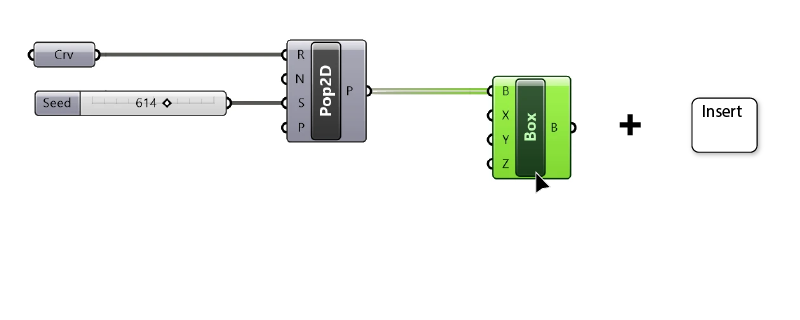
Instead of specifying the destination layer of the objects, the objects will be saved onto the active Rhino layer (the one with the checkmark).
In terms of workflow this means that we can set our desired destination layer to active, and then select the components and simply hit ‘Insert’.
Keep in mind that this way we cannot take advantage of the advanced baking properties, like grouping and assigning names.
It is nevertheless a very handy technique, especially when needing to quickly bake intermediary steps while developing a script!
Can you ‘unbake’ or undo bake in Grasshopper?
Once the objects are baked, they are completely unlinked from the Grasshopper script, so the only way to delete them is to delete them like any other object in Rhino.
So to avoid tedious object selections after the fact, make sure to bake objects to a dedicated layer, or to group them.
If you just baked objects and you want to quickly undo the baking, use the Select Last (type ‘SelLast’ into the Rhino command bar) command it will select the last created or modified object, including baked Grasshopper geometry. Sometimes the first time you run it, nothing will be selected, in that case repeat the command, all the baked geometry should be selected. You can then delete it easily.
Baking Geometry with Attributes in Grasshopper
When your scripts get more advanced, you’ll want to assign specific colors or attributes to specific objects as you bake, and bake different groups of objects to specific layers, without having to select each manually.
The next version of Grasshopper will include more advanced baking components, but for now, there are several free Grasshopper plugins that allow us to do more with baking.
By far the best is Elefront. It is kept up to date and offers a very clear and effective set of components that facilitate the communication and data transfer between Grasshopper and Rhino.
Click here for a guide for installing the Elefront plugin.
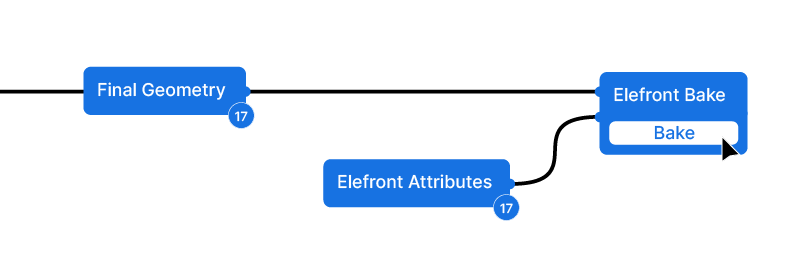
The basic idea of baking objects with attributes is to create a dedicated set of attributes that will be fed into the final bake component together with the objects to bake.
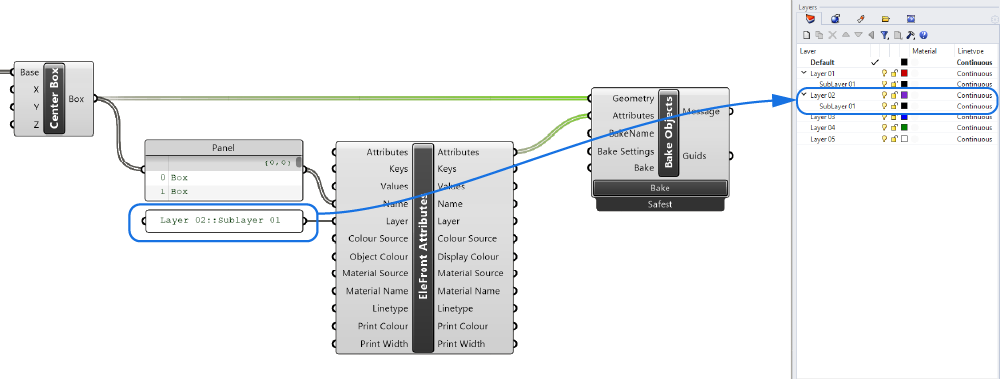
Conceptually, this is what the setup looks like: we have the geometry we intend to bake, then the elefront attributes, and finally both are combined in Elefront’s Bake component, that can be activated with a convenient button right on the component.
Once you installed Elefront, you can add the following two components:
- Bake Objects
- Elefront Attributes
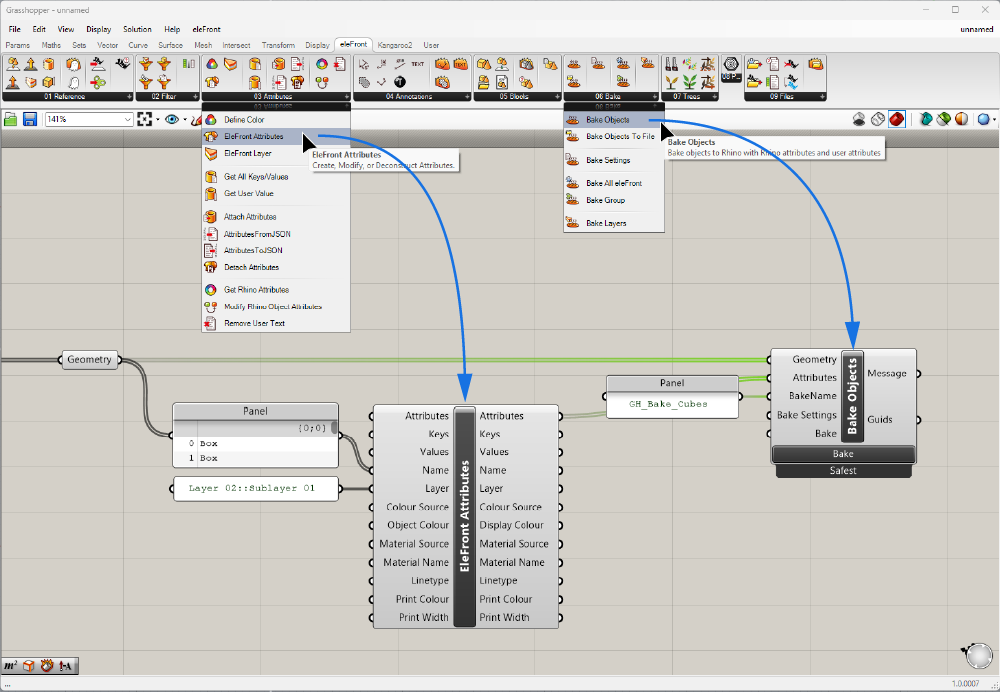
This is what the basic setup looks like with the actual components:
Defining Attributes to Bake
At first glance the Elefront attributes component does look a bit clunky with all those inputs, but as you read the inputs you’ll realize that it’s exactly the properties any Rhino object has. We don’t have to use all of them, just like we don’t have, for instance, to define an object-specific color for every object on a layer in Rhino. In that case, the default option will be applied (in the case of colors, the layer color).
It’s important to mention that for this setup to work, we need the same number of elements in the same kind of tree structure for both the ‘Geometry’ and the ‘Attributes’ input of the Bake component.
In most cases, you won’t need to specify all the available individual attributes for every object, you may for example want to bake all the objects to a single layer, or all the objects to have the same object color. Still, you need to provide the same number of inputs for the bake component to work.
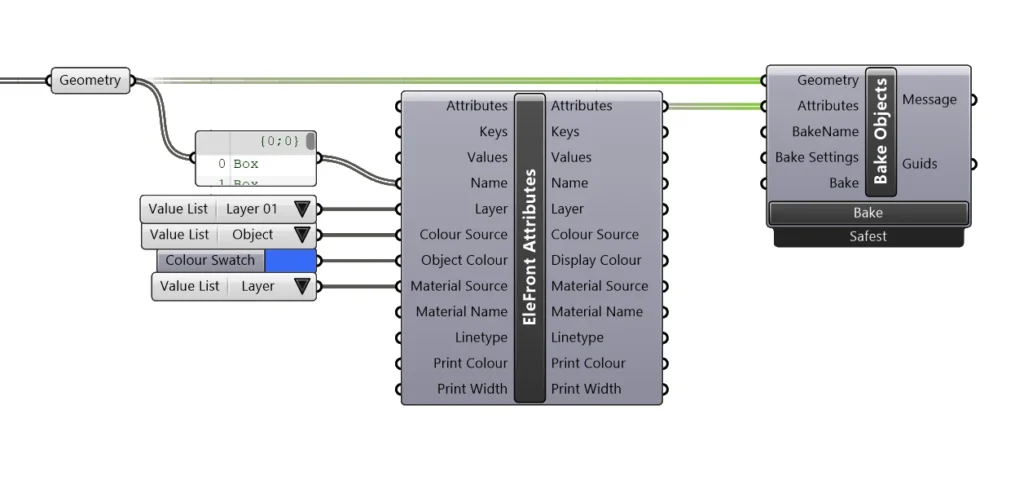
The good news is that you only need one of the inputs to have the same data structure as the objects to be baked, all other singular inputs will then be packaged into the same data structure (meaning you can, for example, have a single value for the destination layer). In the example above, I’ve simply used a Panel component and plugged it into the ‘Name’ input of the Elefront Attributes. This way the number of attributes will be the same as the number of objects to bake.
How to bake objects to a layer in Grasshopper
To bake the objects to a specific layer, add a ‘Value List‘ component and plug it into the ‘Layer’ input of the Elefront Attributes component. The dropdown will allow you to choose from any layer of the current Rhino document.
An alternative way to define the destination layer, is to add a Panel and to type in the name of the layer.
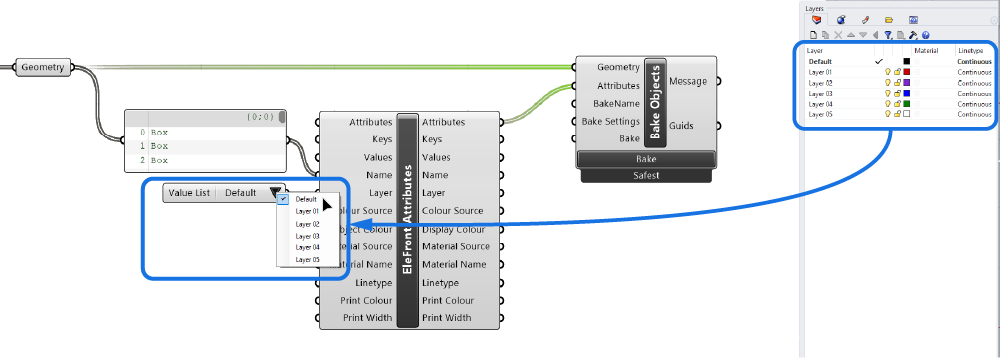
You can specify sublayers by using the following notation:
Layer 01::Sublayer 01::Sublayer 02Add a double colon to signalize a nested sublayer.
Here is an example:
Some of the remaining inputs of the Elefront Attributes component can also be specified with the help of a Value List component. The rest have simple data-type inputs, like text or colors.
Updating Baked Geometry
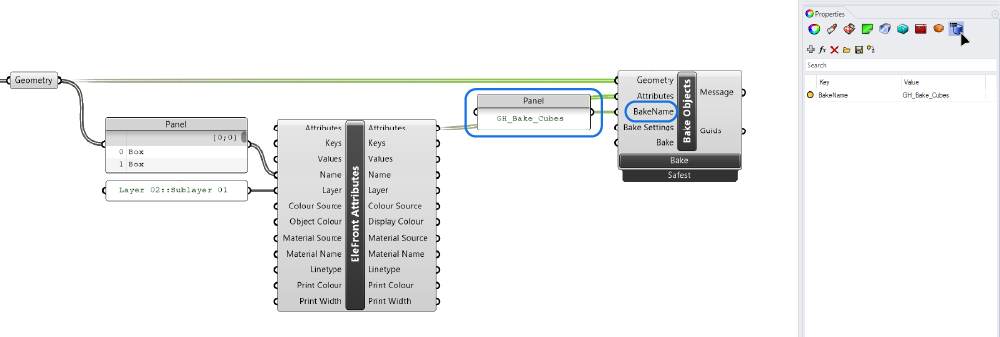
One of the most useful features of the Elefront Bake component, is that by adding a special ‘BakeName’, anytime we bake the same objects again, all previously baked objects of the same name will be replaced!
This saves a lot of manual deleting, but it might lead to surprises as it will also delete hidden objects on hidden layers.
All you need to do to set this up is provide a unique ‘BakeName’ with the help of a Panel component, as shown below.
Upon baking, the ‘BakeName’ will be added to any baked geometry as a User Text string that can be found in the object properties under ‘Attribute User Text‘, the last icon on the properties tab.
Troubleshooting: When you can’t bake in Grasshopper
“Why can’t I bake in Grasshopper?” If you run into a situation where you can’t seem to bake in Grasshopper, you are not alone! Here are a few things that can go wrong when baking objects:
Invalid geometry
In some cases, our scripts will generate invalid geometry, that may still display correctly in our viewport, but that has some geometric property that makes it invalid, for example self intersections or zero-length edges. Those objects can’t be baked to Rhino.
You can find our whether you are dealing with invalid objects by either using a Panel component and plugging the geometry into that, in which case you’ll see ‘Invalid Curve/Surface’ in the List for the problematic object.
Alternatively you can use the ‘Clean Tree‘ component. By default its second input to ‘Remove invalid objects’ is on. The resulting output will only contain valid geometry that can be baked.
“Were sorry but baking is only possible when no other commands are running” Error
This error is annoying but very easily solved:
When this error shows up, all you have to do is click into the Rhino window and hit ‘Esc‘.
This error shows up when you have started but not completed a command in Rhino, meaning in the command bar Rhino is waiting for your input, and meanwhile you are in Grasshopper, trying to bake. Finish or abort the Rhino command and then try baking again!
Conclusion
That’s it! I hope this guide has been helpful in understanding how baking objects from Grasshopper to Rhino works! If you have any additional questions, feel free to add it in the comments!
If you want to speed up your Grasshopper journey, check out our course: Grasshopper Pro – Grasshopper for Rhino training for architecture professionals.
Good luck!