The Panel is one of the most essential components in Grasshopper. It serves a dual function: it allows us to both enter data manually but also to read the contents of other components’ output. As such, it’s a key element for making sure that the script is running as we intend it to.
Keep reading for an in-depth guide on all the functionality the Panel has to offer!
Where to find the Panel component in Grasshopper
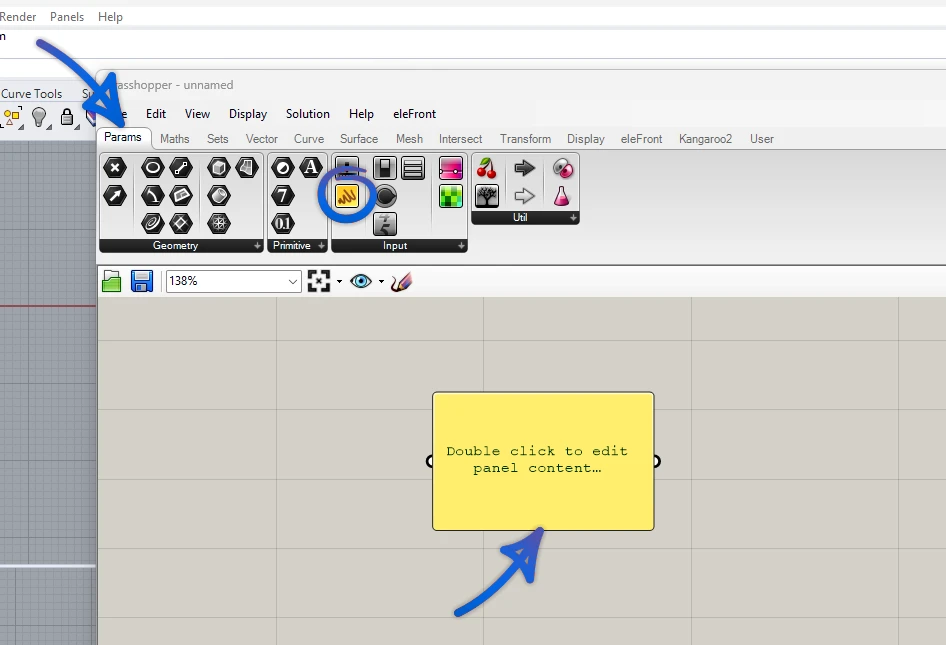
First things first. Let’s learn how to add a Panel component to the Grasshopper canvas. Since the Panel is one of the components we’ll use a lot as we develop our scripts, it’s located on the very first component tab, named ‘Params‘. It’s listed in the component group named ‘Input’. The yellow icon sticks out among the black/gray icons, so it’s easy to find.
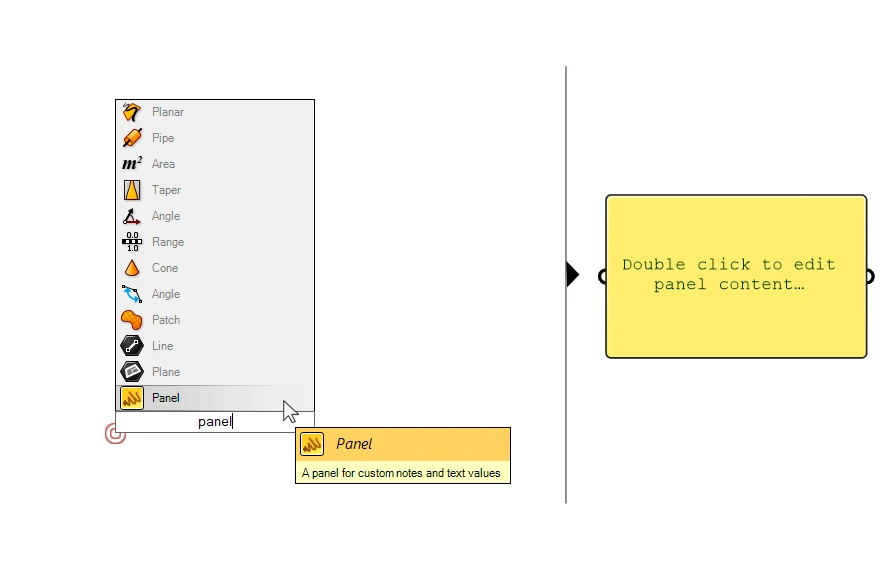
Once we are deep in the script building process, switching around between the component tabs to find the components we want can become tedious. A more efficient way to add components is to double-click onto an empty spot on the Grasshopper canvas and typing the name of the component we want to add. In our case simply ‘Panel’. Hit Enter or select the component to add it to your script.
Anatomy of the Panel component
The Panel looks deceivingly simply: it’s a text box with one input and one output. As we add it to the canvas, it invites us to double-click in it to add content. But that’s just one of the ways to use it.
The Panel can be used in three different ways:
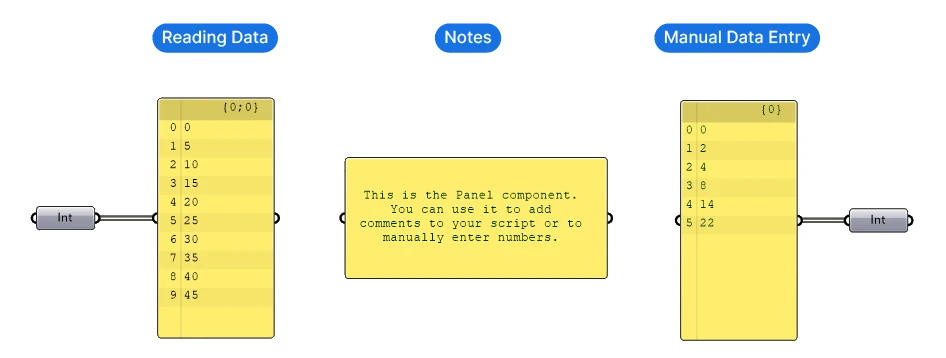
One of it’s uses is indeed to use it as a miniature notepad. We can jot down some quick notes or instructions throughout our script.
But as soon as we plug any component into the Panel input, the Panel changes mode: it now displays all the outputs of the component it receives in text form.
The third use case is to type in several numbers and use them as a list.
Let’s look at each feature in more detail:
Using the Panel to visualize data
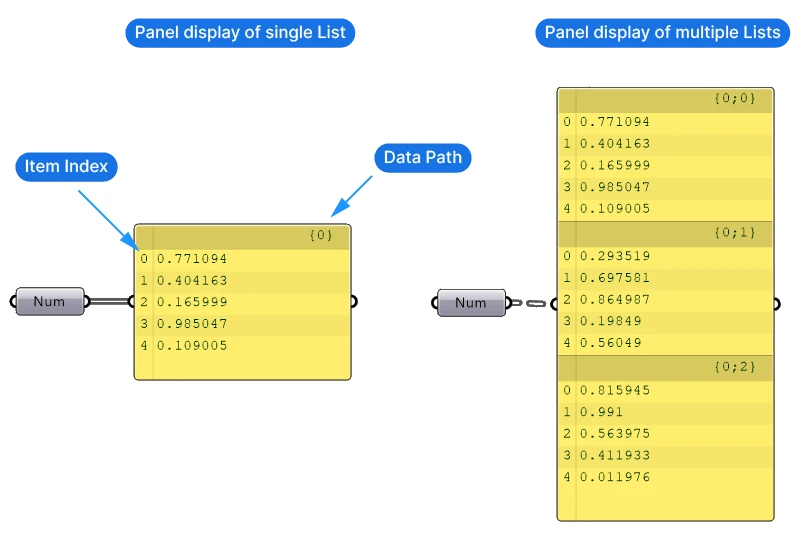
Once we provide an input to the component, the layout of the Panel changes into a table. We get a consecutive listing of all the output items. The position of each item is shown by a number on the left, the so-called index. This index is a feature of lists, the core data storage type in Grasshopper. In so doing the Panel gives us the opportunity to ‘see’ the contents of the components in our script.
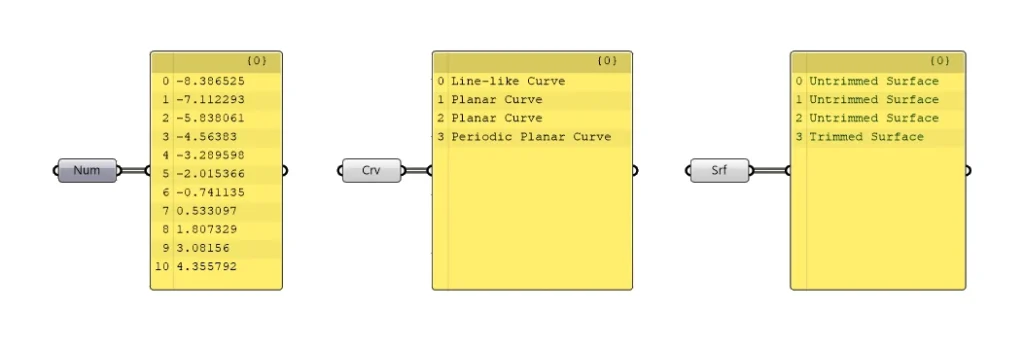
If the data type of the input is numbers or text, the Panel will show the actual contents. Whereas if the contents are more complex data types, like curves, or surfaces, it will simply tell us the kind of item we are dealing with, as shown below.
Besides the index and the textual representation of the contents, the Panel also shows us information about its data structure. Once we are dealing with several lists of items simultaneously, each lists gets its own name – called the data path. You can think of it as the index or identifier of the entire list.
Once we know the contents of a list thanks to the Panel, and we know the position or index of items in the list, we can pick specific items from the list, using the List item component.
When we use the Panel to visualize the content of components, we are usually not interested in its output. In this case the output is exactly what’s shown inside the panel. If it’s numbers, we get numbers, but if it is the textual representation of geometry, like ‘Planar curve’ for example, the output is a text string saying ‘Planar curve’, not the curve itself!
We do want to use the output of the Panel component though, whenever we enter data into the Panel:
Entering data into a Panel
As we’ve learned at the beginning of this post, we can add content to a Panel ourselves by simply double-clicking and typing in our text. In that case the output will then be that exact content we added.
By default, anything we type in, be it text or numbers, will be treated as a single text block. Meaning that even if we hit enter and go to a new line, the output is still one text. We can see the result by plugging the output of the Panel into another Panel (very meta, I know!). The ‘0’ on the left let’s us know that we are dealing with a list with a single item, with the item being a string of text.
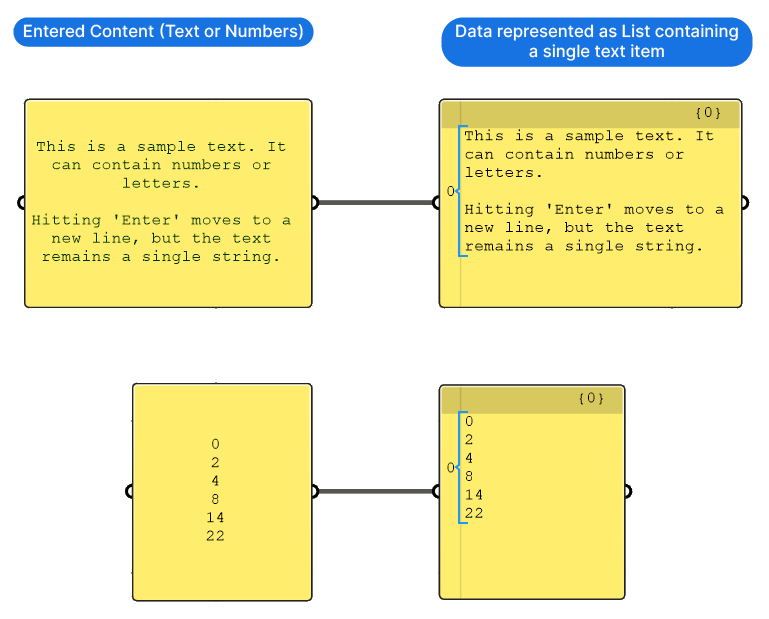
But what if we want to enter several numbers into the Panel and use them as a list? If we just enter the numbers by hitting ‘Enter’ after each number, the content will look like a list. But if we check the output again, we see that it’s still just a single block of text (digits are also treated as text).
We need a way to turn the contents of the Panel into a list:
Creating a list in the Panel in Grasshopper
To get the Panel to recognize our numbers as a list of numbers, we right-click onto the component and deselect ‘Multiline Data‘.
Right away, the numbers we entered are now displayed as a list, with their own index and data path!
With the Multiline Data option deactivated, anytime we hit ‘Enter’ when inputting contents, we are adding a new item in the list.
Every new line in the panel will be treated as an item in the resulting list.
Tip: Be careful not to hit ‘Enter’ at the end of the list: Grasshopper will interpret it as a new albeit empty item, resulting in an <empty> list item, which can cause issues later on in your script.
Customizing the Panel’s look
Grasshopper offers several options to customize the appearance of the Panel. For anyone who wants to control to look and feel of scripts, this is for you.
How to change the color of the Panel in Grasshopper
If you want to change the color of the Panel, right-click on the Panel, go to ‘Colour‘ and use the color widget popup to select your desired color and even transparency. This will change the color of the selected Panel.

If you want all future Panels you create to have that same color, right-click on the Panel component once again, go to ‘Adjust defaults’ and click on the ‘Make Colour Default’ option. The color of the selected Panel will become the default.
How to change the font size in the Grasshopper Panel
We can also tweak the appearance of the actual content of the Panel. To do so, zoom in (scroll) to the panel until nine red-and-gray widgets appear in the middle of the Panel. Hover over the widgets to see what they do: you can adjust the font, the font size and the text alignment.
If you are not interested in the index and data path information, for example if you just want a Panel to monitor a certain final numerical value, you can turn off the index and data path by selecting the two icons on the bottom left.
Exporting the contents of a Panel
Besides aiding in the creation and debugging of scripts, the Panel can be used to access and export numerical data from our models.
We can copy all the contents of the Panel by right-clicking and selecting ‘Copy All Content‘ or ‘Copy Data Only‘
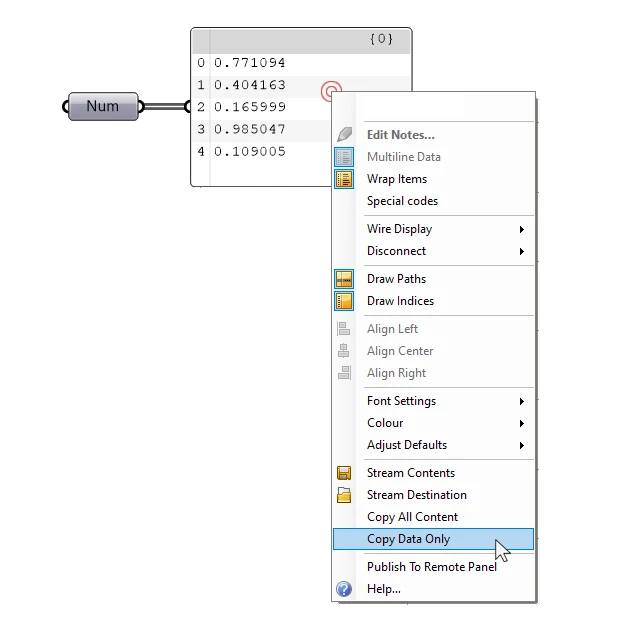
Copy all content will also export the indices as well as the data paths, whereas Copy Data Only will only export the actual content.
You can paste the copied content into any word processors or excel. Exporting the Panel to excel will retain the cell-information, meaning every item will be pasted into its own cell. Unfortunately the contents will be pasted as a single column of values, making it hard to process the data further in excel.
If you are interested in exporting more complex data structures in multi-column tables, there are a number of Grasshopper plugins that offer components for that. You can find them on food4Rhino.
How to use the Panel for debugging
The Panel is a Data Viewer component and it allows us to see the contents and data structure of a components output. As such, it is a crucial part of our debugging toolset. The Panel will show us what kinds of objects the component contains, in text form. It allows us to both double-check the number of items, their type, and if they are numbers, their values.
Use the Panel throughout your scripts to take a look inside the components and check the data before connecting them to other components.
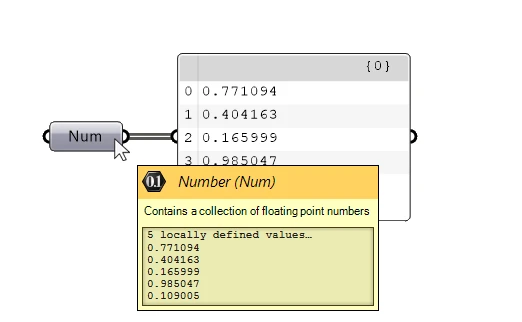
Tip: You don’t always have to use the Panel component to see the output of a component: simply hover over the output letter of a component: A popup will appear, giving you a preview of the contents. This works well if you are working with a limited amount of elements, as from 10 elements onwards, the preview is truncated. If the component contains several lists, we only see their data paths and their length. Even so it already gives us a good idea about the data we are working with.
If you run into a problem with your Grasshopper script, and you either get a component failure (component turns red) or data warning (component turns orange), use the Panel to find out where the problem lies.
To do so, start from the final, failed output and go backwards each step (called “going upstream”) and monitor the output all components every step of the way until you find where something went wrong:
- Do the components contain the data you expect them to?
- Is it the right data type?
- Is the input an empty list?
- Does the list contain invalid items?
With the Panel we can answer all of those questions and get to the bottom of a bug in our scripts.
The bottom line
As we’ve seen, the Panel in Grasshopper is one of those components you can’t avoid if you are using Grasshopper at a professional level.
If you are just starting out with Grasshopper, check out our training program Grasshopper Pro – a self-paced online course tailor-made for architects that teaches you how to use Grasshopper in the context of a professional architecture practice.
Happy designing!