In the realm of parametric design with Grasshopper for Rhino, curves play an integral role. While dividing a curve into regular intervals is a fundamental skill, taking it a step further by dividing it into non-uniform segments is a more advanced technique that opens up a whole new range of design possibilities. In this tutorial, we’ll cover how to divide a curve into non-uniform segments in Grasshopper!
Let’s get started!
Dividing a Curve by Length with the Evaluate Length Component
Dividing a curve in Grasshopper is one of the first things we learn when starting out with Grasshopper. The curve division components are a popular way of quickly creating objects along a curve. But all default division components in Grasshopper have one thing in common:
They only allow us to create regular divisions.
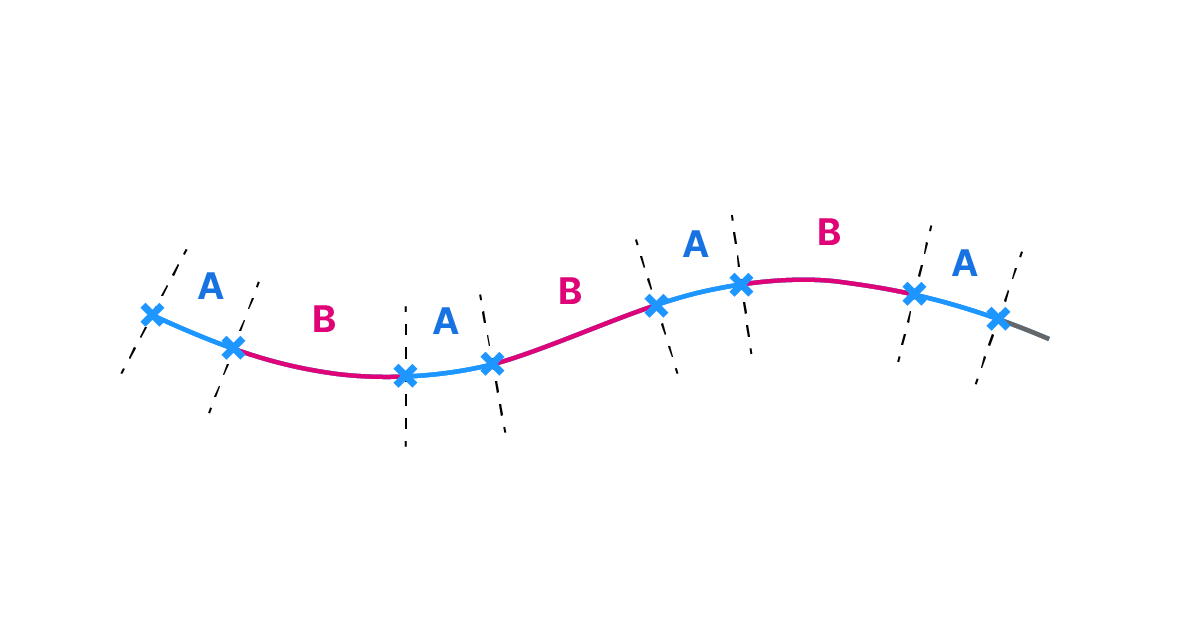
But what if we want to subdivide a curve with irregular lengths? For example two alternating lengths?
To do that, we’ll need a component called ‘Evaluate Length‘. You can find it in the ‘Curve’ component tab in the first component group, named ‘Analysis’.
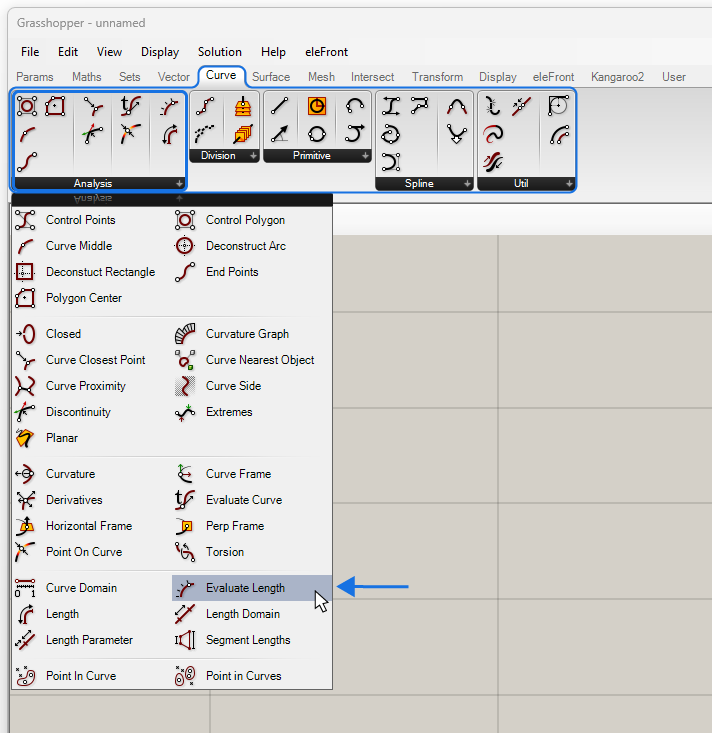
A quicker way to add it, is to double-click onto an empty spot of the canvas and typing ‘Evaluate Length’, followed by hitting ‘Enter’. The component will be added to the canvas.
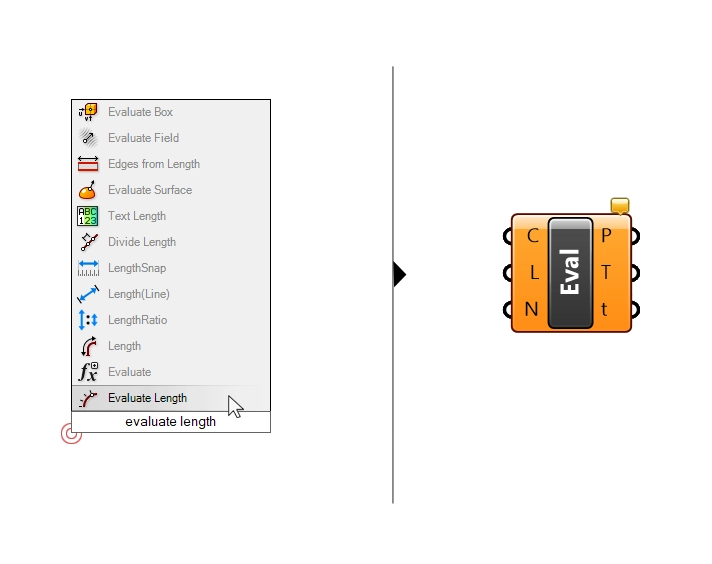
How the Evaluate Length Component Works
As the group its a part of suggests, this component is intended for analysis, in this case for evaluating points on a curve.
It is a cousin of the more basic ‘Evaluate Curve‘ component, which allows us to ‘evaluate’ (i.e. extract the tangent or create a point) along a curve by specifying a ‘Curve Parameter‘. A Curve Parameter is simply a number that Grasshopper uses to precisely describe any location on the curve.
Now, when using the Evaluate Curve component, we input a Curve Parameter and in return we get the point.
But instead of evaluating a curve with a parameter, we want to evaluate a curve with a length. That’s exactly what the Evaluate Length component allows us to do.
The component will create a point at every length we provide in the Length (L) input, measured from the start of the curve. This means that we don’t need to deal with the Curve Parameter, we directly specify the lengths.
The component is not all that straight-forward to use, so let’s learn how to use it in a script:
Example Script
The best way to learn how to divide a curve into non-uniform segments in Grasshopper with the Evaluate Length component is with an example.
Let’s say that our goal is to divide a curve into segments of two, alternating lengths. For simplicity’s sake, I’ll use the values 0.50 and 1.00. Our goal is to create the following output:

To start, I’ll create a Curve Container and reference a curve from Rhino.
Let’s also go ahead and add the Evaluate Length component, as it will be our core component.
The first step is to specify, in a list, the lengths we want our curve segments to have.
In our example we only want two different segment lengths, so let’s add two Number Sliders and give them two different values. Let’s use a ‘Merge‘ component to combine these two values in the order we want.
We will now connect this list of (two) values to the Length (L) input of the Evaluate Length component.
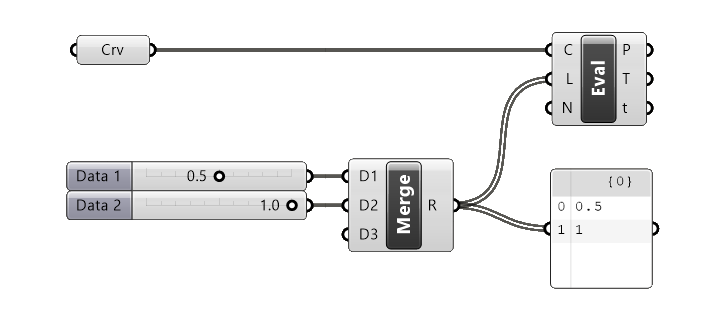
Before we continue, we also need to change the ‘Normalized (N)‘ value in the third input to ‘False’. We do that by right-clicking on the third input, going to ‘Set Boolean’ and selecting ‘False’. This is an important step! If left at the default value of ‘True’, the values we provide will be simply interpreted as curve parameters.
Only two points appear on the curve, and they aren’t even spaced according to our values!
Let’s solve this step by step. Let’s start with the spacing.
Understanding How to Evaluate by Length
The component creates two segments with a length of 0.50, instead of one of 0.50 and then one of 1.00, so what happened?

By connecting those two values, the component created a point for each of the two lengths as measured from the start of the curve. As a result, the distance between the first and second point is just 0.50 instead of 1.00.
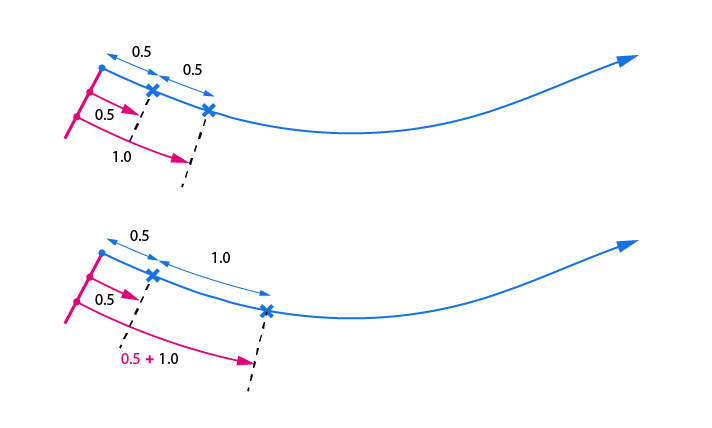
To fix that, we need to create sequential values. We need 0.50, and then 1.50, followed by 2.00. then 3.00 and so on.
Doing this manually would be way too complicated.
Luckily there is a better way.
Creating Sequential Values With the Mass Addition Component
To turn as series of repeating numbers into an increasing sequence of values, we can use the ‘Mass Addition‘ component.
Double-click on an empty spot on the canvas and type ‘Mass Addition’ to add it.
This numerical component takes a list of numbers and outputs two things: the sum of all the numbers in the list in the output ‘R‘, but also, and more importantly, every partial result of the sum in the second output ‘P‘.
This partial result is what will turn our values into a sequential list of values.
We connect the merged values to the Mass Addition component, and then the Partial Results output (P) to the Length input of the Evaluate Length component.
The second point now jumps, and we get curve segments of the lengths we defined: the first segment is 0.50 units long, and the second 1.00.
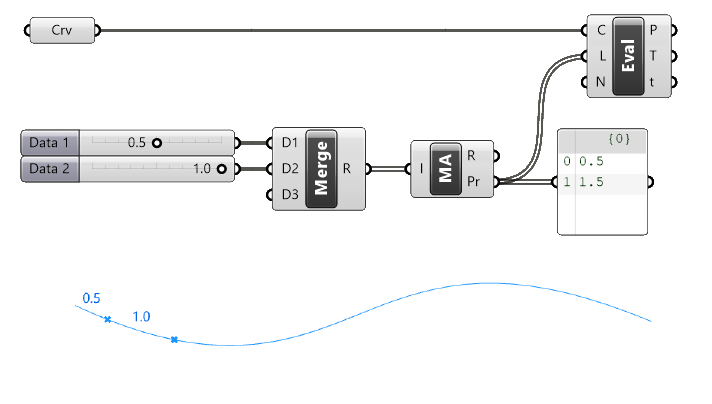
So far, so good. But we want to divide the entire curve with those two lengths, not just the first bit. All we need to do, is duplicate the values as many times as needed to reach the length of the curve.
Duplicating the Data
To segment the entire curve, we are going to duplicate our two values as many times as needed to fill the entire curve. We add a ‘Duplicate Data‘ component, connect our merged values to the ‘D‘ input (the data to duplicate), and add a Number Slider to define the number of copies in the N input.
The output is a list of our two defined values, copied the specified number of times.
Now, all that’s left to do is connect this duplicated data output to the Mass Addition component, replacing the old connection.
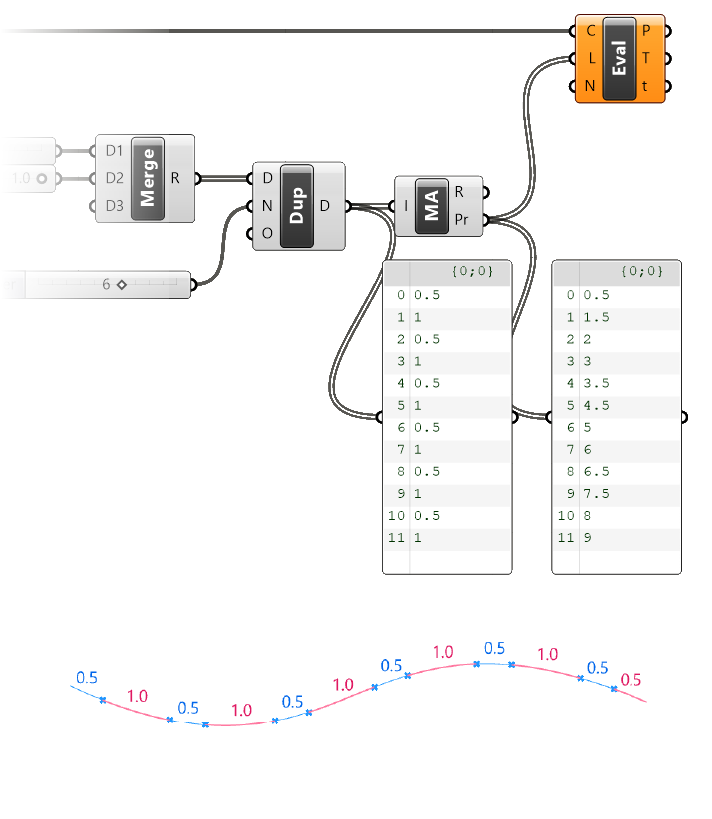
And there we have it: We created points spaced by alternating lengths along the curve.
In the example above, the Evaluate Length component has turned orange. The reason for that is that we are trying to evaluate a length that goes beyond the length of the curve. Naturally that won’t return any results.
Although the component returns a useable output even when orange, there are two possible ways to fix it:
- simply cleaning the resulting output with the ‘Clean Tree‘ component , which will remove any invalid (Null) entries in the list
- Adding a condition that will remove any numbers larger than the curve length. This could easily be done with the Cull Pattern component.
The Evaluate Length component has the same outputs as the Curve Division components, which means that we can use the Tangents (T) or Curve Parameters (t) at those points if needed. We can use the tangents to, for instance, create an array of objects perpendicular to the curve.
Concluding Thoughts
Knowing how to divide a curve into non-uniform segments in Grasshopper is a game-changer for designers seeking to introduce complexity and dynamism in their designs. The Evaluate Length component, along with Mass Addition and Duplicate Data components, proves to be an invaluable combination for achieving irregular divisions along curves.
Did you find this tutorial helpful? Want to skyrocket your Grasshopper skills? Dive into our online course, Grasshopper Pro. Master game-changing architectural methods used by the world’s leading architecture firms. This is your golden ticket to evolve from a beginner to a expert in a matter of weeks!
Happy designing!

