We’ve all encountered this problem: we have a bunch of curves and want to offset them, and while most curves offset the way we expect them to, some unexpectedly offset in the opposite direction! This can be frustrating as it seems to be completely random. Luckily it’s not, and in this article we’ll cover how to offset curves in the same direction in Grasshopper.
Let’s get to it!
Grasshopper’s Default Offset Behavior
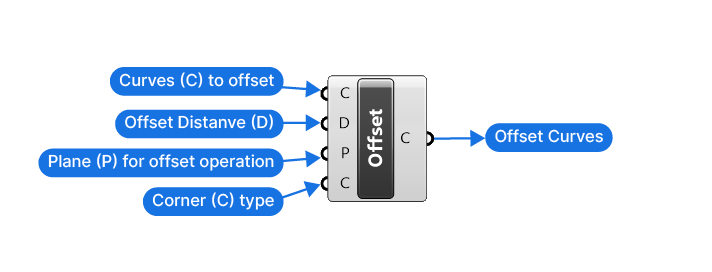
Let’s start by understanding how Grasshopper offsets curves. The Offset component has four possible inputs:
- Curve (C) – the curves(s) to offset
- Distance (D) – the offset distance
- Plane (P) – the local construction plane for the offset operation
- Corners (C) – the type of corner to use for sharp corners
The Offset component works exclusively on planar surfaces, which are essentially flat surfaces.
Now here’s the tricky part: The offset direction will differ depending on whether we provide a Plane (P) input, or not.
Let’s go through both scenarios:
The Offset Direction of Curves if no Plane Input is Provided
If we provide a Curve (C) and Distance (D) input, but no Plane (P) input, Grasshopper will do the following to generate the offset curve:
First, it will fit a plane through the controlpoints of the curve, in order to determine the plane for the offset operation. No matter how the curve to be offset is oriented in space, as long as it is flat, Grasshopper will find the correct offset plane.
Here is the more important part:
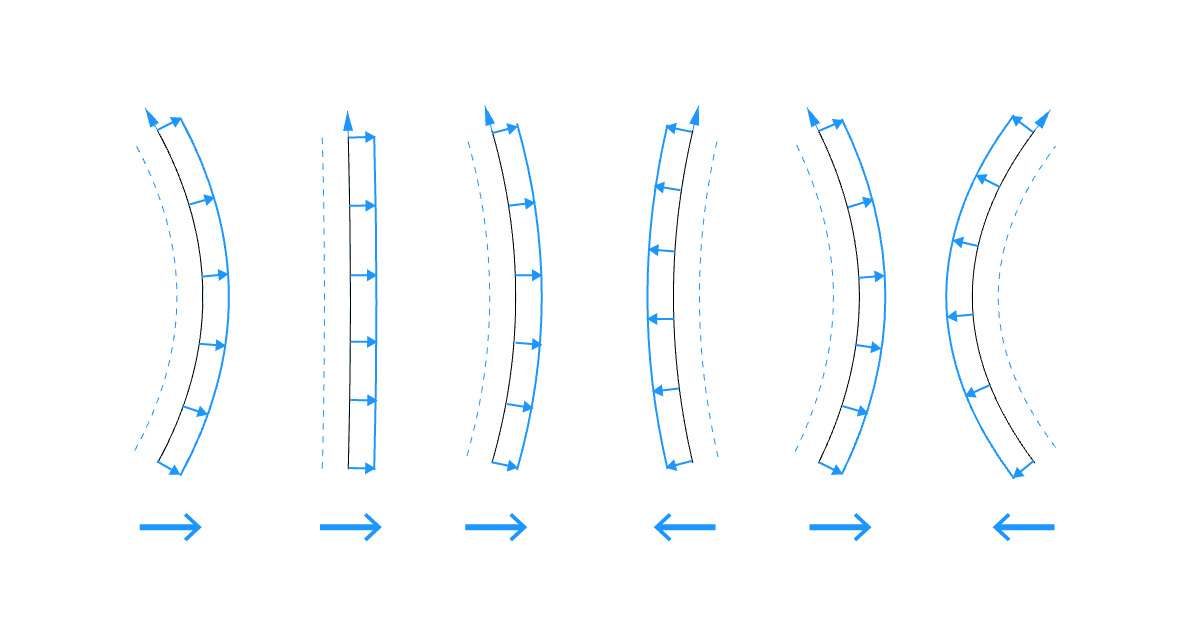
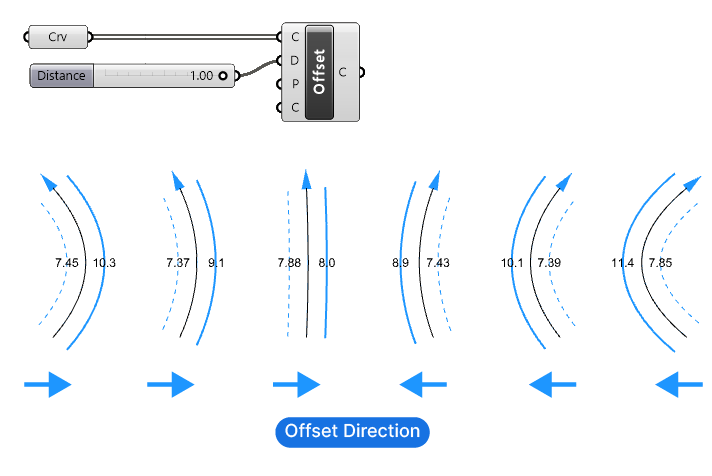
Grasshopper will offset the curve to the side that results in a longer offset curve. This happens regardless of the curve direction!
This is best shown with an example. Below I’m offsetting curves that are bending from one side to the other. Notice how as soon as the bend changes, the offset direction does too. In dashed lines I’m showing the other possible offset curves, which are shorter.
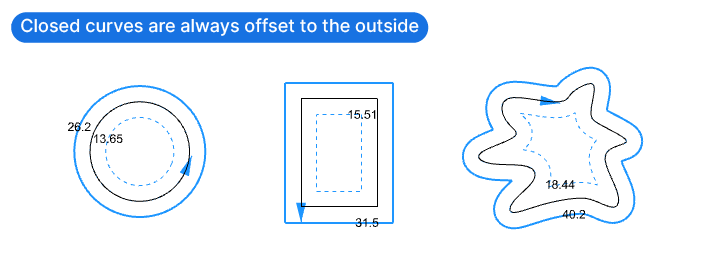
This behavior also means that any closed curves, will always be offset to outside, as the outside offset will always be the longer curve.
But what if we have curves that bend in different directions and we still want to offset them to the same direction? In that case we have to specify the plane for the offset operation.
Let’s see how that changes the offset behavior next!
The Offset Direction of Curves With a Plane Input
If we provide a Plane (P) input to the Offset component, Grasshopper will no longer pick the side with the longer offset. Instead, the direction will be determined by a combination of the Plane and the Curve Direction.
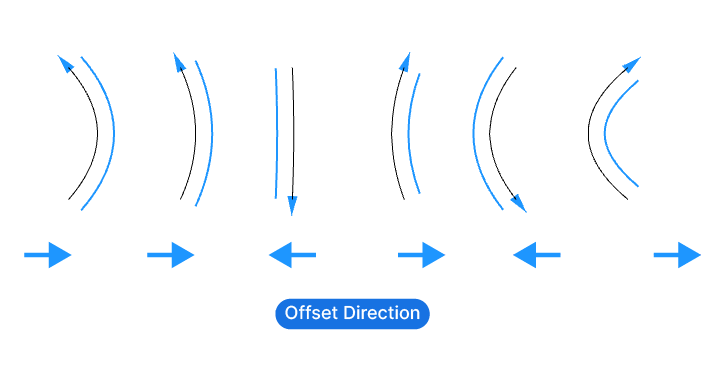
Let’s take the same example of the bent curves. If we specify a plane for the offset operation, in this case simply the XY-Plane (the ground plane), the curves are now all offset to the same side. To ensure this is the case, we have to ensure that all the curves are facing in the same direction.

As soon as some curves are flipped, the offset direction changes. Once we provide a Plane (P) input to the Offset component, the Curve Direction directly influences the offset direction.
If you created the curves parametrically, they should already face in the same direction.
If you are referencing the curves from Rhino, make sure they all face in the same direction. To check a curve’s direction in Rhino, enter ‘Dir’ into the command line and press Enter.
Arrows will then appear on the selected curves, displaying the curve direction. To change the direction, simply click on the curve to flip it. Alternatively, use the ‘Flip Curve’ command in Rhino.

How to Offset Curves in the Same Direction in Grasshopper – A Summary
In summary, the behavior of the Offset component varies depending on whether we connect a Plane for the offset operation or not. No plane means that the curves will be offset to their longer side. If we provide a Plane input, a consistent orientation of the curves will ensure the curves will be offset to the same direction.
If you are an architect looking to learn Grasshopper, and you want a clear and structured learning resource, check out my Grasshopper for Architects training: Grasshopper Pro. It’s a comprehensive online course where I share everything I’ve learned in over 10 years of using Grasshopper in a professional practice.
Happy designing!