If you’ve spent any time learning Grasshopper, you’ve encountered the term ‘Reparametrize’. Especially for someone just starting out with visual programming and Grasshopper, this concept can be confusing. But it holds the key to precisely describing locations on curves and surfaces in Grasshopper.
In short, reparametrizing a curve or surface in Grasshopper, means resetting their parameters to a range of 0.00 to 1.00.
By the end of this 5-minute read, you’ll know exactly what reparameterization is, and how to leverage it to have more control over your designs in Grasshopper!
Curve and Surface Parameters
To fully understand what Re–parametrization means, we have to start with what parametrization means!
Parameterization is Grasshopper’s (and Rhino’s) way of describing a specific point location on a curve or surface. This location is described with a simple number.
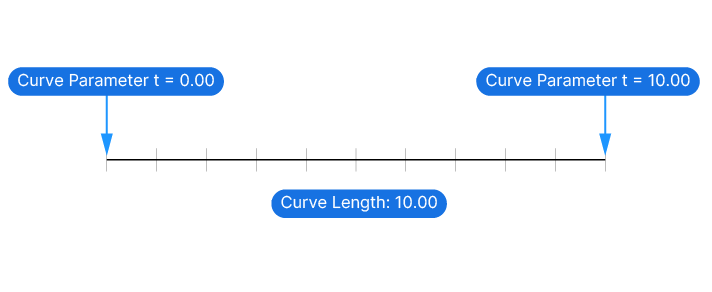
Without boring you with the math behind it all, in practical terms, this means that the start of the curve has the parameter ‘0’, and the end of the curve a parameter that equals the length of the curve.
Now knowing this, we can infer the following:
If we have a simple line with a length of 10 units, at 3/4 of the length of the curve, the curve parameter would be 7.50.
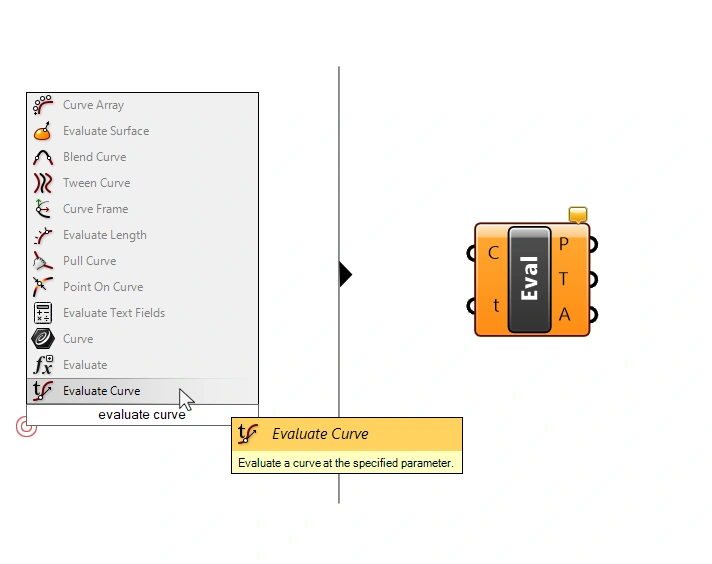
We can verify this with the help of the Evaluate Curve (EvalCrv) component, which allows us to extract this point on the curve, together with additional information, such as the tangent vector at the location on the curve.
You can add the Evaluate Curve component to your script by double-clicking anywhere on the Grasshopper canvas and typing ‘evaluate curve’. Pick the ‘Evaluate Curve’ component from the list to add it to your script.
We connect the curve to the Curve (C) to evaluate input, and add a Number Slider with a value of 7.50 to the Parameter (t) input.
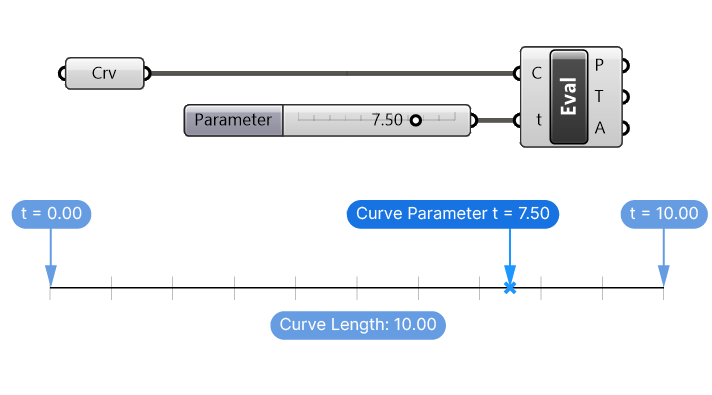
And indeed, the output is a point at exactly 3/4 of the curve.
But here it gets tricky. This will not always be the case.
The Difference Between Uniform and Non-uniform Parametrization
In the example above, we are dealing with a simple, straight line. Which is why Grasshopper performs what’s called a Uniform Parameterization. In other words, the curve parameters are linearly distributed along the curve. Consequently the curve parameter exactly matches the length of the curve up to that point.
But at the core of Rhino’s modelling power is the NURBS mathematical model, which stands for Non-Uniform–Rational-B-Spline. Now what does a non-uniform parameterization look like?
When creating a NURBS curve in Rhino, we pick the controlpoints, and the NURBS model creates the beautiful, smooth curve behind the scenes. The flexibility and ‘shapability’ of the curve comes from the fact that we can influence its curvature by placing the controlpoints close together, or further apart.
This influences not only the resulting curve shape, but also the curve’s parametrization.
The curve parameters are no longer linearly distributed along the curve. The curve parameters are still 0 at the start of the curve and equal the length of the curve at the end. What changes is the distribution of the curve parameters in-between.
Instead of being linearly distributed, the curve parameter values are now distorted with the curve. Visually speaking, the parameters “speed up” when the controlpoints are further apart and slow down as controlpoints are closer together.
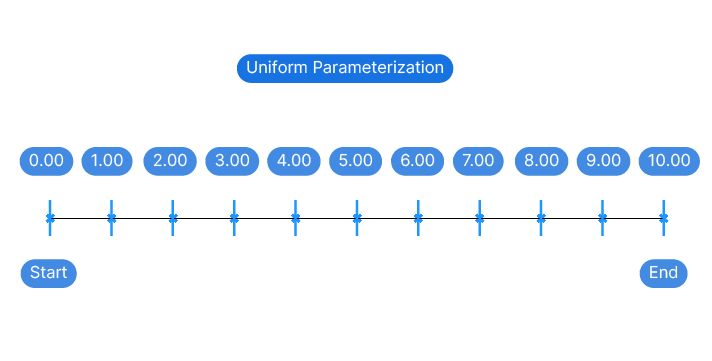
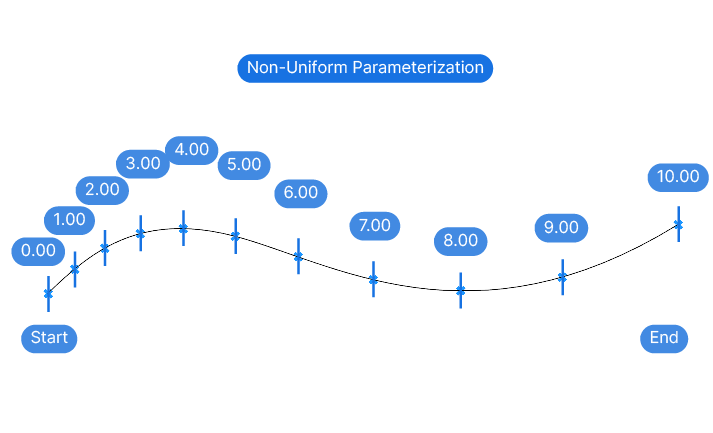
Below I visualized the curve parameters to illustrate the behavior of non-uniform parametrization. The curve has a length of 10 units. Even though the parameters are equidistant (increments of 1.00), the points are distributed unevenly along the curve.
As we’ve seen, curve parameters are closely linked to the shape of the curve and the mathematical model behind it.
But how does Re-parametrization fit into the picture?
Reparametrizing Parameters in Grasshopper
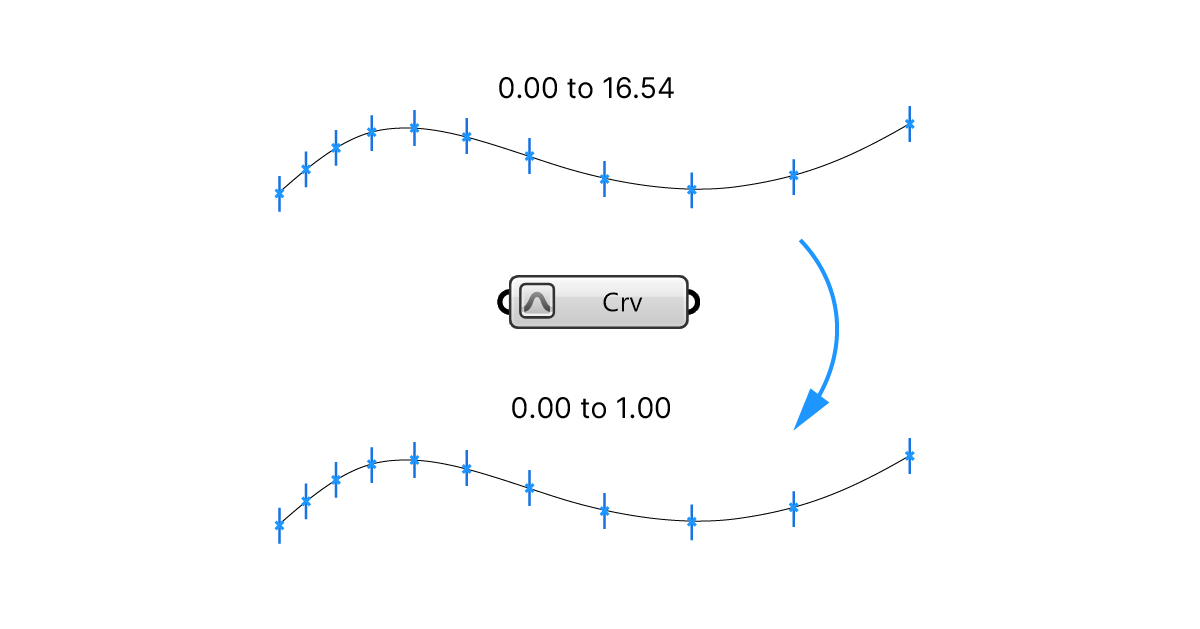
Re-parametrizing is the process of changing the curve parameter range to the values 0.00 to 1.00.
Now why do that?
In the first example, we used a straight line with a length of 10 units. The resulting curve parameters ranged from 0 at the beginning to 10.00 at the end.
In the second example, we used a curve. It’s harder to control the exact length of a NURBS curve, so the curve parameters started at 0 but may end with an arbitrary number like 13.60.
And here we start to see the problem: the domain or start-and end value of the curve parameters can be hard to keep track of. This makes evaluating points complicated and confusing.
To make matters worse, once we trim a curve, the remaining portion of the curve still retains the original curve parameters! That means that the curve parameter may no longer start at 0!
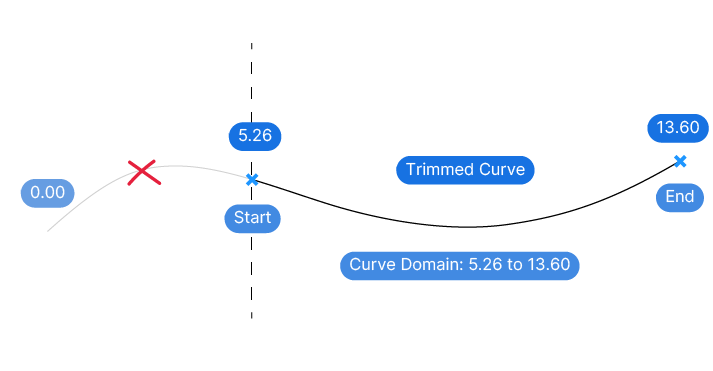
Once curve parameters range from 5.26 to 13.60, understanding where the point is located by looking at the numbers becomes impossible.
That’s exactly why we can reparametrize in Grasshopper.
How to Reparametrize a Curve in Grasshopper
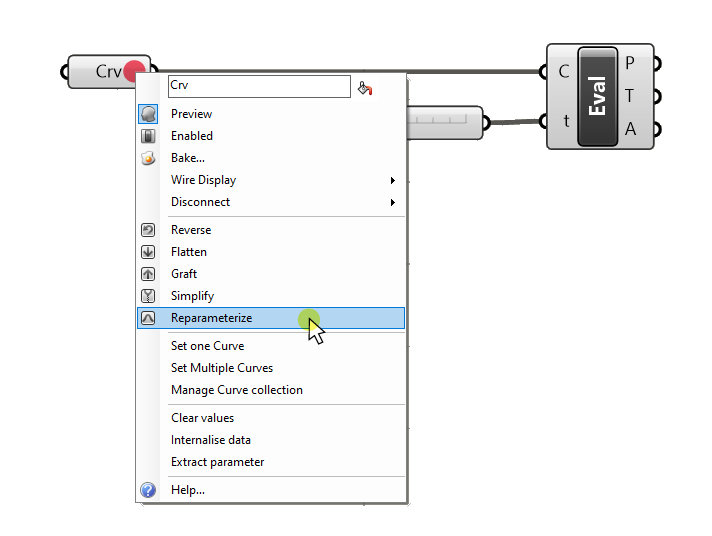
By right-clicking on any Curve or Surface input of a component, and selecting ‘Reparametrize’, Grasshopper will reset the curve parameters of that curve to range from 0 to 1.00.
Regardless whether we trimmed, scaled, or otherwise transformed that curve, we can now say with certainty that a curve parameter of 0 describes the start of the curve, and a curve parameter of 1.00, its end.
Much easier, right?
Once we reparametrized the curve, we can evaluate any point along that curve with a Number Slider set to a range of 0 to 1.00!
The length of the curve or the original curve domain don’t matter anymore – they’ve been reset.
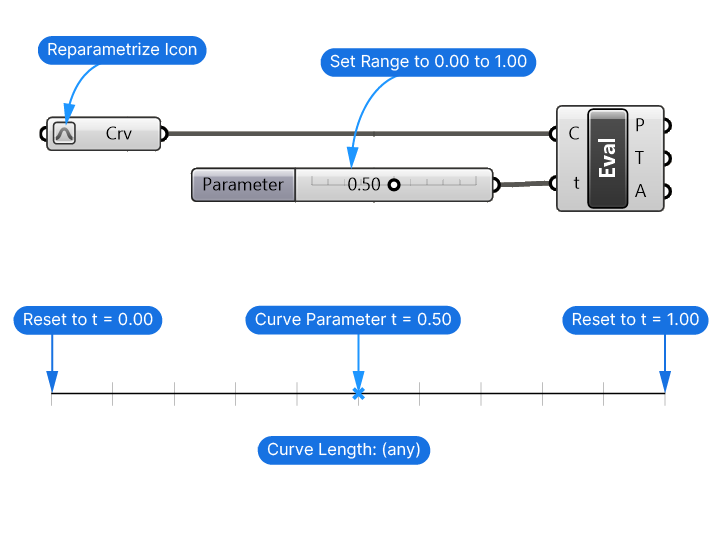
Tip: The evaluation parameters and the curve domain must always match. If the evaluation parameter falls outside the curve domain, Grasshopper will throw an error.
Reparametrizing a Surface in Grasshopper
It’s quite straight-forward how curve parameters work on a curve, a number describes the position on the curve. But how do they work on a surface?
No matter how a curve is bent in 3D space, its curve parameters are effectively a 1-dimensional property, their value lives in the linear space of the curve. That’s why we can use a single number to precisely describe a point along it.
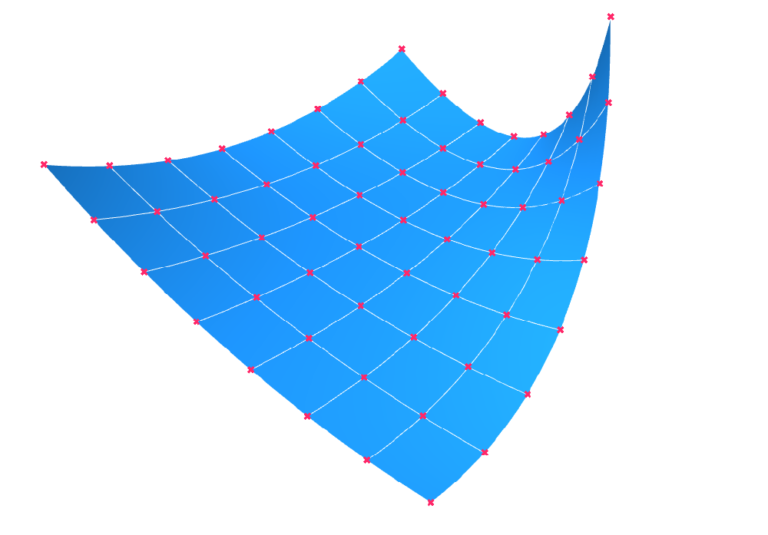
And while Surfaces in Rhino can take on a 3-dimensional shape, in essence they are 2-dimensional objects. As such, one number is no longer enough to describe a position on the surface, we need two:
- A parameter to describe the position along the U-direction of the surface
- A parameter to describe the position along the V-direction of the surface.
To successfully describe a position on a surface, we therefore need to use this pair of numbers, which are called the uv-parameters of a surface.
We can create a uv parameter by using the Construct Point (Pt) component and specifying an x and y- coordinate value. The Evaluate Surface (EvalSrf) component is used to extract information about the surface at those coordinates. For example a point, the surface normal, or the surface frame.
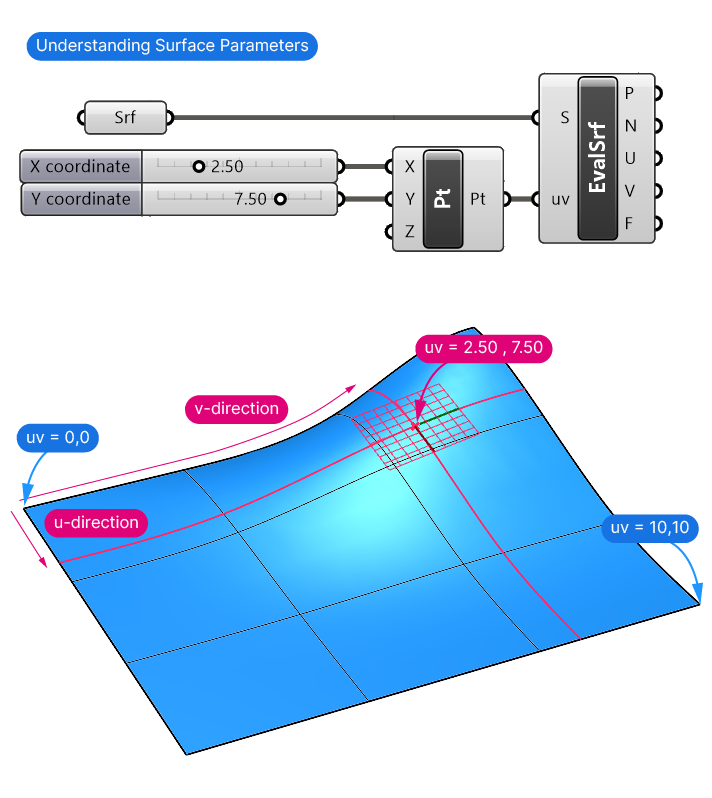
Like with curves, start and end u-and-v values are created automatically. But once again, these numbers can quickly become hard to interpret.
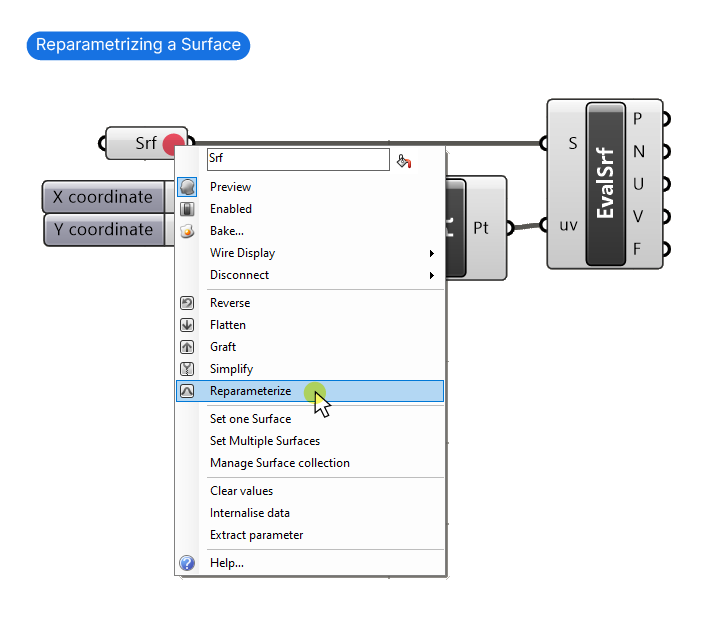
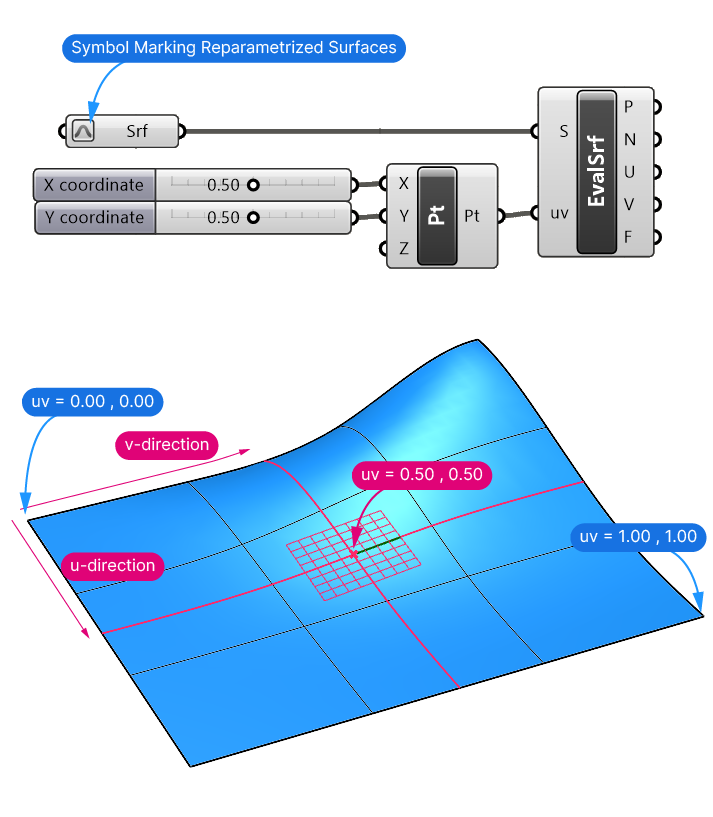
When reparametrizing a surface, the domain of both u-and-v parameters are reset to range from 0 to 1.00.
Right-click on the surface component and select ‘Reparameterize‘.
Evaluating a surface with uv-parameters of 0.5, 0.5, will then predictably create a point in the central area of the surface.
Tip: Use a Multidimensional Slider (MD Slider) to quickly create a uv-parameter with a single component.
Concluding Thoughts on Reparameterization in Grasshopper
Understanding what it means to Reparametrize a curve or surface in Grasshopper can be a lot to take in at first, but I hope this article shed some light what it is and how to apply it.
In a way it’s Grasshopper extending a helping hand – making it a bit easier for us to understand what the evaluation parameters mean. By adjusting parameters to a standard range, Grasshopper helps us focus more on creativity and less on the complexity of the underlying calculations.
Happy designing!