Picture this: You are eager to start your architectural design project, but you open the site files and all they contain are a cloud of points. When faced with a large and unordered set of points, traditional 3D modeling methods may not be up to the task. This is where Grasshopper shines by offering an efficient and precise solution for creating a mesh from points.
In this article, we will explore a technique called Delaunay triangulation, which allows us to create a mesh from a set of points. This mesh is not only lightweight but also accurately represents the surface through the points provided. The Delaunay Mesh component in Grasshopper is central to this process, and we will guide you through its usage step by step.
By the end of this article, you will have gained actionable insights into creating detailed and optimized meshes in Grasshopper. Let’s dive in and unlock the potential of this powerful technique.
Let’s dive in!
Delaunay Triangulation: The Secret to Creating a Mesh From Points in Grasshopper
Grasshoppers offers ways to create a surface from points, but the result will just be an approximation and often result in a very heavy, slow file. If we are dealing with a large number or unordered points, and we want to make sure we are accurately representing each point in our dataset, we need to use a different data type: a Mesh.
Meshes are based on a different 3D modelling philosophy than surfaces and Breps, one that approximates complex geometries by creating small ‘facets’ each connecting three or four points. While its not as precise as Nurbs-based geometry, it is much more light-weight and can easily handle thousands of points.
But how can we generate these facets given a set of random points?
This is where the Delauney Triangulation comes in.
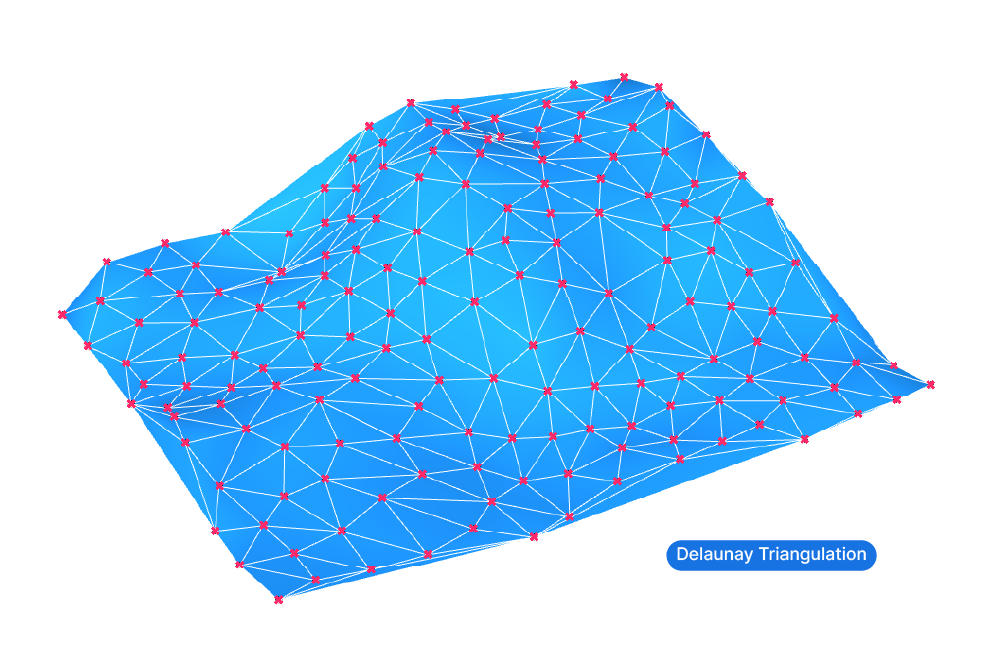
Think of Delaunay (pronounced “Deh-loh-nay”) triangulation as a smart connect-the-dots game. You have a bunch of points, and you want to link them with lines to make triangles. Delaunay triangulation algorithm does this in a way so that the resulting triangles are as even as possible, without any super skinny ones.
Delaunay triangulation is widely used in various fields such as computer graphics and geographic information systems (GIS), as it efficiently creates a well-distributed triangular mesh that can be used for surface approximation and terrain modeling.
Why Choose Delaunay Triangulation?
Compared to other ways of turning points into a surface, the Delaunay Triangulation has three main advantages:
- The Delaunay Mesh component is extremely fast, it can easily process thousands of points.
- The output is a very light mesh, much lighter than a complex NURBS surface would be.
- The resulting mesh will precisely run through each point in the collection.
Luckily, we don’t have to write the Delaunay algorithm ourselves, as Grasshopper comes with a Delaunay Triangulation component!
Let’s learn how to use the Delaunay component step-by-step:
Step-by-Step Guide: How to use the Delaunay Mesh component
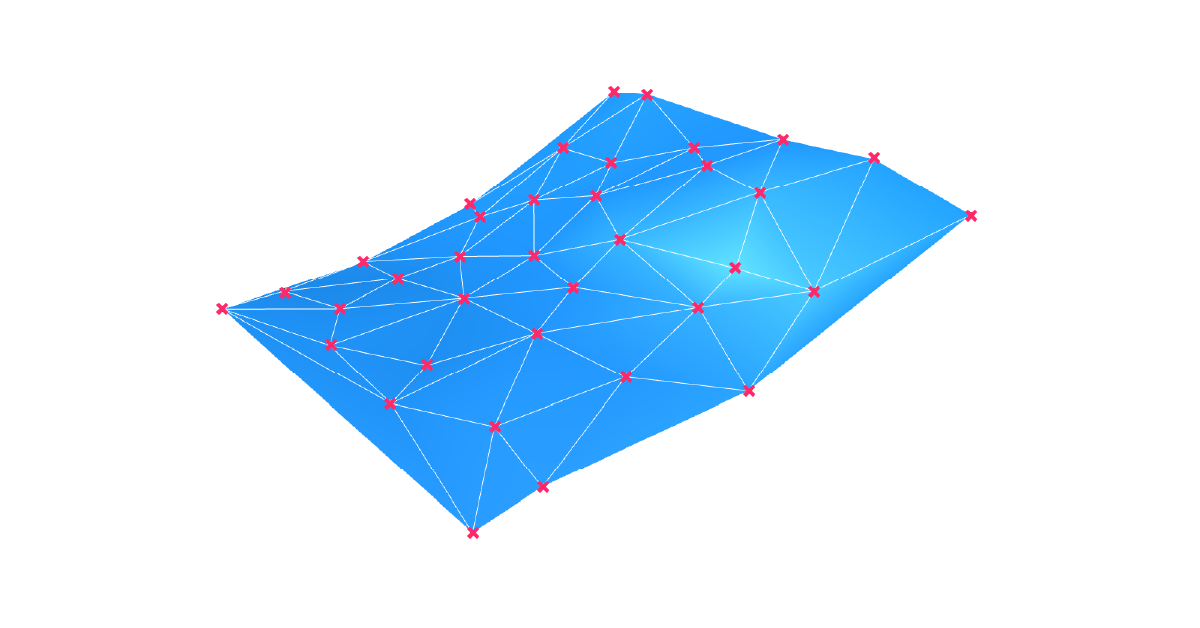
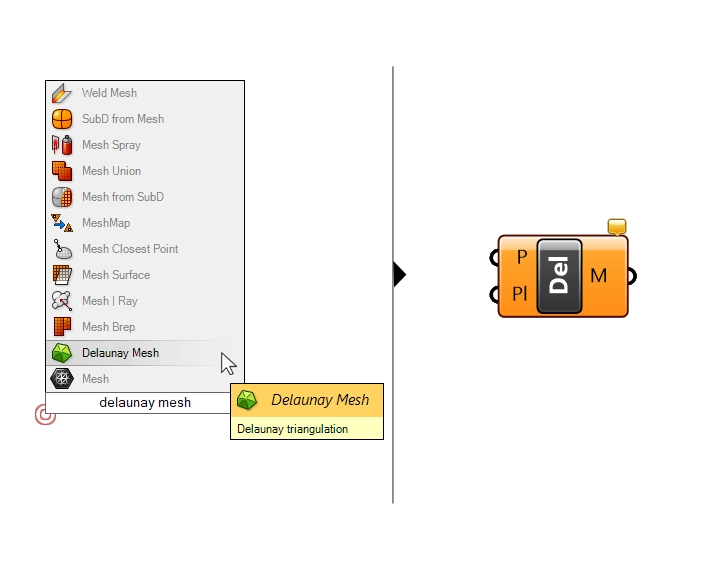
To create a triangulated mesh from points in Grasshopper, we are going to need a component called ‘Delaunay Mesh‘. Add it to the canvas by double-clicking and typing its name into the component search bar. Click on ‘Delaunay Mesh’ to add it to the Grasshopper canvas.
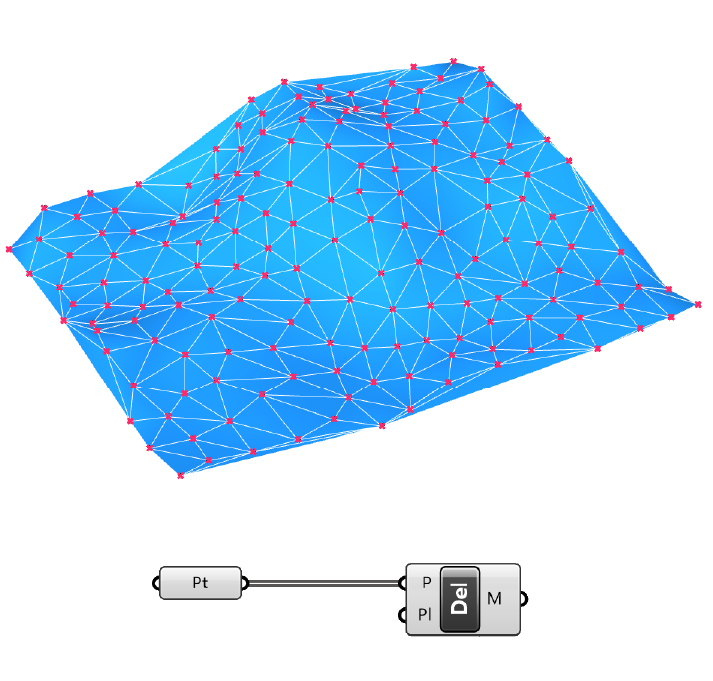
The component is very straightforward: all we need to do is provide a list of points as input. The points can be in a completely random order. The component will use the triangulation algorithm to determine adjacent points and connect three points each with a mesh triangle – the result is a continuous, triangulated mesh.
Cleaning Up Your Mesh: Handling the Perimeters
How clean the resulting mesh will be largely depends on the input points. Relatively uniform point spacing will lead to a mesh with triangles that have a more uniform size, resulting in a cleaner mesh.
While the Delaunay algorithm works well for points that are surrounded by other points, the perimeters of the resulting mesh will usually be less clean. As the points become less frequent towards the perimeter of the collection, the triangles will become more and more distorted.
The simplest way to get to a cleaner terrain mesh is to simply trim the mesh and only keep a certain part of the mesh.
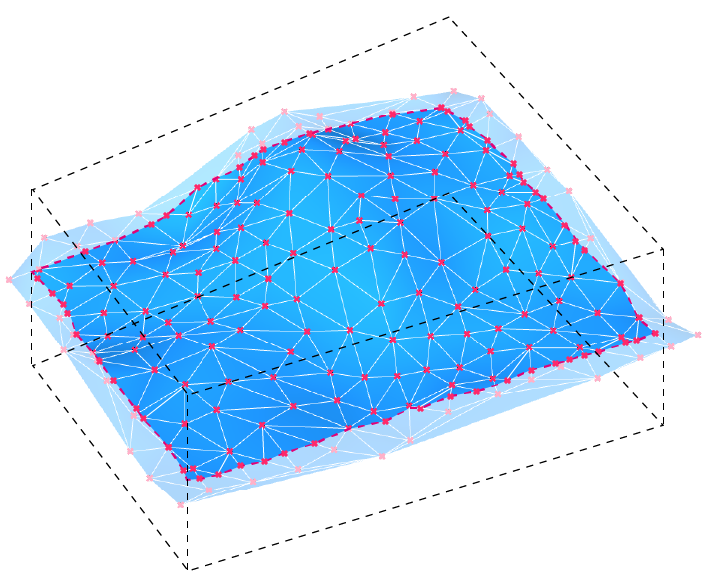
To do so, start by baking the mesh to Rhino. Next, simply draw an outline in the top view, extrude it so it intersects with the mesh, and then run the MeshSplit command in Rhino. Finally select and delete the unclean parts of the mesh.
How to Turn Contour Lines Into a Mesh in Grasshopper
In architectural practice, besides terrain points, we are often provided with site files in the form of terrain contour lines. Since contour lines tend to be irregular, lofting them is not an option. Instead we can use the same Delaunay Mesh technique, but with a twist.
The trick is to turn the contour lines into a set of points that we can the triangulate.
By using a Divide Length component, we can generate points at regular intervals along the contour lines. Pick a distance that meets the precision needs for your model. For reference, pick a division distance that matches the contour line height interval. If the contour lines exist at a vertical interval of 1 unit for example, a division length of 1 unit will create a relatively uniform mesh.
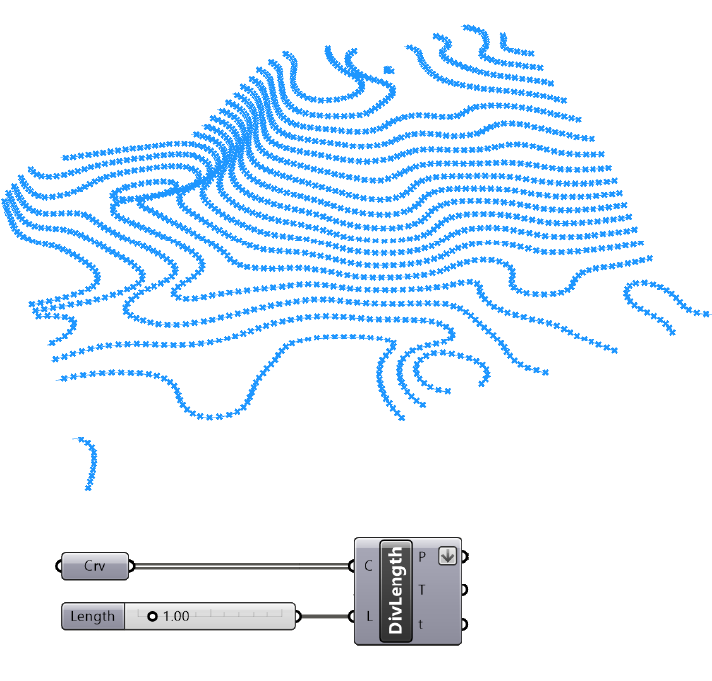
Before you continue, make sure to flatten the output of the Divide Length component. You can do so by right-clicking on the Points (P) output and selecting ‘Flatten’ in the menu. This will ensure that all resulting points will be processed together, instead of contour line by contour line.
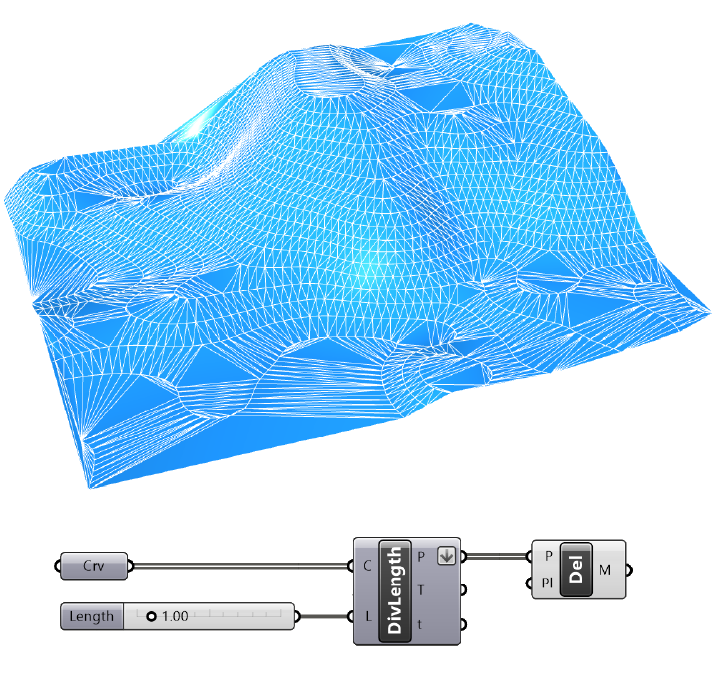
Then use the ‘Delaunay Mesh‘ component to generate the mesh from the points.
As you can see below, areas with a lower sample point density of the terrain, like planar areas, are not covered in as much detail as the rest. This is most evident towards the edges.
Final touches: Converting a Mesh Into a Polysurface
When it comes to turning contours into a mesh in Grasshopper, consider what you want to use the resulting topography for.
Will it just be used to create a context model and won’t need to be touched after creating it? In that case a triangulated mesh will keep your Rhino file light.
Will it be part of the design and will you need to modify it? Then converting the mesh into a polysurface might be the most useful option.
Keep in mind that complex meshes with many mesh faces will turn into very computation-heavy polysurfaces. Be specific about the area of the terrain you need to modify. I recommend trimming the mesh to only include the area you need to work on before converting it.
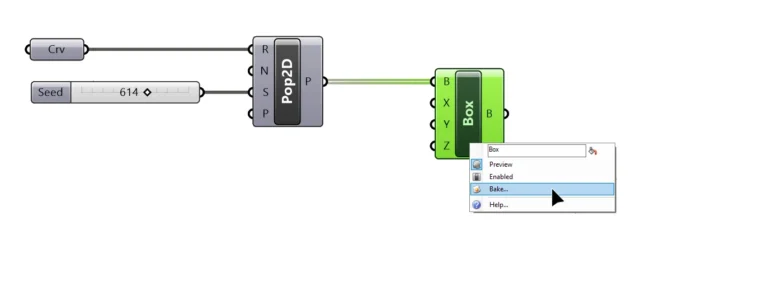
To turn the mesh into a polysurface, first bake the mesh to the Rhino file.
You can bake it quickly by selecting the Delauney Mesh component and hitting ‘Insert‘ on your keyboard.
Then look for the ‘Convert to NURBS‘ command in the main toolbar. Make sure to right-click on the command.
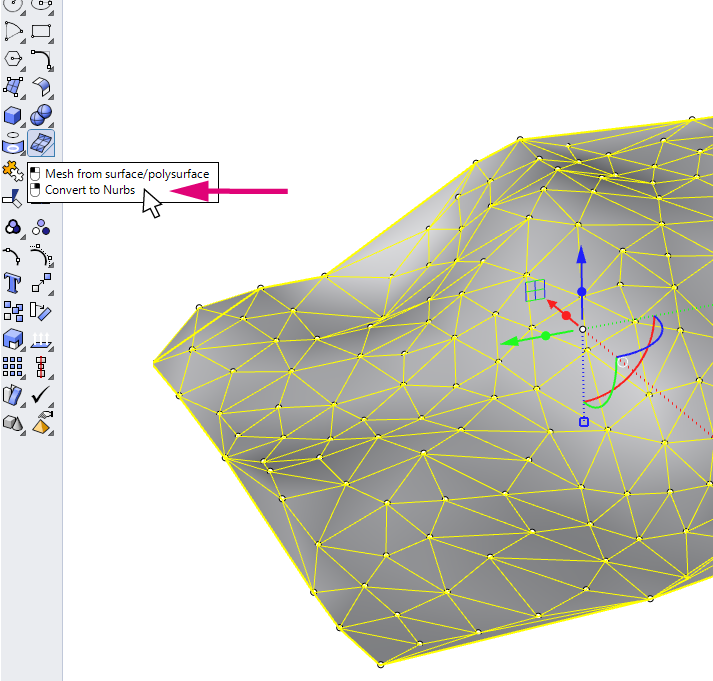
By default the command will not delete the source mesh, so make sure to delete or hide it to keep your file clean!
You will get a polysurface that you can then extrude to create a solid. That way you can use it for Boolean Operations as you model the terrain.
Concluding Thoughts: The Power of Mesh From Points in Grasshopper
In conclusion, mastering the creation of a mesh from points in Grasshopper is an invaluable skill, especially for architects and designers working with terrain models. Through the Delaunay triangulation technique, we can efficiently turn a scattered set of points into a neat and lightweight mesh. This mesh can then be refined and converted into a more solid form if needed.
The Delaunay Mesh component in Grasshopper makes this process remarkably simple and fast. As we have seen, the key is understanding how to work with the points and how to fine-tune the mesh for the specific requirements of your project. With this knowledge in hand, you are well-equipped to tackle complex terrain modeling challenges and bring your creative visions to life.
If you are new to Grasshopper and you would like to fast-track your way to Grasshopper mastery, check out our online course: Grasshopper Pro – Grasshopper for professional architectural practice.
Happy designing!