Diving into the world of Grasshopper, there’s no escaping the significance of mathematical operations when scripting and creating designs. Among the many components available, the expression editor in Grasshopper stands out as a unique, powerful, and versatile component. It simplifies complex tasks, reduces clutter, and elevates your parametric designs. In this beginner’s guide, we’ll demystify the expression editor, showing you its core functionalities with real-world application examples.
By the end, you’ll be able to incorporate it seamlessly into your scripts.
So, let’s jump right in!

Adding the Expression Component to Your Script
You can find it in the ‘Maths‘ component tab, in the ‘Script‘ group. Select it and click anywhere on the canvas to add it to your script.
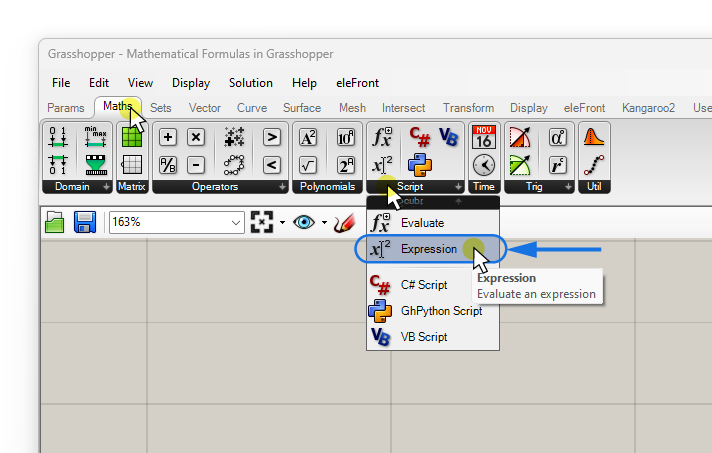
If you prefer to use the component search bar, simply double-click on the canvas where you want the component to be placed, and type “expression”. Click on the first result to add the component.
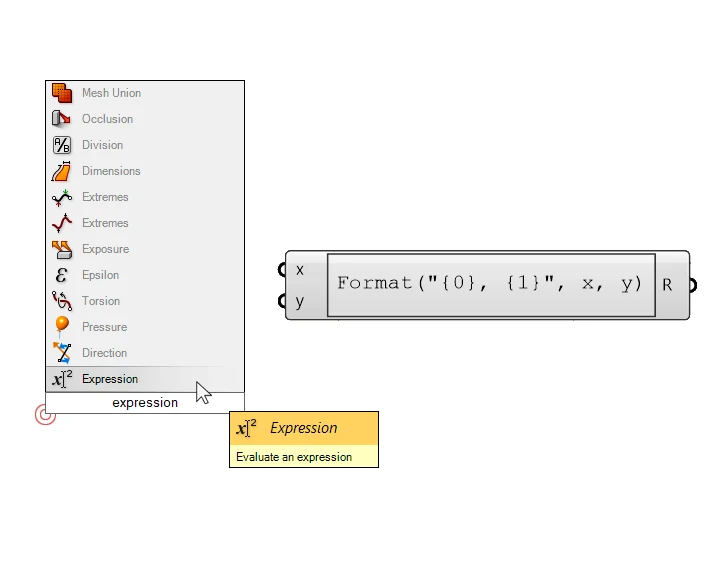
Don’t be deterred by the notation that appears in the component’s center; it’s merely a template we’ll replace with our own formula shortly!
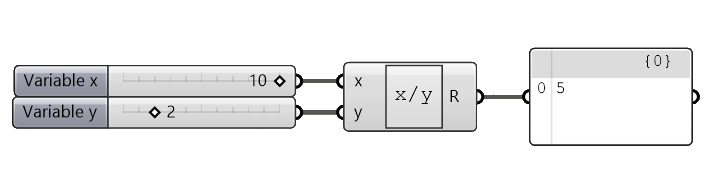
First let’s look at the anatomy of the component: we have simple x and y inputs, which will be numbers, and one resulting number output (R).
The area in the middle is different from other components in that it’s not a static label, but the live-representation of the formula that’s being calculated!
Tip: Although there are dedicated mathematical components for simple operations in Grasshopper, I recommend to always use the expression editor. Instead of using ten different components, we can use one that can do everything. We can easily type and modify any formula, we see the formula directly, and that we can do multiple operations in a single component.
To add your own formula, simply double-click into this central area of the component. A new window will open: the Expression Editor.
Entering a Formula in the Expression Editor
After double-clicking on the central formula area, we are presented with an advanced expression editor window. In here, we can define any mathematical formula we need.
We are presented with functions, constants, and operators that we can use to write our formula. Now keep in mind that these are just there as an aid, we don’t have to use these commands. For architectural design applications, while we’ll rarely venture beyond basic algebra, when we do, all the necessary tools are right here!
By default the expression editor comes with a formatting template (which we’ll get to later in this guide) but for now let’s simply replace it with a simple formula.
x / yTo apply the changes, confirm with ‘OK’ on the bottom right.
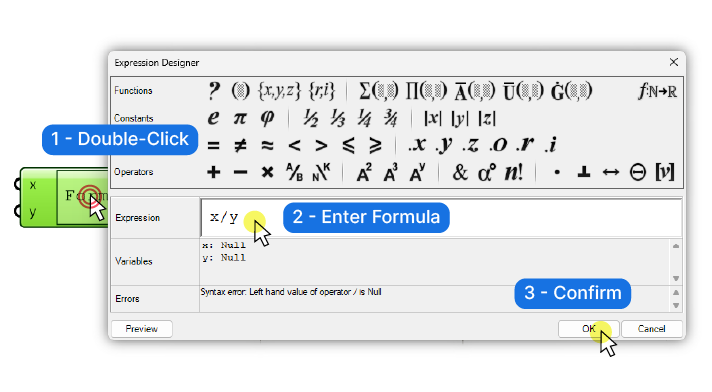
If we haven’t linked numbers to the x and y inputs, the component will turn red upon confirmation, indicating missing values.
Below is a simple setup, to show what the expression editor might look like in action:
Adding More Inputs
The expression editor offers all these functions and operators, it would be silly if we can only apply them to two input variables (x and y)! Luckily we can add and remove input variables easily:
If we zoom in close to the inputs of the expression component (really zoom in close, see the image below for reference) , small plus and minus signs appear (you’ll get a tooltip with a countdown the first time you do it).
By clicking the plus and minus symbols, we can add or remove inputs. These inputs will be the variables we can use in our formula.
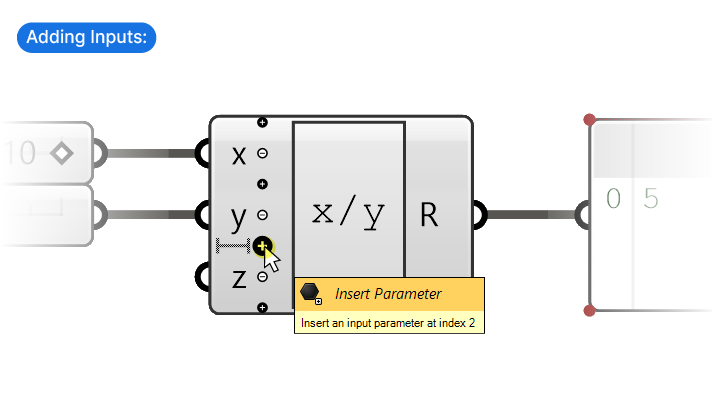
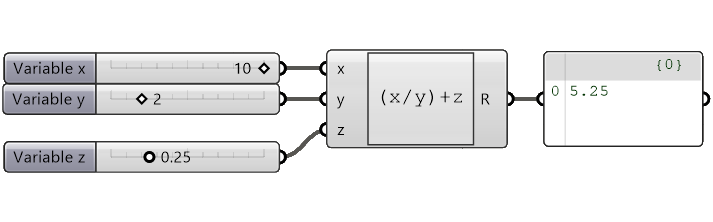
Grasshopper will assign letters, like ‘z’ in this instance, to the new inputs. The more variables our formula contains, the more important it becomes to make sure we know what each variable represents! That’s why it’s a good idea to give the variables descriptive names.
Changing the Input Variable Names
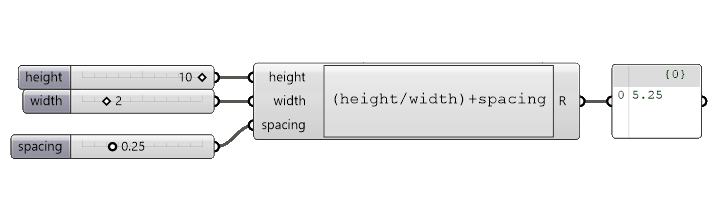
We can give the inputs any name we want provided we use the same name in our formula as well.
To change the name of a variable, right-click on the input and type the desired name into the text field at the top.
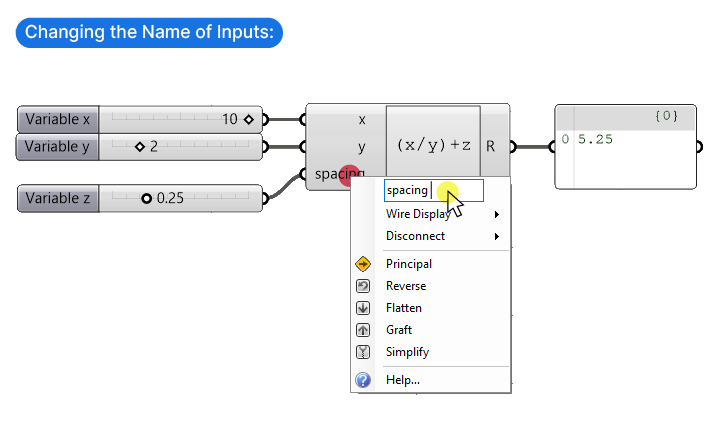
Important: Make sure to update the name in the actual formula as well, or the component won’t find the variables to use!
Advanced Uses:
The expression editor is not limited to just numbers, it can also:
- process vectors
- concatenate text
- format numbers
- round numbers
- use advanced functions, like trigonometric functions
Let’s see an example for each of these use cases:
Vectors in the Expression Editor
Vectors are described with three numerical values, their x,y,-and z coordinates. For that reason the Expression component can easily handle them and apply formula. Here are some possible uses cases:
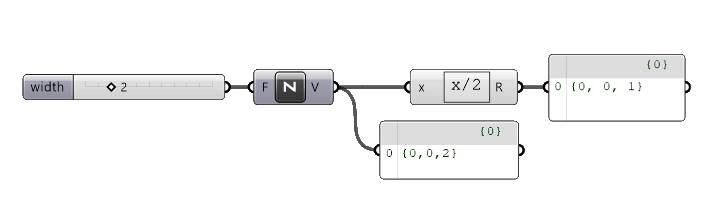
The most common application is to use simple math operations to modify the length of a vector. If we multiple a vector input with a number, the length or ‘amplitude’ of the vector will be multiplied. In the example below the expression:
x/2…changes a vector from a length of 2 to a length of 1, for example to extrude an object to half the vectors length.
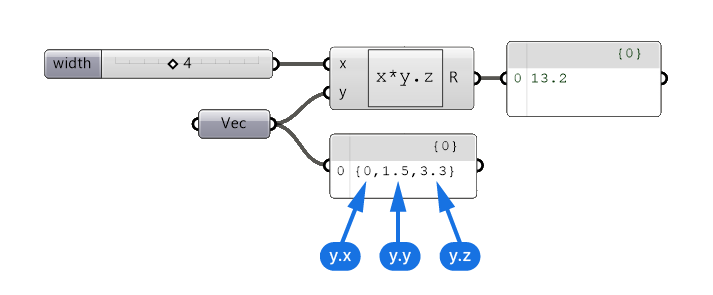
In the example below we multiply a number with one of the coordinates of a vector. To access a specific coordinate value of a vector in the Expression Editor, type the variable name (defined by the input name), followed by a dot (‘.’) and the coordinate you wish to extract (‘x’, ‘y’, or ‘z’). To just use the ‘z’ coordinate value of an input vector, we can use:
y.zThe number 4 will be multiplied by the vector’s z-coordinate value 3.3, resulting in 13.2.
How to Join Text Strings with the Expression Component
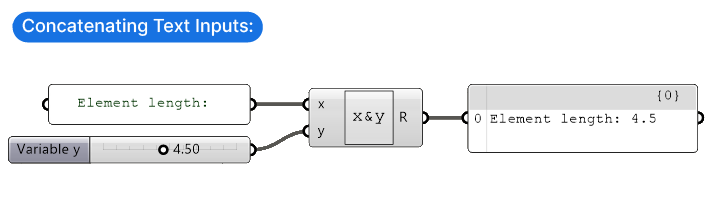
The Expression Editor also allows us to join together different pieces of text, called ‘strings’. To do that, use the ‘&’ sign between variables in the formula. In the example below, a text string is joined with a number. This could be useful when creating parametric tags for your model.
There is a dedicated component that does the same thing, called ‘Concatenate’ – feel free to use whichever one you feel more comfortable with! The advantage of doing it in the expression editor, is that you can apply formulas to any of the inputs.
How to Format Numbers with the Expression Component
Remember the default expression that shows up when you add the Expression component?
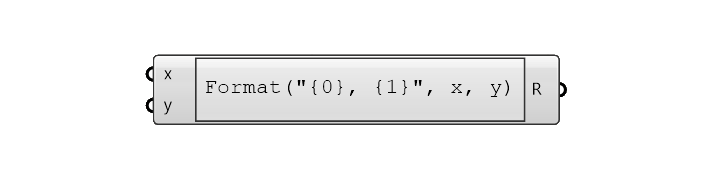
It’s a code that allows you to format a number, more specifically, it allows you to define the number of digits you want to number to have – effectively rounding it. In addition you can add descriptive text right in the expression editor, for example units. This comes in handy when displaying tags in your parametric design.
Let see an example:
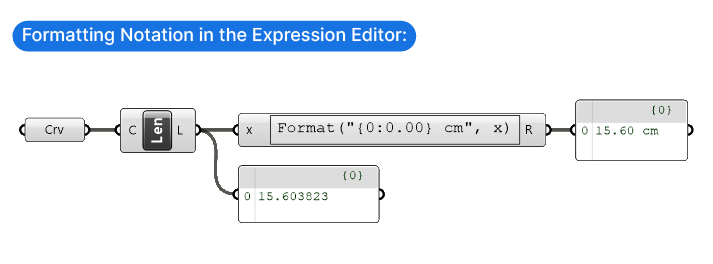
Let’s say we created a series of curves parametrically and we want to display their length in the viewport with a Tag. If we get the curve’s length with the Length (Len) component, we get a floating point number with many digits after the comma. Showing that number in the viewport wouldn’t be all that helpful. To change that we can use the following notation:
Format("{0:0.00}", x)We start by invoking the ‘Format’ command, that captures everything in rounded brackets. Between the double quotation marks (“…”) we are describing the format we want the number to be. The first zero is just a placeholder for any number. After the colon, we type a zero, a dot, and then we add as many zeros as we want decimal numbers. All of this is enclosed in wavy brackets “{…}”. After that, there is a comma “,” followed by the variable name. In the example below I’m just operating on a single number, so I removed the ‘y’ input.
The output would now be “15.60”, already much more readable, but adding a unit after the number would make it even more useful. To do that, simply type the text between the second wavy bracket “}” and the double quotation mark like so:
Format("{0:0.00} cm", x)As you can see below, the final output reads “15.60 cm”.
Rounding Numbers Up or Down with the Expression Editor
This is a super useful one. Sometimes you are dividing two numbers, but you want to round the result either to the next integer or the previous one. A classic example is calculating stairs. If you have the floor height and you divide it by the maximum riser height, you may get a number like 23.39, but if you round it to 23, the resulting riser height will be more than the maximum allowed.
To solve that we can use special functions in the Expression Editor that return us the so-called ‘Ceiling’ or ‘Floor’ of a number. As the names suggest, the ceiling is the next largest integer, and the floor, the next smallest.
To access these and more functions, click on the advanced functions button on the top right of the Expression Editor window:
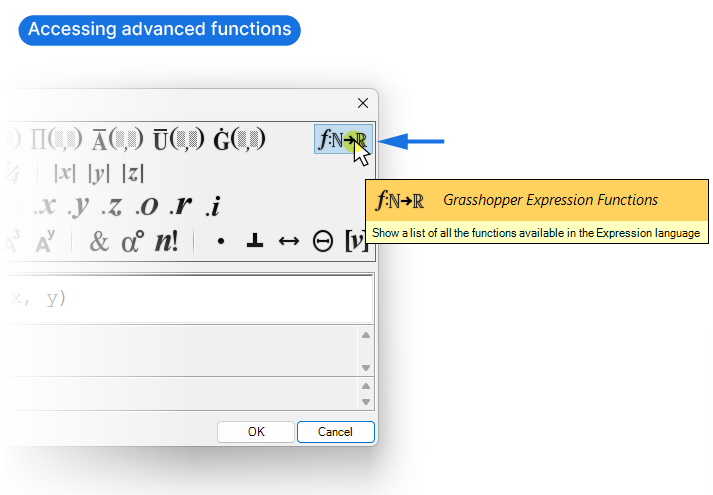
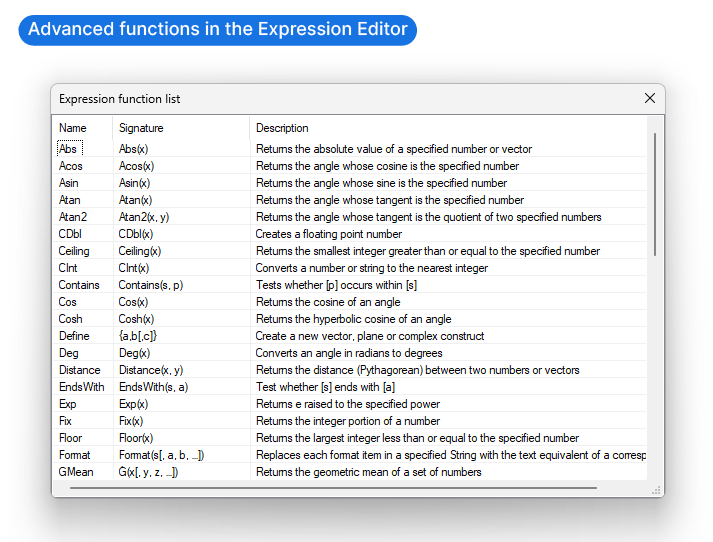
A new window will open, displaying all available functions. The list includes the name, the signature, which shows you the format you need to use them in, and a brief description.
Among them you’ll find the two we were talking about: Ceiling and Floor. The format for both is to simply put the number to operate on in round brackets after the command, like so:
Ceiling(x) or Floor(x)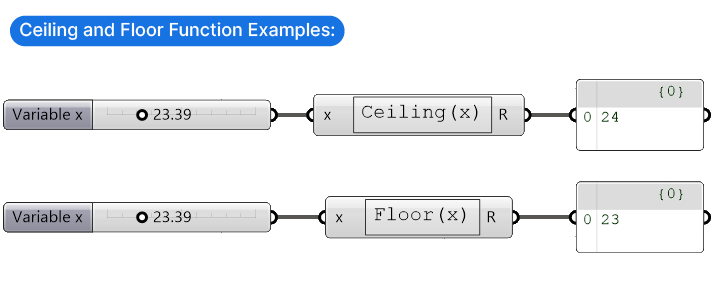
Trigonometric Functions in the Expression Editor
The one tool that can’t miss in a designers mathematical toolkit is trigonometry! We’ve learned it, and yes, we probably all forgot it, so just in case, here is a brief refresher. With any right-angled triangle, we can define the relationship between the length of the three sides and the two non-right angles. See the functions below:
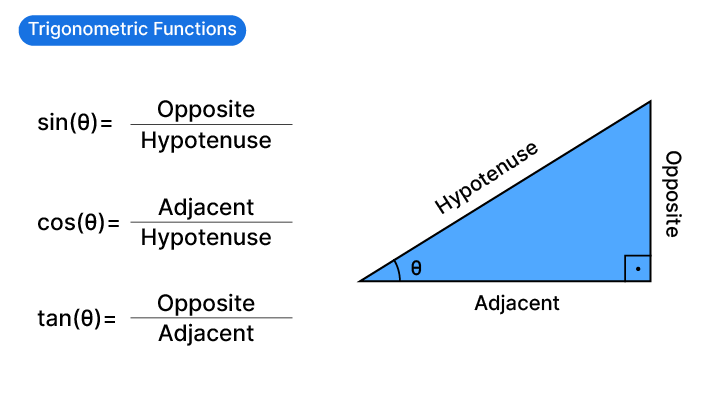
For practical applications, this means that if we are dealing with right angles, if we have two of the three variables in the above functions, for example the angle and the hypotenuse, we can calculate the length of the remaining sides.
To do so, all we need to do is solve the equation to solve for the unknown. It’s best illustrated with an example:
In the example below, I want to create a simple shed roof. To ensure simple construction, I want the angles at the top to be right angles. Now I want to create a parametric study that shows how the angle of the shed will affect the shed’s overall shape.
I have the hypotenuse (in this case the distance from shed to shed), and I’m controlling the angle theta (θ) with a Number Slider.
This means the relevant trigonometric function is:
cos(θ) = a / h
To get the length of the adjacent, I solve for it with:
a = h * cos(θ)
…and enter the formula in the Expression Editor:
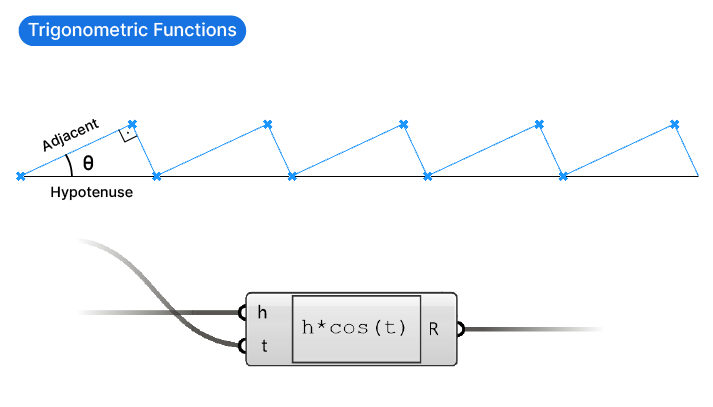
With the help of the length, I can construct the main shed line, defined by the angle, and construct the rest by connecting points with a Line component.
The Expression Component – Final Thoughts
The expression editor in Grasshopper is more than just a tool—it’s a gateway to unlocking the vast potential of parametric design. I hope this guide has empowered and inspired you to bring precision, efficiency, and creativity to your projects. If you want to learn more about adding formulas in Grasshopper, check out our guide to Mathematical Formulas in Grasshopper.
Want to dive deeper and fast-track your skills? Check out Grasshopper Pro, our comprehensive online course tailored for architects. It’s your golden ticket to mastering Grasshopper and elevating your architectural design skills!
Happy designing!