Fillets are an indispensable design tool for any designer. It’s one of those commands that can make simple shapes look sophisticated. While it is a straight-forward command in Rhino, in Grasshopper it can be a bit more complicated to fillet a curve. That’s why I decided to write this guide.
In this 5-minute read I’ll go through the three ways we can fillet curves in Grasshopper. I’ll be highlighting their differences and possible applications.
The Basics
If you’re used to fillet curves in Rhino, trying to do the same in Grasshopper may be confusing at first.
Here’s why:
In Rhino, a fillet usually involves selecting two separate curves, and specifying a radius. Rhino then connects them with a fillet of the radius we specified.
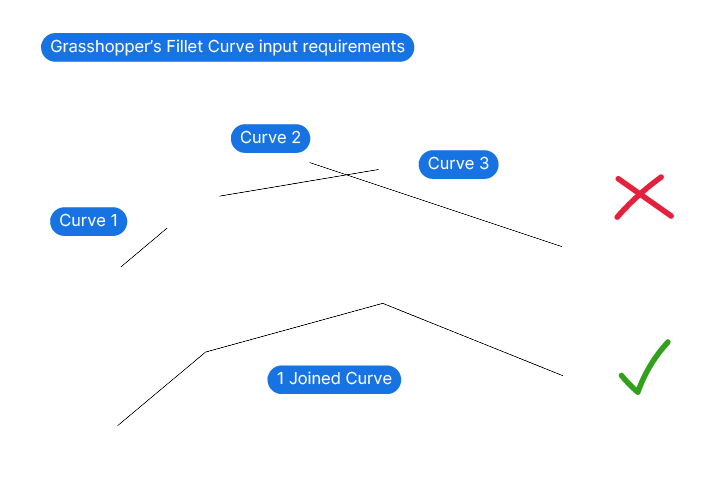
In Grasshopper it’s different: We can only fillet segments of a joined curve. In practical terms, this means that we need to join any curve segments we want to fillet before running a fillet command! Curves that aren’t connected, or touch but are still two separate curves, won’t work.
The 3 Ways to Fillet a Curve in Grasshopper
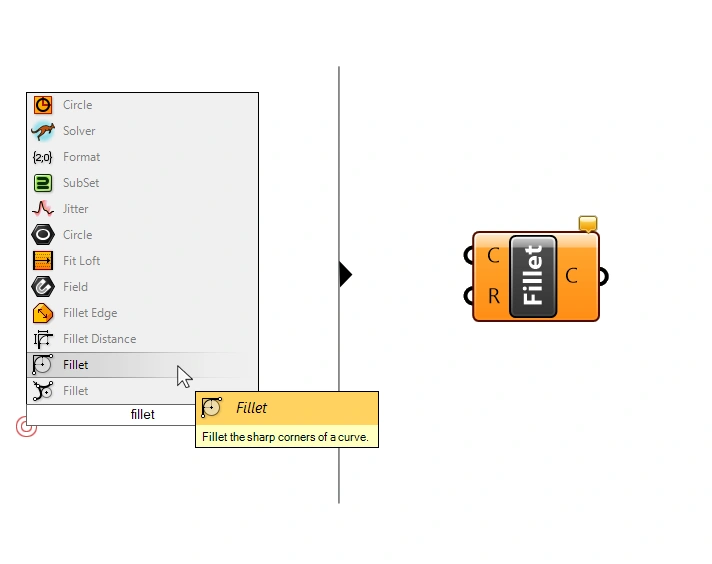
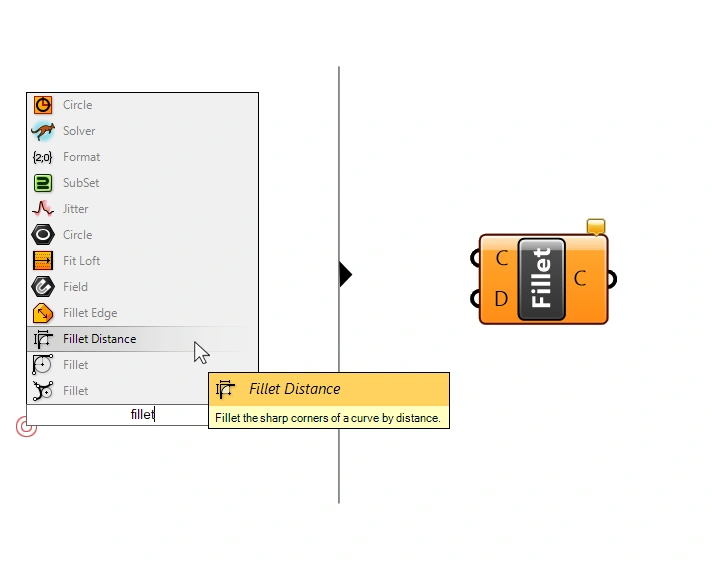
There are three different fillet components in Grasshopper. Type ‘fillet’ into the component search bar (accessible by double-clicking anywhere on the Grasshopper canvas) to find the available components.
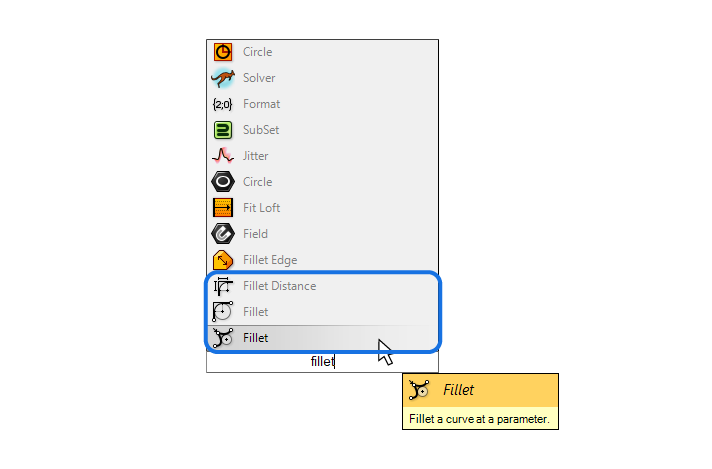
The first three results all fillet curves, but they work slightly differently. The first two components actually have the same name, but their description reveals how they differ. Here are their names and descriptions:
- Fillet (Fillet a curve at a parameter)
- Fillet (Fillet the sharp corners of a curve)
- Fillet Distance (Fillet the sharp corners of a curve by distance)
Let’s look at each component more in detail.
Fillet (Fillet a curve at a parameter)
The first result when searching ‘fillet’ in the component search bar is arguably the least useful one! Let’s look at it anyway.
This component will fillet only a single corner of the curve. We specify which corner to fillet with a Curve Parameter (t). The corner on the curve closest to the curve parameter is the one that will be filleted.
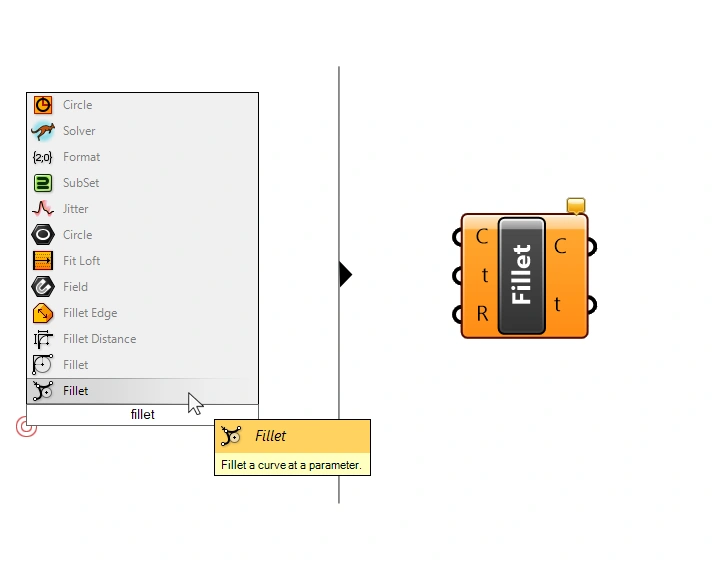
The component has three inputs:
- the Curve (C)
- the Curve Parameter (t)
- the fillet Radius (R)
Like all fillet components, the Curve (C) input asks for the joined curve to perform the fillet operation on. The Curve Parameter (t) is used to indirectly pick which corner to fillet. And the Radius (R) input controls the radius of the resulting fillet.
For any component involving Curve Parameters, I recommend to reparametrize the curve before continuing. This ensures that the Curve Parameters are reset to a range from 0.00 to 1.00. That allows us to specify the location on the curve with a Number Slider of the same range. The value 0.00 corresponds to the start of the curve, and the value 1.00 to the end.
Basic Script Example
Here is the basic setup:
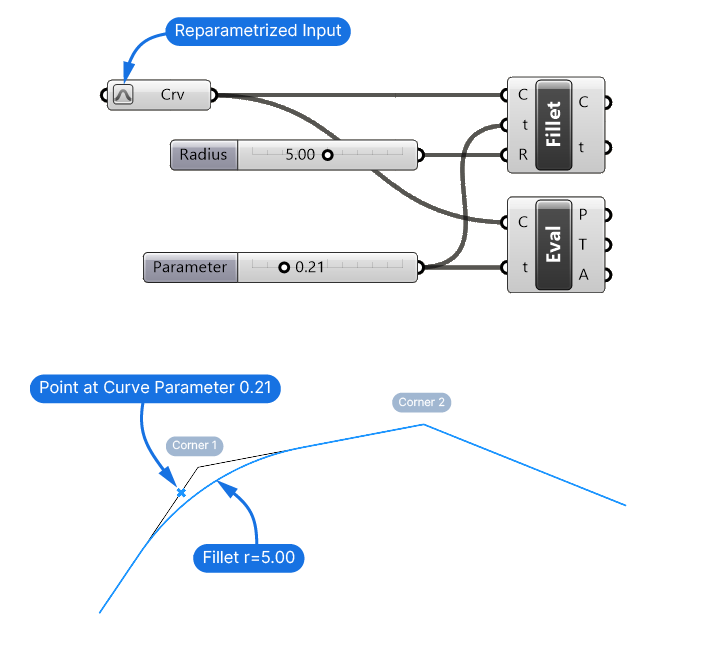
I referenced a Curve from Rhino, reparametrized it by right-clicking on it and selecting ‘Reparametrize’, then added the Fillet component as well as an Evaluate Curve (Eval) component. The Evaluate Curve component displays a point at that Curve Parameter. I used a Number Slider with a range of 0 to 1.00 to specify the Curve Parameter for both components.
In the example above I have a curve with two corners. The Curve Parameter of 0.21 (visualized as a point with the Evaluate Curve component) is closer to the first corner, which is why that’s the corner that’s going to be filleted. When changing the Number Slider value, the fillet will jump from the first sharp corner to the next. Whichever corner is closest to the chosen curve parameter, will be filleted.
As you can imagine this approach is not very precise. We have to approximate the location of the corner to fillet, making it a poor choice for a robust Grasshopper script. On the other hand, it’s the component that gives us the most control.
If we want to fillet all the sharp corners of a curve, there is a better option:
Fillet (Fillet the sharp corners of a curve)
The second ‘Fillet’ component fillets every single sharp corner on the curve.
Because of that, the inputs are reduced to two:
- the Curve (C)
- the fillet Radius (R)
The Curve (C) is the curve to perform the fillet operation on. And the Radius (R) input controls the radius of all the resulting fillets. (With a caveat, more on that soon.)
Here’s what the basic setup looks like:
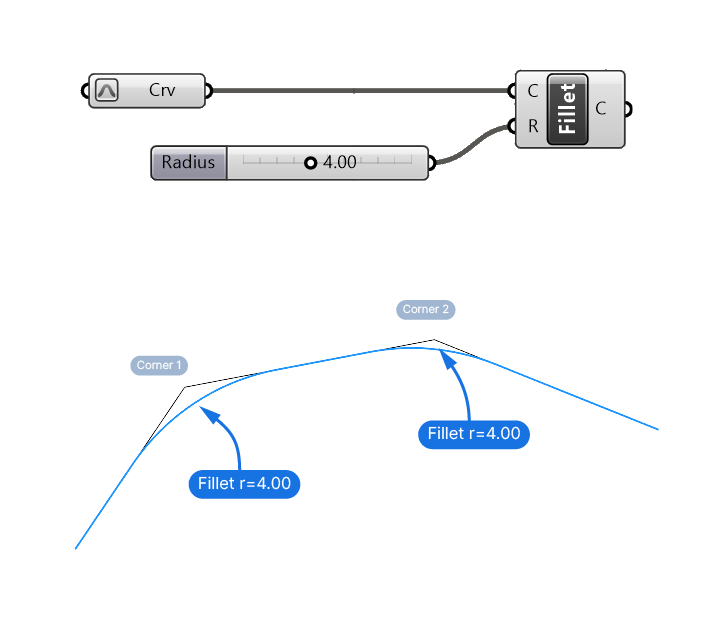
I set the Radius (R) to 4.00, and as a result, all sharp corners on the curve are filleted with that radius.
But the resulting fillet radius won’t always be exactly what we specified:
Limitations
Just like in Rhino, we can’t provide just any Radius for the fillet. If the two curves to fillet are too short, Rhino will ‘run out’ of curve to fillet – the fillet can’t be created.
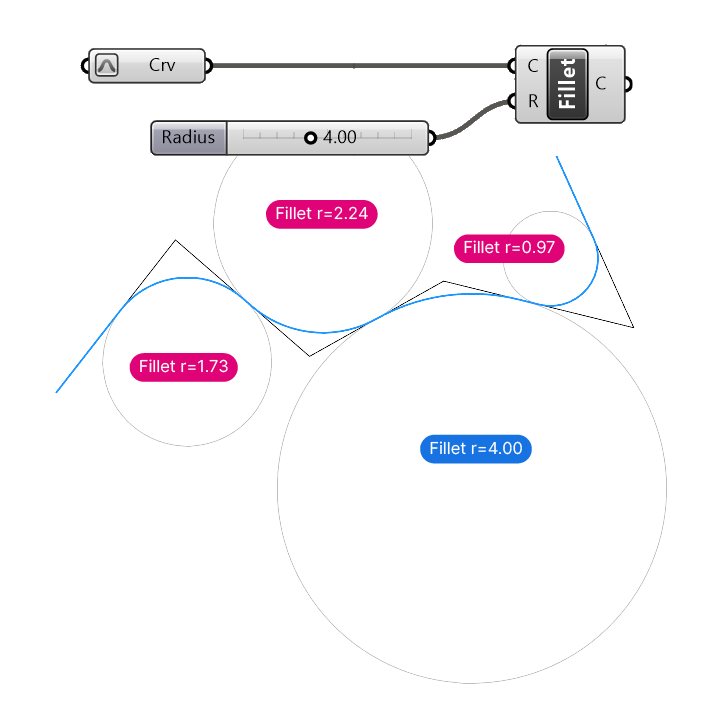
To help with this problem, the Fillet component in Grasshopper will automatically reduce the fillet Radius of those corners to a radius that works.
Here is an example: the radius of 4.00 works for one corner, but all the others have smaller radii.
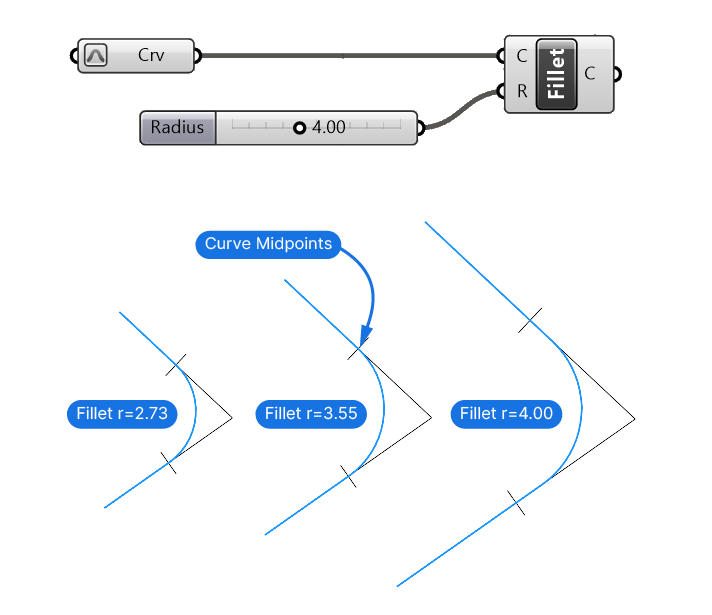
It’s also important to note that Grasshopper will never go beyond the curve segments middle point for a fillet – probably to ensure that the other side of the curve can be filleted too.
In the example below, all three curves should be filleted with a Radius (R) of 4.00. But the curve segments of the first and second curve are too short – creating a fillet with a Radius of 4.00 would mean that the fillet goes beyond the midpoint of the curve segments. Grasshopper limits the radius to the midpoint of the shorter curve segment.
In many cases we’ll want to fillet all the corners of a curve and not just a single one, so this component is already much more useful than the first. Still, it can lead to undesired results.
Consider the following example:
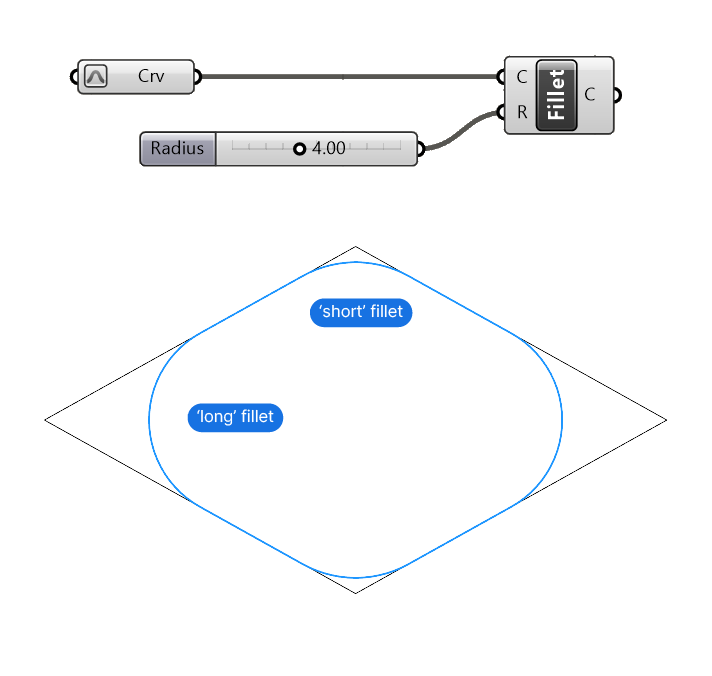
We have a closed, polygonal curve. By filleting all the corners, we get a very different looking fillets, even though they all have the same radius.
Why?
Because the different angles between the segments lead to very different ‘fillet lengths’. Where we have a ‘short’ fillet, we only see a small portion of a circle, whereas ‘long’ fillets show more of that circle – making it appear bigger and more prominent.
While geometrically correct, this visually uneven result is often not what we’re after!
This brings us to the third and final fillet component:
Fillet Distance (Fillet the sharp corners of a curve by distance)
Fillet Distance again fillets all the sharp corners of the input curve, but creates a more uniform look.
It comes with two inputs:
- the Curve (C)
- the Distance (D)
Besides the Curve (C) input, we get to define the Distance (D).
So how can we control the fillet without using a radius and using a distance instead?
Instead of applying the same radius to all the sharp corners of the curve, this component generates custom fillet radii that depend on the distance from the corner points.
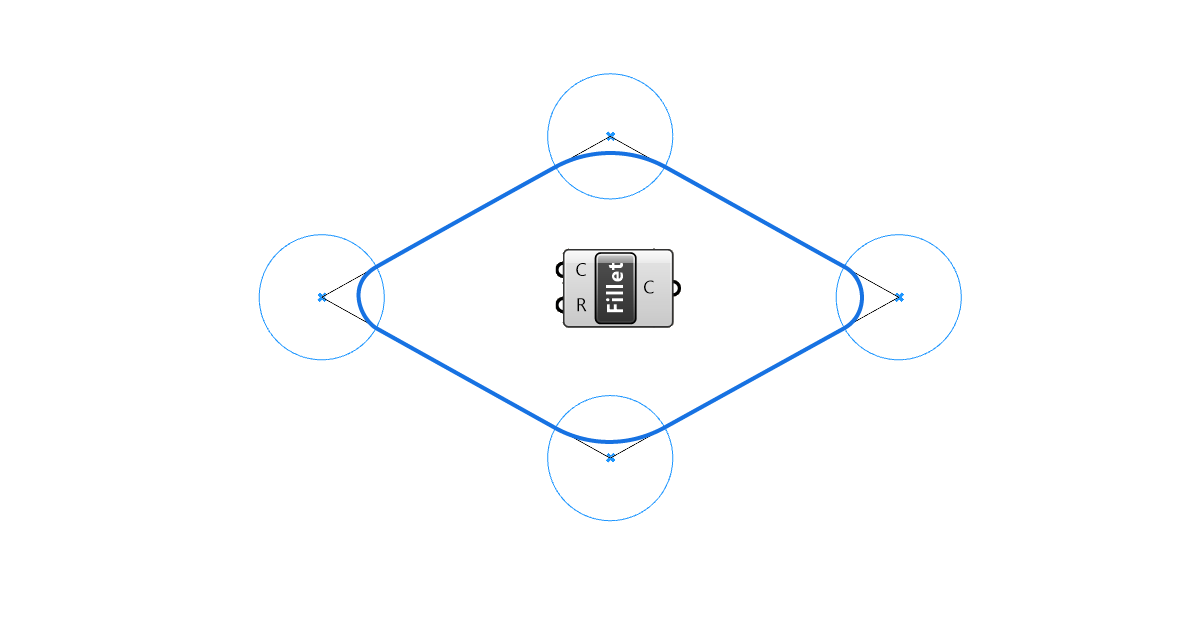
The process is best explained with a diagram:
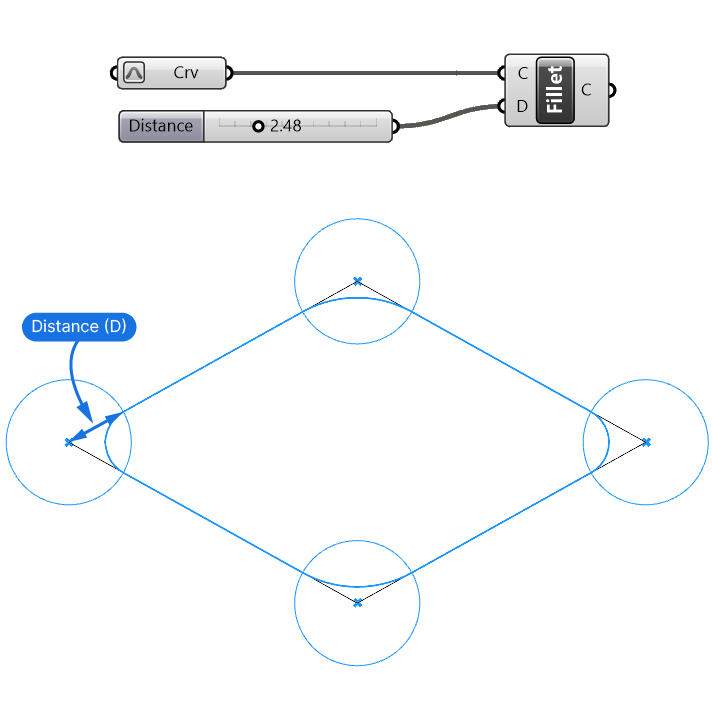
- First the component generates a circle at each corner point.
- Then it trims the curve segments within that circle.
- These two curves are then joined with a fillet that starts right at those two curve endpoints.
- The resulting radius depends on the angle between the two curve segments.
This may sound a bit complicated, but the result is much more visually consistent compared to the constant radius fillets.
Here’s a comparison:
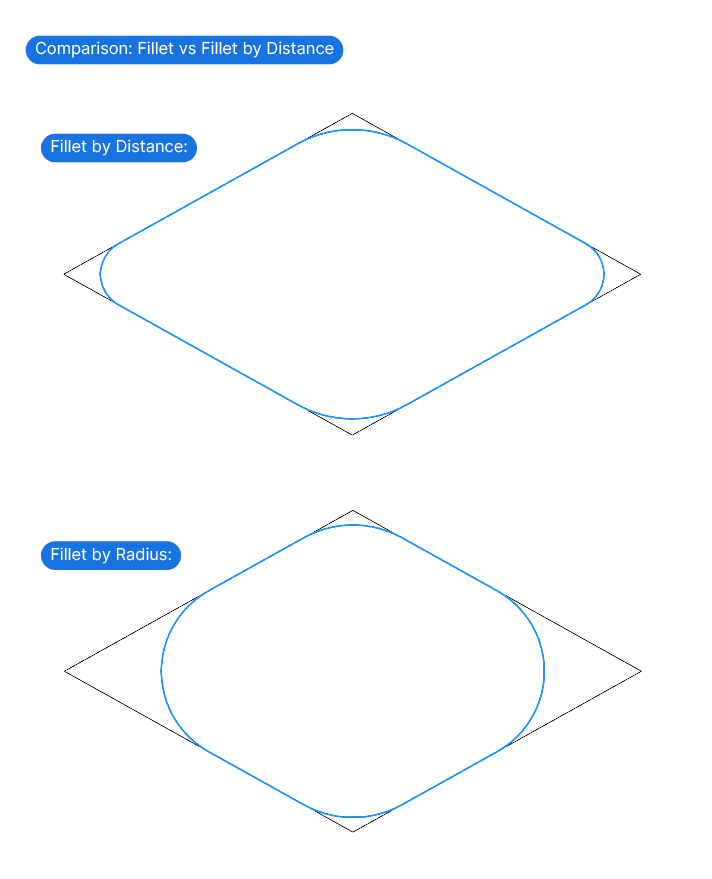
Looks much cleaner, right?
Concluding Thoughts on How to Fillet a Curve in Grasshopper
When used correctly, fillets can add a touch of sophistication to our designs. Grasshoppers offers three different ways of controlling fillets. Which one you choose for your projects depends on what you are trying to achieve. Whether you want to fillet a single corner or all of them at once, I hope this guide has empowered you to fillet with confidence!
Happy designing!