Imagine effortlessly filtering through a list of objects in Grasshopper to find exactly what you need. The Cull Pattern component in Grasshopper makes this possible. It allows for both manual selection and sophisticated parametric selection. Manual selection is done by defining a ‘Cull Pattern’, while parametric selection is achieved through conditions that we specify. In this article we’ll cover how the component works and how to best use it in practice.
Let’s dive in!
How the Cull Pattern Component Works
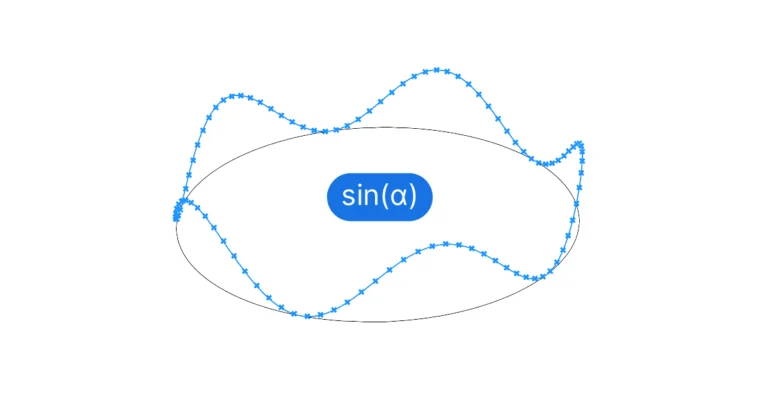
Let’s start with the name: to “cull” is a term from the farming vocabulary that means to reduce the size of a herd by removing certain animals. Not a pretty image, but it conveys the core purpose of this component: to make a selection of a set of objects by ‘deleting’ or ‘culling’ some of them.
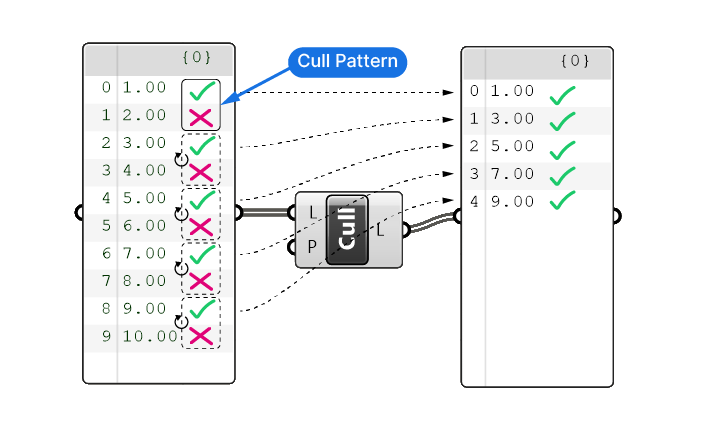
Now what’s the mechanism for defining which items in a list to keep and which to ‘cull’ or delete? To determine which items to keep, the Cull Pattern component has an input that allows us to connect a True or False Pattern that determines which items of the List to keep and which to remove, or cull. If the value is True, the item is kept; if it’s False, it will be removed.
So far, so good, but how does this work in practice? Let’s take a closer look at the component.
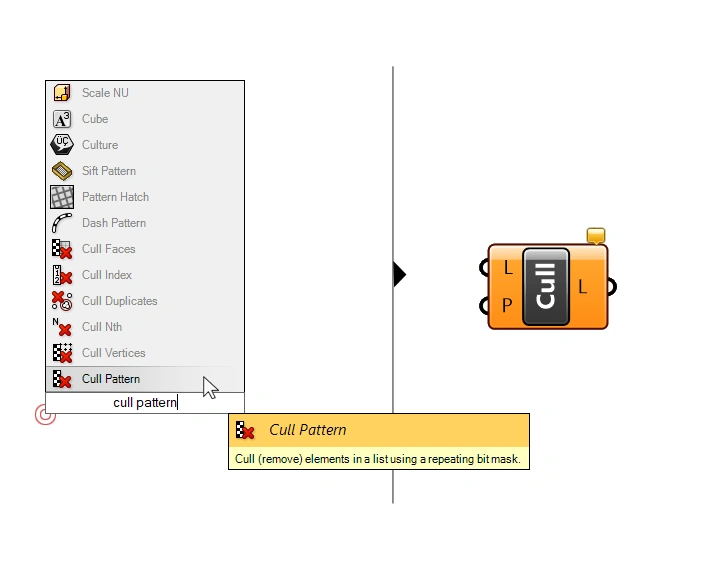
The Cull Pattern component is located under the ‘Sets’ component tab, grouped under ‘Sequence’.
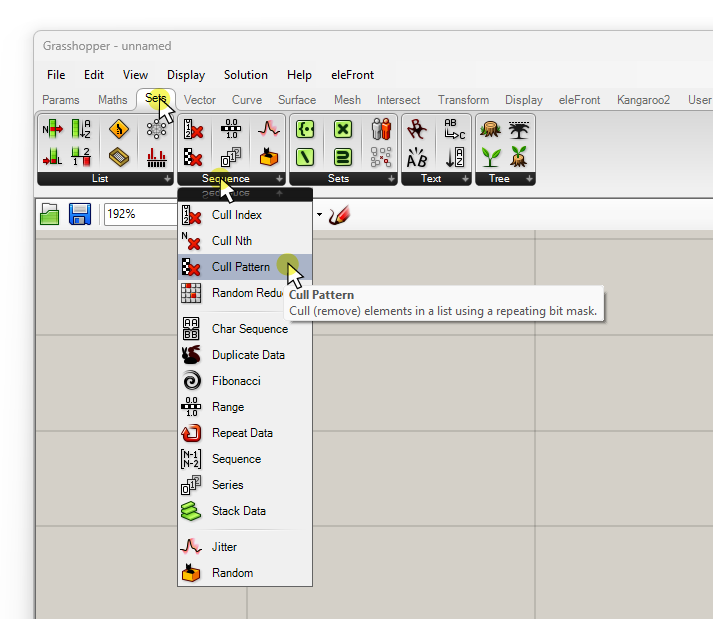
To add it via the component search bar, double-click where you want the component to be placed and type ‘Cull Pattern’, then select the first result.
The component has two inputs:
- the List (L) to cull, or delete items from
- the Culling Pattern (P), defined by a list of True or False values
The output is the culled list (L).
At this point you may wonder, what kind of lists can you cull? The answer is simple: any. As long as the data you want to cull is a list of items, you can cull it. It can be numbers, polysurfaces, points, even letters.
Defining a Cull Pattern
Now let’s see the component in action. I added a Panel, deactivated ‘Multiline’ to have the input behave as a list, and typed in a series of numbers. Then I copied the Panel and connected the output, as follows:
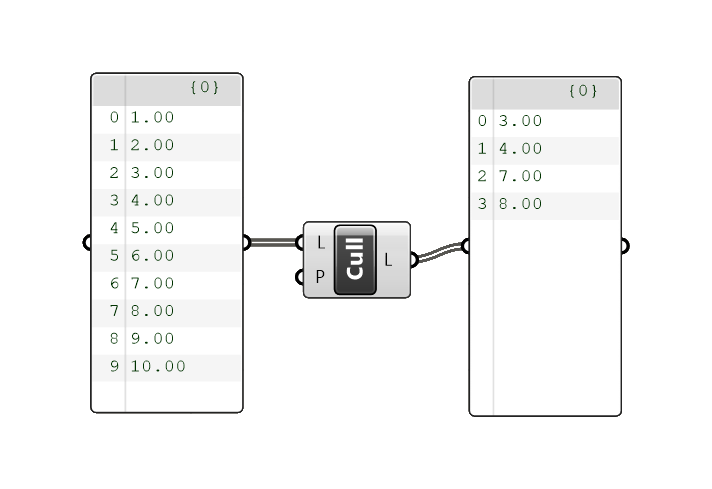
If this is your first time using this component, the output might seem confusing: why did it keep those four numbers? It seems almost random. The answer lies in the Cull Pattern (P) input. You see, like many components in Grasshopper, the Cull Pattern (P) input comes with a default value.
To see it, right-click on the Cull Pattern (P) input, and click on ‘Set Multiple Inputs’.
In this submenu, we can see the default pattern that Grasshopper applies.
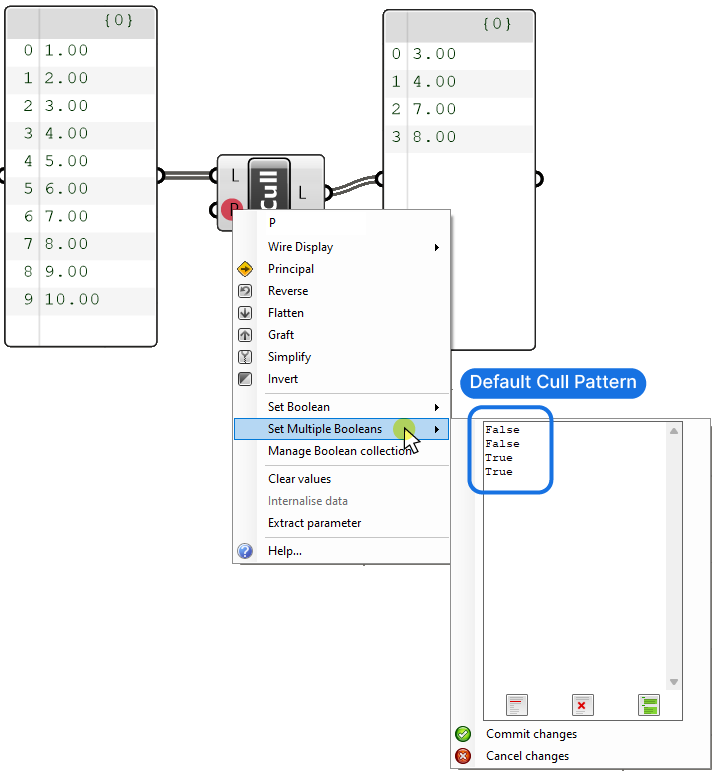
The Pattern goes:
- False
- False
- True
- True.
This list of Boolean values is used to processes the input list as follows:

The pattern will start at the top of the list and delete (cull) items that have a value of ‘False’ and keeps the ones with ‘True’. Now the list we are culling has 10 items, but our pattern is just 4 values long. Whenever that’s the case, Grasshopper will repeat the input pattern over and over until the entire input list has been processed.
This is perhaps easier to understand when using a simpler Cull Pattern (P) input, like a simple True and False value. We can go back to the ‘Set Multiple Booleans’ input and simply type ‘True’ into the first line, and ‘False’ into the second. Hit ‘Commit changes’ to save.
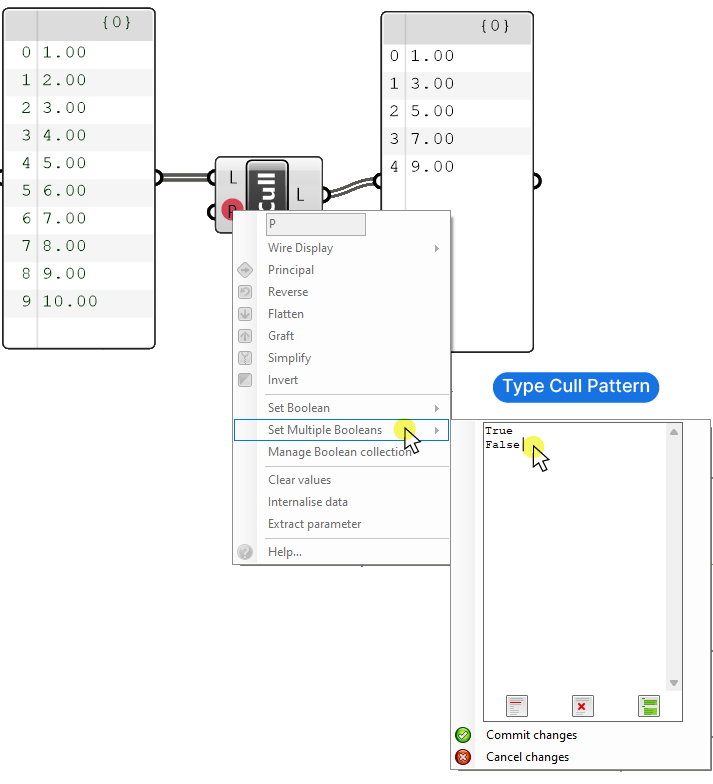
We have now set the pattern right inside the component input. As soon as we confirm, we get the following result:
We are now effectively deleting every second item. In practical terms, the basic ‘True, False’ pattern is used most frequently.
Inverting the Selection Pattern
At this point you may wonder: what if I want to keep the deleted items in a separate list? While the proper way to do that is to use the ‘Dispatch’ component, we can also simply copy the Cull Pattern component. To get the culled items, simply right-click on the Cull Pattern (P) input and select ‘Invert’.
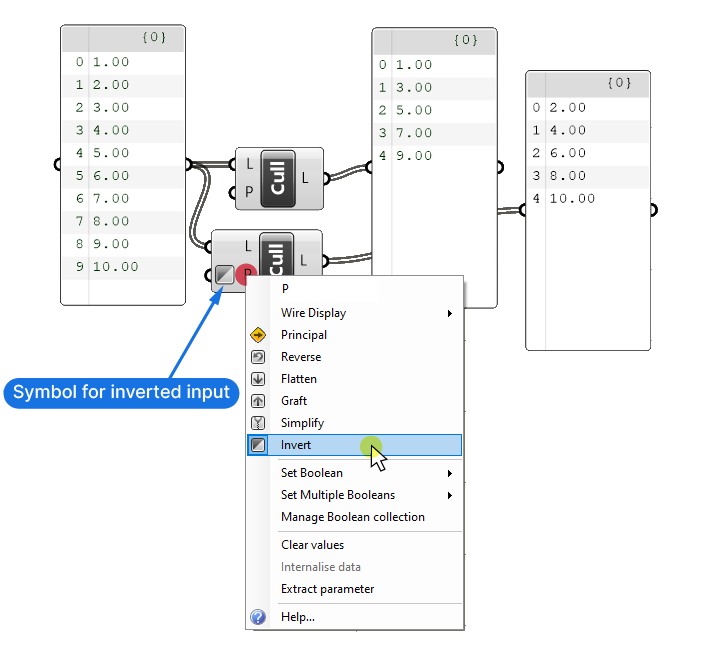
This ‘inverts’ the True and False values, leading to exactly the opposite selection. At times, this can be a quick way to separate a list into two.
Parametric Selection with the Cull Pattern Component
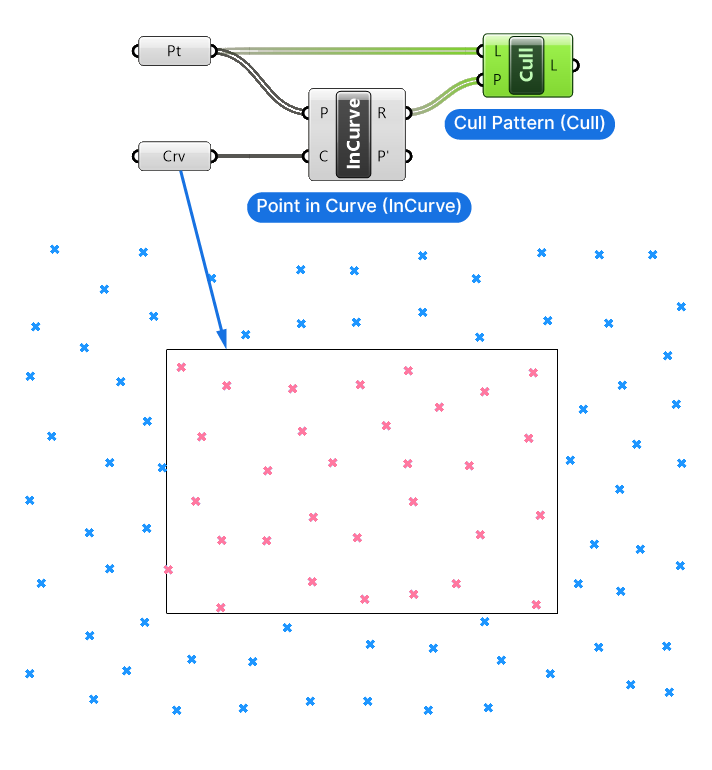
So far we’ve entered the Cull Pattern (P) manually. But the true power of the Cull Pattern component in Grasshopper is the ability to define selection patterns parametrically. This means that instead of typing the Cull Pattern, we’ll have components generate the pattern for us.
There are several components that allow us to create these parametric selection patterns, for example:
- Point in Curve (InCurve) – checks whether a point is located inside a closed curve
- Point in Brep (BrepInc) – checks whether a point is located inside a closed volume
- Is Planar (Planar) – checks whether a surface is planar
- Closed (Cls) – checks whether a curve is closed (as opposed to open)
All these components return a list of True/False values, one for each item in the list. This list can then be directly connected to the Cull Pattern (P) input of the Cull Pattern component, to make a selection. See an example of the Point in Curve (InCurve) component below:
Defining Custom Selection Patterns with the Expression Editor
But we are not limited to the above components, we can define our very own evaluation conditions using the Expression Editor component. As long as we can express our condition with numbers, there is not limit to what we can do.
Here is a simple example:
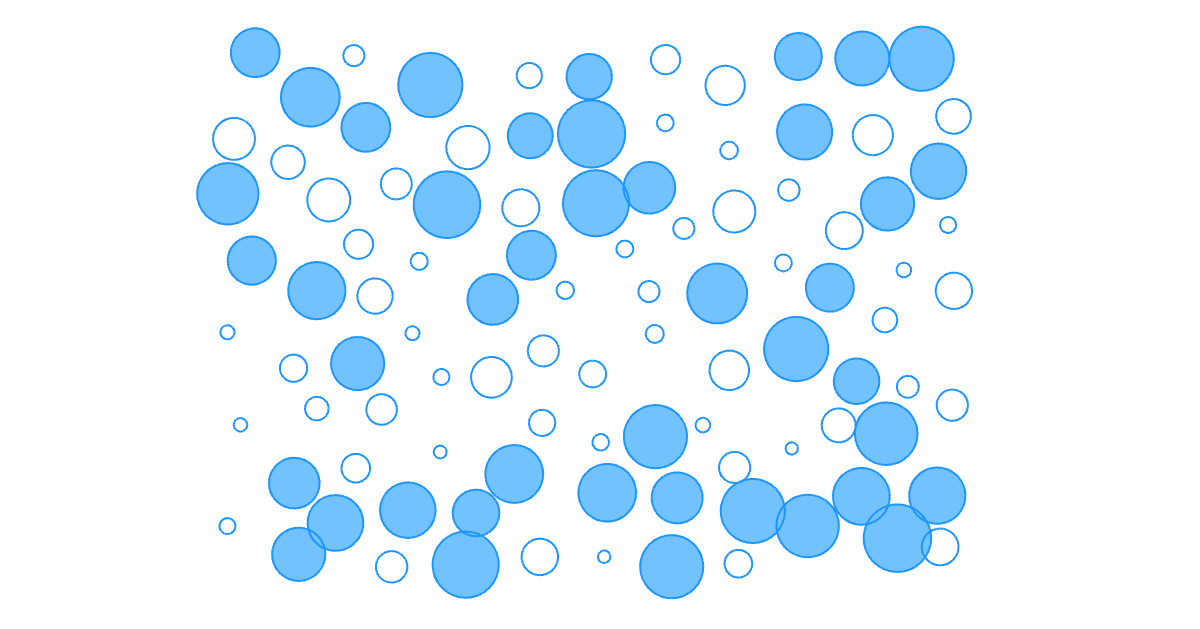
Let’s say we have series of circles of random sizes and we only want to keep the ones that have a certain size. We could define a radius and only keep the circles that have a radius above that value.
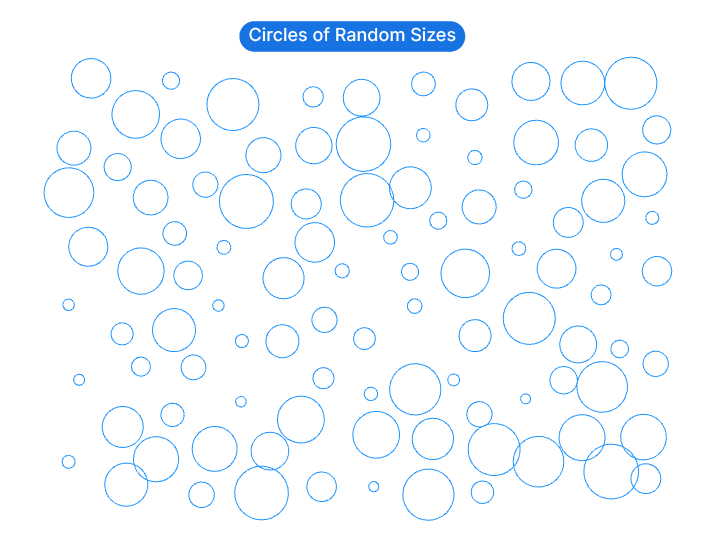
Here is how we can make this selection parametrically:
First, we measure the length of the circles, which equals their circumference. To do so, I’ll use the ‘Curve Length (Len)’ component. Since the circumference of a circle c = 2*r*Pi, we can solve the equation for the Radius r and we get r = c/(2*Pi).
Before we continue, let’s add a Number Slider, which will define our radius threshold. Any value below this one will be deleted.
Now let’s add an expression editor component, and express the condition we just defined: the circumference must be larger than the number slider value:
(x/(2*pi)) > yAny time we use a larger than (>) or smaller than (<) sign, the expression editor will return a Boolean value, that is, a True or False value.
Now all that’s left to do is add a Cull Pattern component and connect the list of circles to the List to cull (L) input, and the output of the expression editor to the Cull Pattern (P) input.
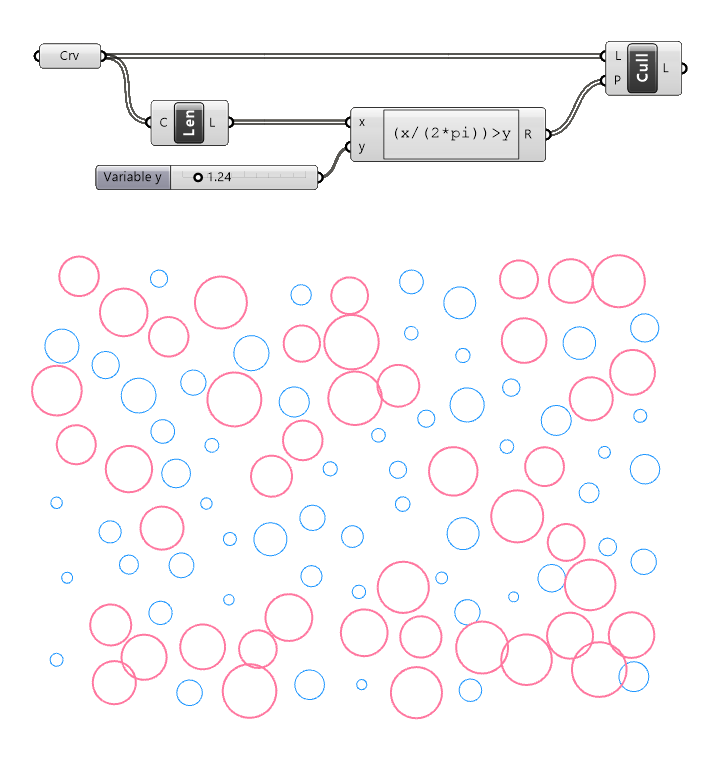
And there we have it! We parametrically defined a Cull Pattern!
We can use any property of the input geometry to define our dynamic pattern, it could be the Z-value of a point, the distance to another object etc.
Cull Pattern in Grasshopper – Final thoughts
As we’ve seen the Cull Pattern component is an extremely powerful tool in your Grasshopper toolset. Its ability to process any list of items is an invaluable help when scripting. When defining custom conditions for the Cull Pattern, extract a property from the objects you are trying to process, and then evaluate these properties with the expression editor.
I hope you’ve found this guide helpful!
If you want to get a comprehensive Grasshopper training where I cover everything you need to use Grasshopper at a professional level, check our my online course: Grasshopper Pro.
Happy designing!