Attractor points are one of those captivating effects in Grasshopper that bring our parametric designs to life. Whether it’s a single point or multiple, in this guide I’ll walk you through the logic behind the attractor effect and how to put it together in a script, explaining each step in an easy-to-follow way.
Ready? Let’s get started!
What are Attractor Points in Grasshopper?
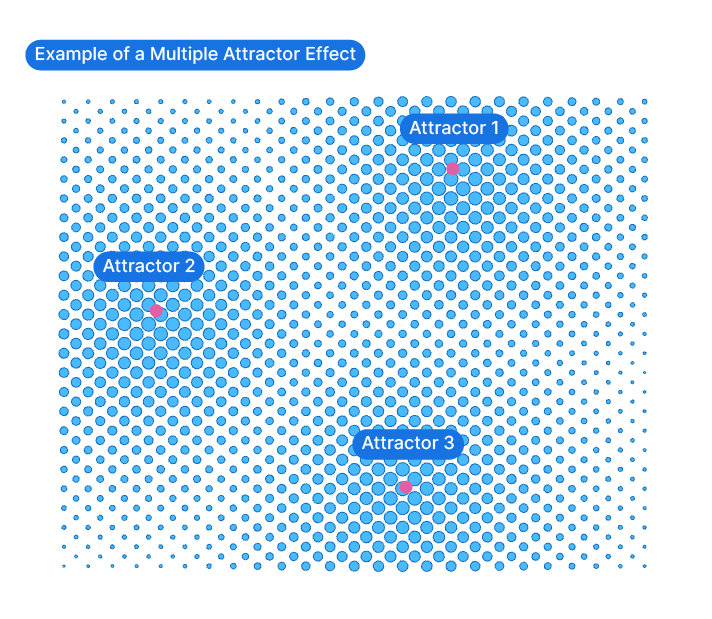
Attractor points describe an effect where a grid of objects deforms based on its proximity to a specific point or points. The objects in the grid seem to be “attracted” to the point – hence the name “attractor point”.
In computational design, this kind of effect is widely popular because it creates a sophisticated effect with a quite simple setup. Attractor effects, commonly observed in nature, are often considered particularly aesthetic and beautiful.
But what’s behind this emergent effect? What’s the logic leading to this captivating appearance?
The Logic Behind the Attractor Points Effect
Before we dive into which Grasshopper components to use, it’s important to understand the logic behind the attractor points effect.
At the heart of this effect is a simple distance measurement. The distance from each point in the grid to its closest attractor point. All the resulting distances will naturally have a smallest and largest value: the closest object will measure the shortest distance, and the object furthest away, the largest distance.
We can then remap these distance values to a controlled target range, such as a specified minimum and maximum radius.
These remapped values will then drive the extent of the attractor effect, in our example, the radius of the circles.
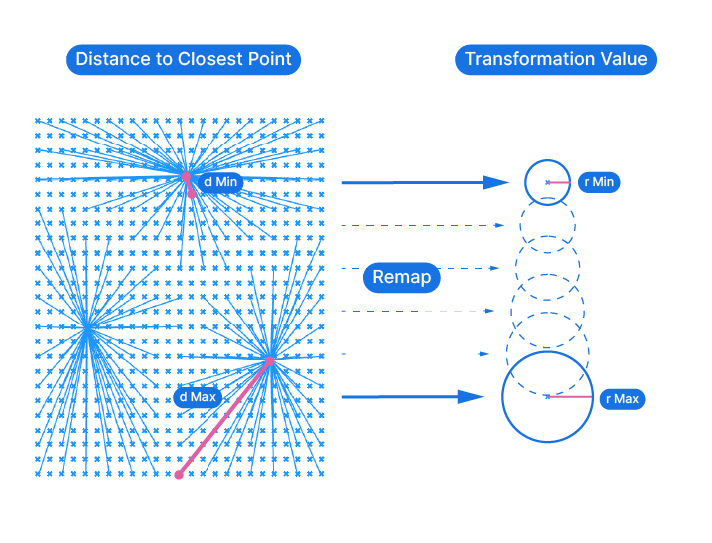
The difference between a single and multiple attractor points is that, with multiple points, the distance to the closest attractor point is measured.
Now let’s go ahead and build the attractor effect step by step. We’ll be using a setup that will work with both one as well as several attractor points. We’ll build the script in these four steps:
- Create a grid of points and define attractor points
- Set up the circles with a starting radius
- Measure the distance from each point to the closest attractor point
- Remap the resulting distances to our target minimum and maximum radius values
Step 1. Creating a Grid of Points
For the attractor points effect in Grasshopper to be recognizable, we need a certain number elements to apply this effect to. We need to create a field. In this example we’ll create a two-dimensional grid of elements. To have control over the extents of our field, we are going to create a grid by subdividing a surface.
We’ll start by creating a surface that’s 50 units wide and 40 units tall, and reference it to a Surface container in Grasshopper.
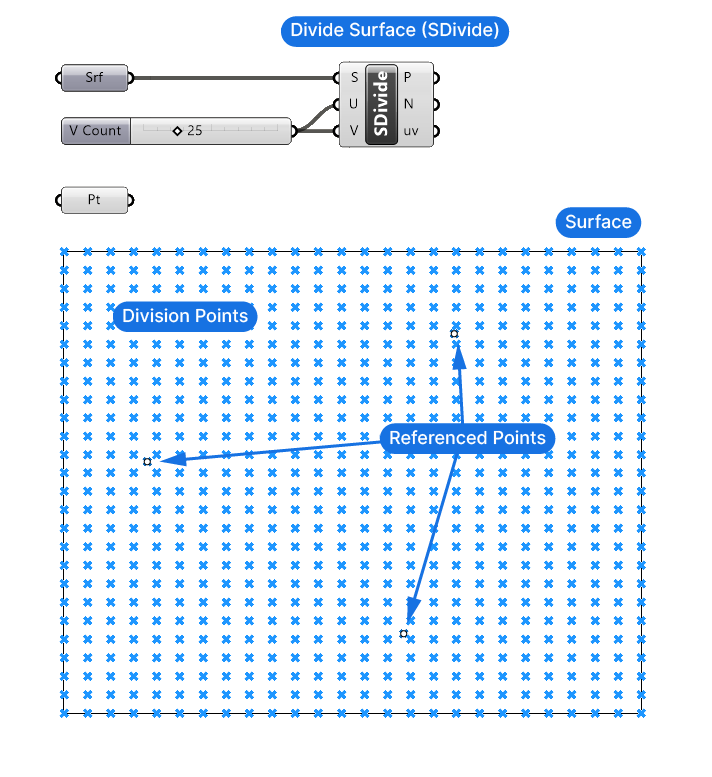
Next, add a ‘Divide Surface‘ component to subdivide the surface.
By default, we’ll get 10 subdivisions in both the U and V direction. I’ll add a Number Sliders, connect it to both the U and the V input, and give it a value of 25.
We now have a grid of points – they represent our ‘field’ of objects.
Let’s add 3 points into the grid area in Rhino and reference them to a Point data container. These will be our attractor points.
Step 2. Defining a Geometric Transformation for the Objects in the Grid
Once we’ve set up our field, the next step is to define the transformation. The transformation can be as simple as the scaling of circles, but it can also be much more complex, the only requirement is, that it can be controlled by a single numerical value.
In our case, the radius is the single numerical value that will drive the transformation of the circle size.
Let’s add a Circle component. Make sure to pick the one with the description “Create a circle defined by base plane and radius.”, as there are several Circle components to choose from.
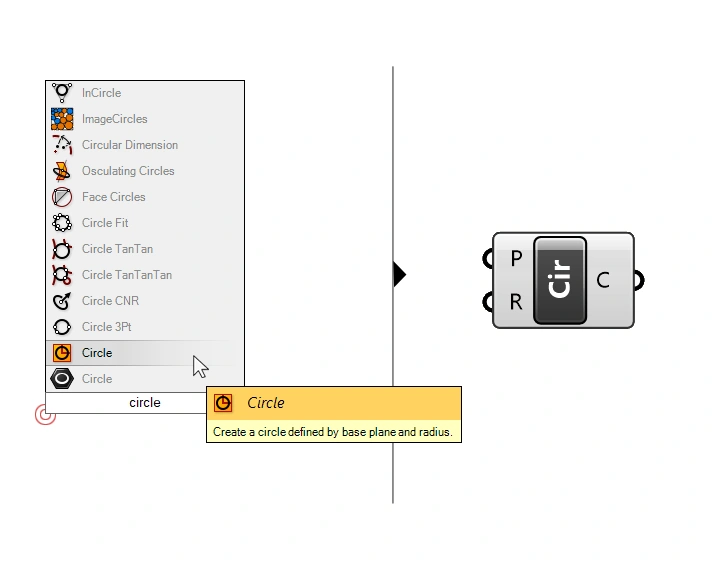
Let’s connect the division points to the Plane (P) input, and let’s add a Number Slider with a value of 0.70 to the Radius (R) input, to make sure everything works as expected. I’ll also add a Surface container component and connect the circles, just to have a shaded preview that’s easier to see.
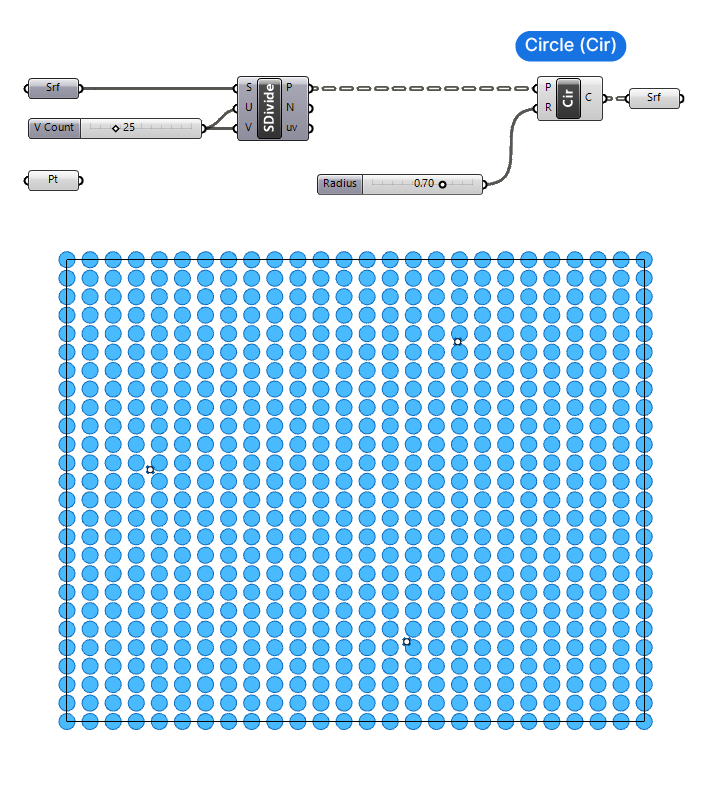
Currently every circle has the same radius – once we’ve completed the script, each point will get its own dedicated radius value.
Next, let’s measure the distance to the closest attractor point!
Step 3. Measure the Distance to the Closest Point
To create an attractor points effect in Grasshopper, we need to create a parametric relationship between the distance from each point in the grid to the closest attractor point.
This distance will drive the extent of the transformation. Since the distance will be different for each object, each transformation value will be unique, resulting in a gradual, nuanced transformation effect.
To find the closest point, we’ll use a component called ‘Closest Points’. This component calculates the distance to a specified number of attractor points we provide, sorted by distance.
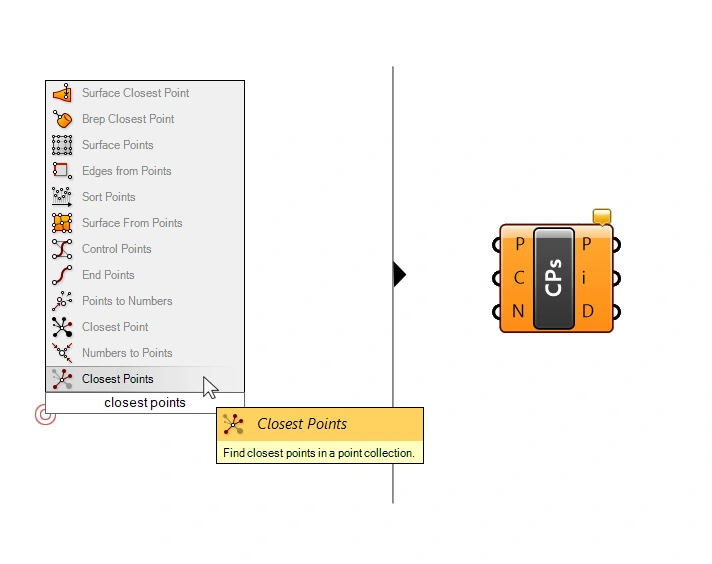
The component has three inputs:
- the Points (P) to search from
- the Cloud of Points (C) to search the closest point among
- and the Count (N) of the number of closest points to find.
The Closest Points (CPs) component will output the closest points in the Point Cloud provided, in the order of proximity, in the (P) output. In (i) we find the index of those points, and in (D) the distance to the same points, once again, in order of proximity.
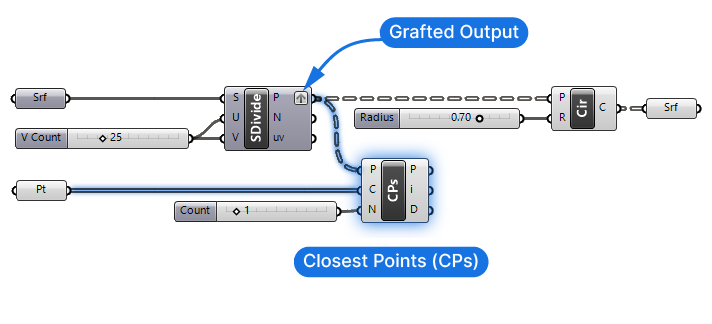
Let’s connect the points of our grid to the Cloud of Points input. These are the points we want to search the closest attractor points from. And then we’ll connect the referenced points to the Cloud of Points (C) input.
The Count (N) input comes with the default value of ‘3’, meaning that it will find the three closest points in the Cloud of Points (C). For now, let’s add a Number Slider and set it to a value of 1. This way, we’ll only get the closest point.
Controlling the Data Structure
Before proceeding, graft the output from our division points. To do so, right-click on the (P) output of the Divide Surface component and select ‘Graft’. By default, the Divide Surface component outputs each row of points in a separate list, but going forward, we need to ensure that every point is isolated. By grafting the output we make sure each point is in its own dedicated branch.
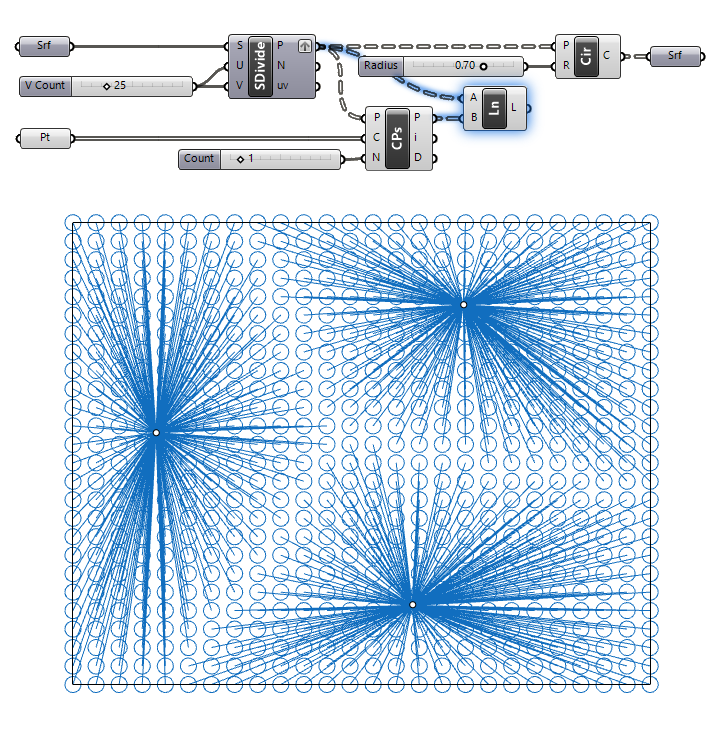
After making the connections, no additional geometry will appear in the viewport. What we can do, is visualize the closest attractor point from each point on the grid.
How to Visualize the Attractor Attribution
To visualize the distance between each grid point and their closest point, we’ll draw a line between the grid points and the closest points output (P) with a Line component. This way we can visualize the closest point among the attractors from each point in the grid.
Step 4. Remap the Distance to the Transformation
The final step that brings the attractor points effect to life in Grasshopper, is to create a relationship between the distance values and the extent of the transformation, in our case the size of the circles.
Both distance and radius values have their own respective minimum and maximum ranges.
By remapping the distances from the distance range to the target radius range, we create a proportional relationship between the two.
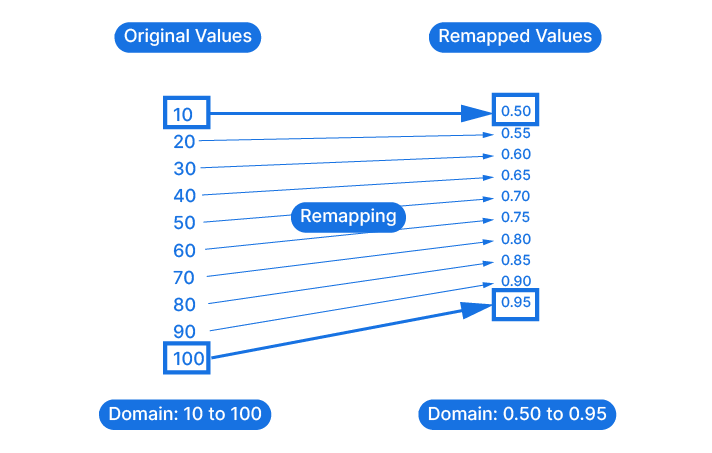
Remapping a number means that we take a number that exists within one numerical domain and remap it to another numerical domain, proportionally. Remapping values works by using the “Bounds” or minimum and maximum values of the domains. These Bounds will be matched, and every values in-between will be interpolated proportionally.
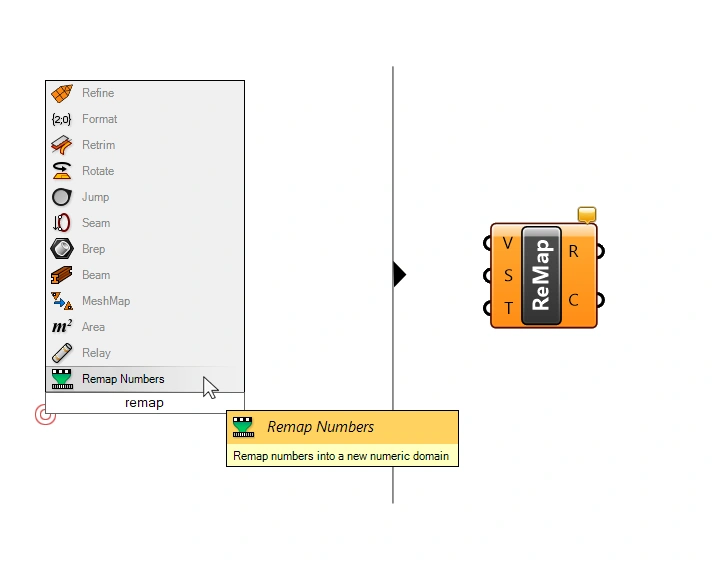
Let’s add a Remap Numbers (ReMap) component to map the distances to a radius.
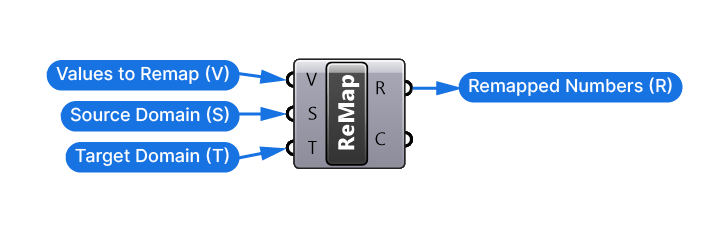
The Remap component has three inputs:
- the Values to Remap (V) (our distances)
- the Source Domain (S) (minimum and maximum values of our distances)
- the Target Domain (T) (minimum and maximum values of our radius)
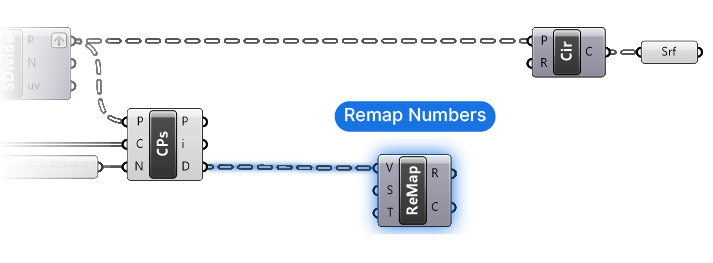
The Values to Remap (V) are the distances to the closest attractor point. We find them in the Closest Point Distances (D) output.
Defining the Source Domain
For the Source Domain (S) input, we need the minimum and maximum values of all the distances of our points. Luckily we don’t have to sort and pick these values manually – we can extract the minimum and maximum values of a list of numbers with a component called ‘Bounds (Bnd)’. This component takes any list of numbers as input and outputs the “numerical ends” in the form of a Domain.
Let’s add a Bounds component to generate the source domain from these distance values. And then plug it into the Source Domain (S) input.
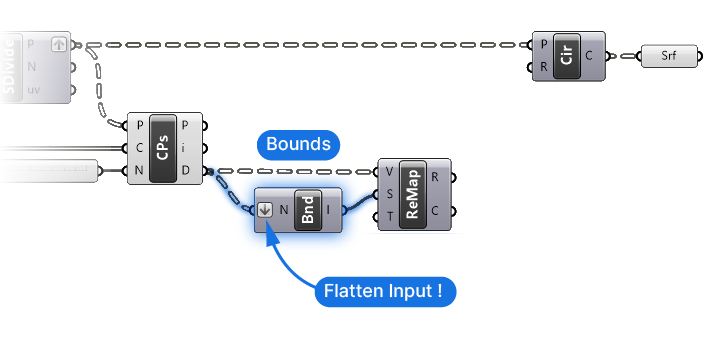
Before we continue, we must Flatten the input of the Bounds (Bnd) component. The reason is simple: due to our current data structure, every distance output value is stored in a separate data branch, or list. Without flattening, the Bounds component, which extracts numerical bounds from a list, returns bounds starting and ending with the same distance value. (I.e. the bounds of a list containing a single number, for example 3.40, are “3.40 to 3.40”.)
To get the bounds of all the point grid distances, we must flatten the input, thereby joining them in a single list. Once we do, we get a single domain that describes the minimum and maximum distance from the grid points to the closest attractor point. To flatten the input, right-click on it and select ‘Flatten’.
We now have the Values (V) and the Source Domain (D), the last input we need is the Target Domain (T).
Defining a Target Domain
To define the Target Domain (T), we’ll add a Construct Domain component. With this component we can provide a minimum and maximum numerical input and we get a Domain.

Let’s say that our radii will go from 0.10 to 0.70. We’ll add two number sliders with those values. Now since we want the points in the grid that are closest to the attractor points to be the largest, we need to construct the domain accordingly: the distances with the smallest value will map to the largest radius. This means that our target domain will range from 0.70 down to 0.10.
Yes, Domains can also be reversed!
The output Remapped Number (R) output of the Remap component now contains the distance values remapped to a radius value within the target domain we specified.
Finally, let’s connect this output to the Radius (R) input of the Circle component. The attractor point effect is now complete!
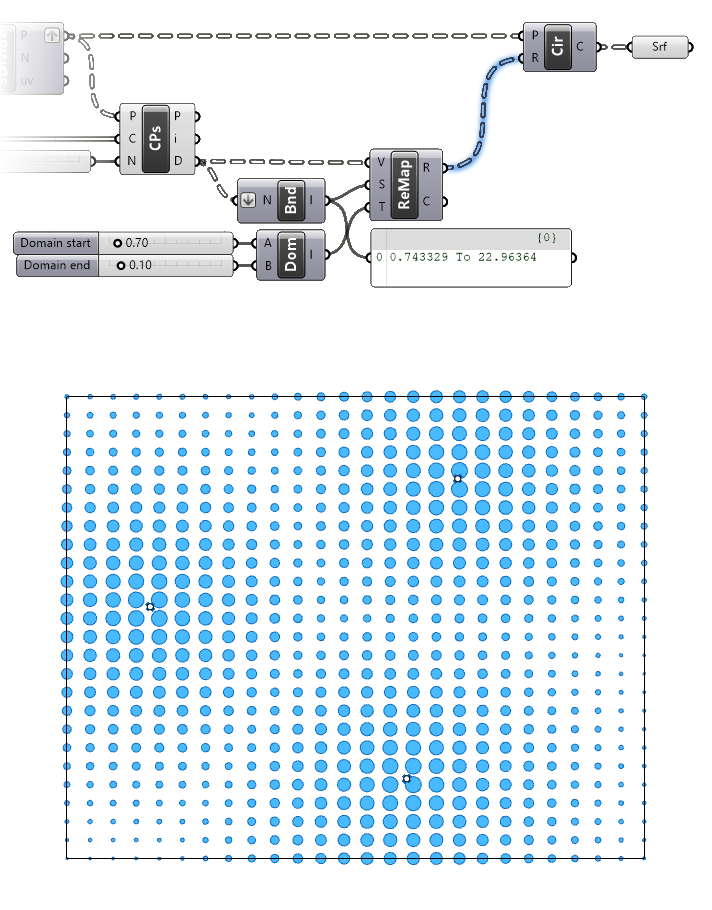
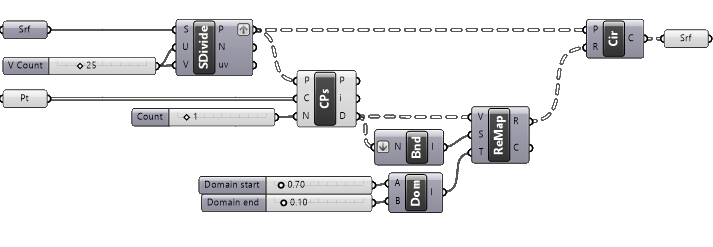
See the full script below:
Advanced: Creating a More Nuanced Effect
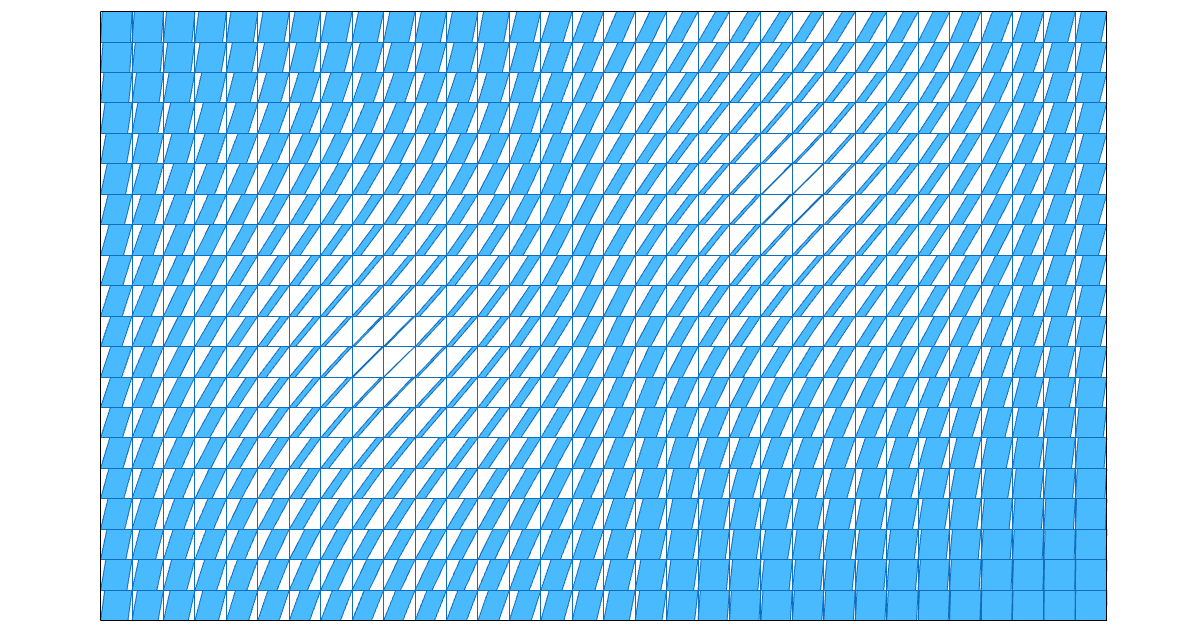
The effect that this Grasshopper script creates can feel a bit “flat” at times, especially when two attractor points are close together. The size of the circles will remain constant because only the distance to the closest point is considered.
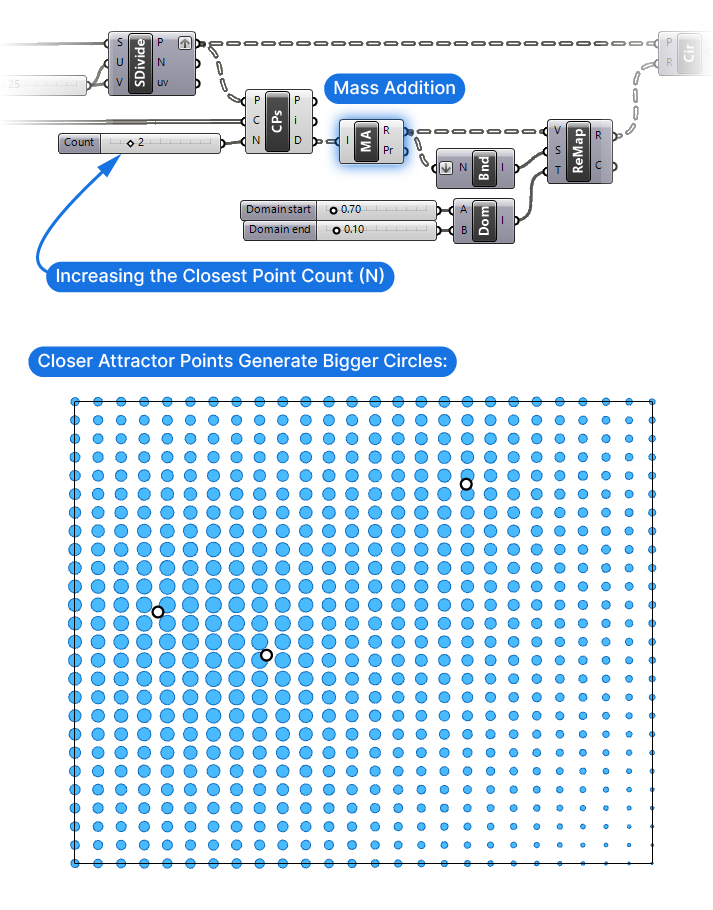
To create a more nuanced effect, we can sum up the distances to not just to the closest, but to the second-closest or even third-closest point. This means that attractor points that are clustered together will create a larger visual impact.
To do so, all we need to do is add a Mass Addition component right after the Closest Points (CPs) distance output. This component will create the sum of all the items in its input. Currently we are only measuring the distance to the closest point, but by changing the Count (N) value of the Closest Points (CPs) input, we can expand it to more points!
See an example of how including the second-closest distance can impact the attractor points effect below:
Attractor Points in Grasshopper – Final Thoughts
So there you have it! With just a handful of components we’ve walked through the four steps to create an attractor points effect in Grasshopper: setting up a field of points, defining a transformation, measuring the distance to the closest point and remapping the distances to the transformation. Along the way, we’ve learned how to use the Closest Point and Remap Numbers components.
Experiment with different transformations as well as different attractor geometries, like attractor curves, and see what kind of results you can achieve!
If you are just starting your Grasshopper journey and you want to shortcut your way to an advanced level, check out our comprehensive course: Grasshopper Pro. The course covers all the bases and saves you hours of time learning on your own!
Happy designing!