With Grasshopper, creative exploration and mathematical precision go hand in hand. To harness the full power of parametric design in Grasshopper, mastering the expression of design intent through formulas is essential. In this guide, we’ll demystify the process of integrating basic to complex mathematical formulas into your Grasshopper workflows.
Whether you just want to add numbers, calculate the radius of a circle or use more complex mathematical formulas, this guide has got you covered.
Grasshopper offers three different ways of using mathematical formulas, and we’ll go through them in order of difficulty, showing application examples for each!
Let’s get started!
Basic Math Components and How to Use Them
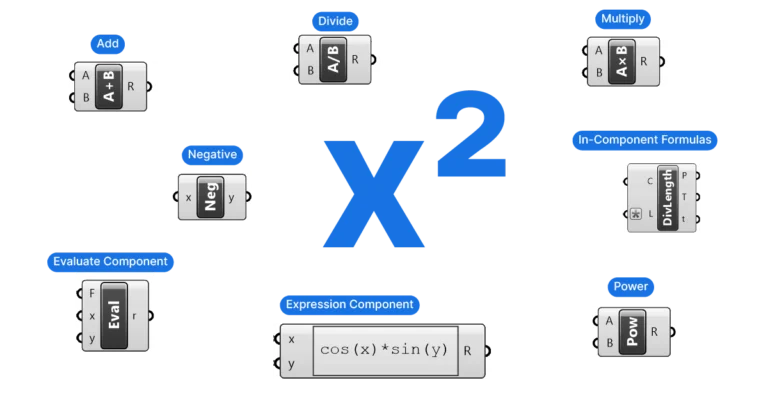
Let’s start with the basics. Basic numerical calculations are fundamental to any programming language, and Grasshopper is no exception. Grasshopper offers dedicated components for all the basic mathematical operations: Additions, Subtractions, Multiplications, Divisions, Power and Negative. The ‘Negative’ component simply returns the negative of a value. The other operations are self-explanatory.
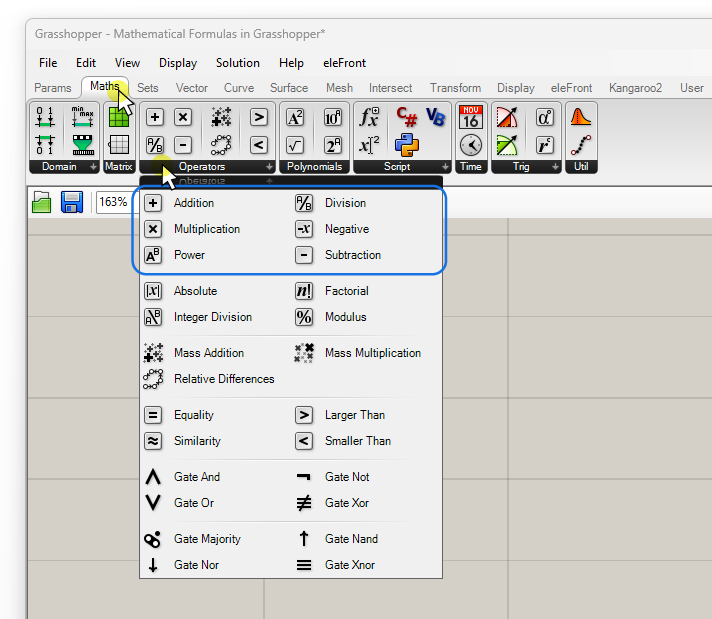
You can find them under the ‘Math’ component tab, grouped under ‘Operators’. Click on the black text to open the subsection. The first six components on top are the basic math operators available in Grasshopper.
See below what they look like:
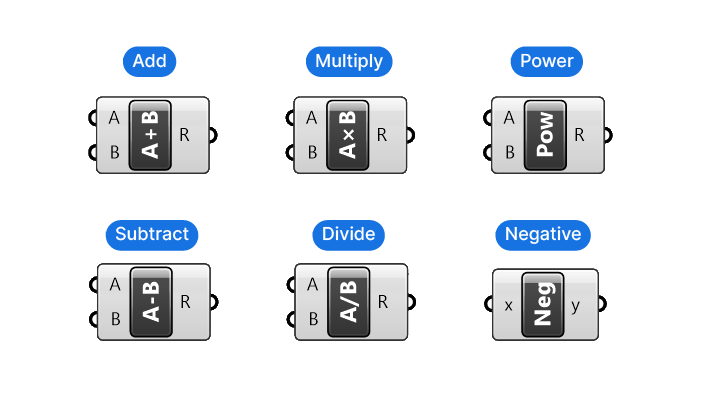
Their component inputs and outputs are straightforward: you receive inputs for the numbers you wish to operate on and one output, which is the resulting number.
You can add additional variables by zooming in on the components’ inputs. Small plus and minus signs will appear. Add or remove additional inputs by clicking them.

Note: This only works for the Addition, Subtraction and Multiply components.
Application Example for Basic Math Components
So when would you use the basic math components? It’s best shown with an example:
Below is a simple script that returns the number of floors that fit within a given massing based on a combination of the clear height and the floor slab. Two Number Sliders define the clear height and the slab thickness. We want to be able to specify them separately, but also get their sum so we can use it to generate the floors with a contour component.
To do that I used a basic ‘Addition‘ component. The resulting floor to floor height is then connected to the ‘distance’ input of the contour component.
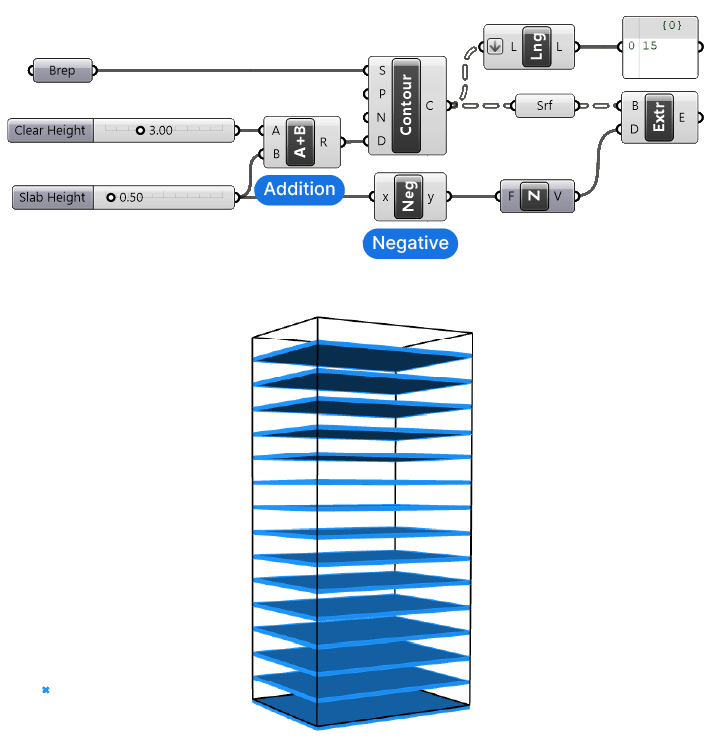
To visualize the slab thickness, I turned the contours into a surface, and then used an ‘Extrude’ component to extrude the surface downwards. I defined the vertical extrusion direction by adding a ‘Unit Z’ vector. The extrusion height matches the slab thickness value defined at the beginning. To ensure that the surface is extruded in the right direction, I added a ‘Negative‘ component that way ensuring the surface is extruded along the negative Z direction – downwards.
Finally I added a ‘List Length‘ component and a Panel to show the number of floors that fit into the massing. By adjusting the clear floor height and the slab thickness, I can quickly see how different configurations affect the number of floors of the building.
The Evaluate Component
While the basic math operators in Grasshopper are great for quick and simple mathematical formulas, things get more complex when you want to use several mathematical operations at once. While you can chain multiple basic operators together, it often results in a tangled web of components and wires. Changing around the order of the operations or any other change would require a complete re-organization of the components.
Luckily we can express multi-factor formulas using a single component!
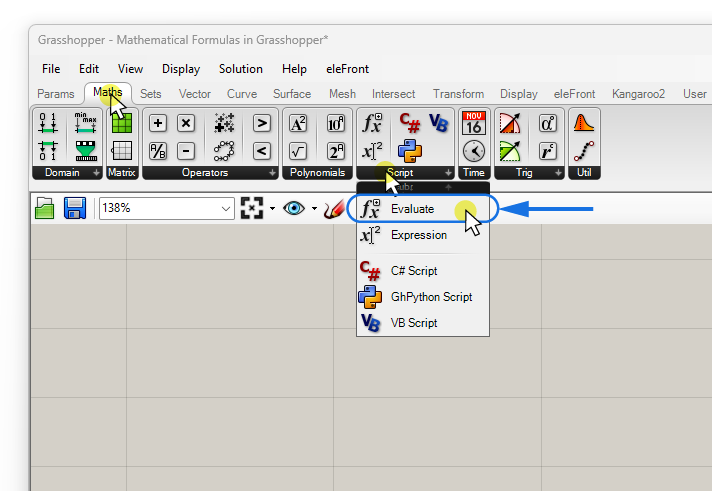
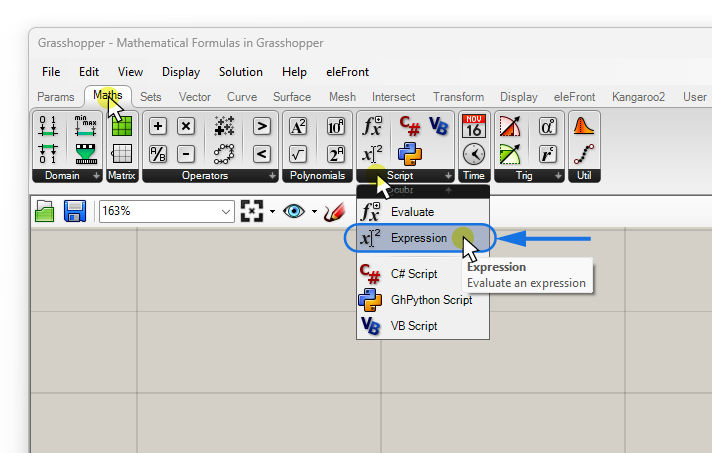
The component is called ‘Evaluate‘. You can find it in the ‘Math‘ component tab grouped with the ‘Script‘ components.
The inputs look similar to the basic math operators, with the difference that there’s an additional input ‘F’ on top.
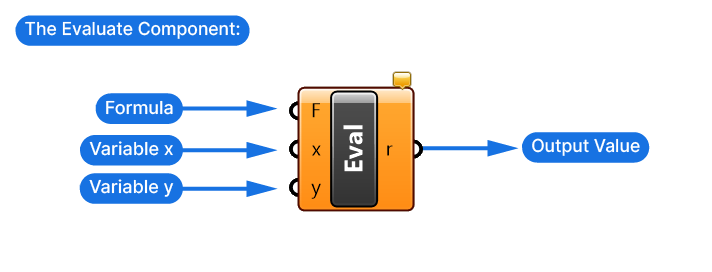
The ‘F’ input is where the magic happens. To add a formula, you first need to add a Panel component. This is where you are going to type the formulas with basic mathematical formatting. For example:
(2*x)-y/2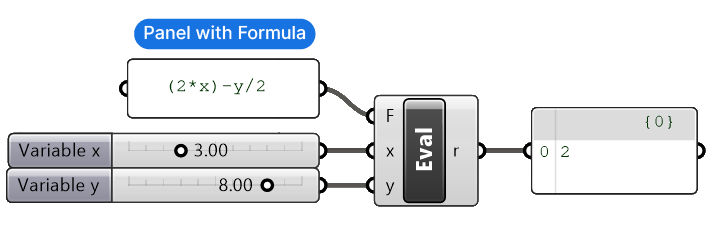
Connect the Panel containing the formula to the ‘F’ input of the Evaluate component and connect values to the x and y inputs. The output will contain the result, here shown in a Panel.
Make sure the variables you use in the formula (x and y) match the variable input names of the Evaluate component, by default, ‘x’ and ‘y’.
If the component turns red, check for formatting mistakes in your formula, and that all required values are connected.
While the ‘Evaluate’ component is already a big step forward compared to the simple operators, there is an even better way of using mathematical formulas in Grasshopper! Let’s learn about it next!
The Expression Component
Grasshopper offers an additional component that combines the simplicity and legibility of the basic operators with the flexibility of the ‘Evaluate’ component. It’s called the ‘Expression‘ component. This component does exactly the same thing as the ‘Evaluate’ component, but allows us to type the formula directly ‘into’ the component. This way the formula is always clearly visible and we don’t need an extra component to type in the formula.
It’s located in the ‘Math’ component tab, right below the ‘Evaluate’ component.
When you add the expression component, it will come with a predefined formula. Don’t let that fancy notation scare you off! It is an example of what you can do with this component, the default text allows you to format a number to a specific number of decimals, but that’s for another article!
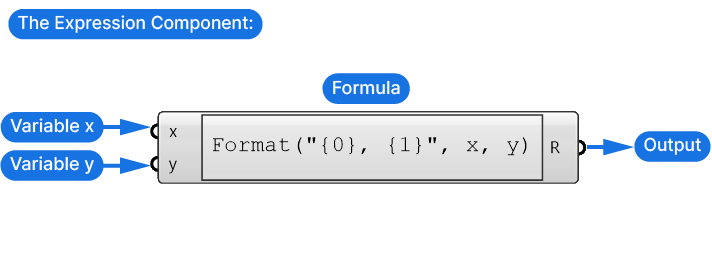
You can replace it with your own formula, by double-clicking onto the formula field. A separate window will open – this is where the magic happens!
The Expression Editor
You’ll see the expression text field and all the operators and functions that you can use to write your formula.
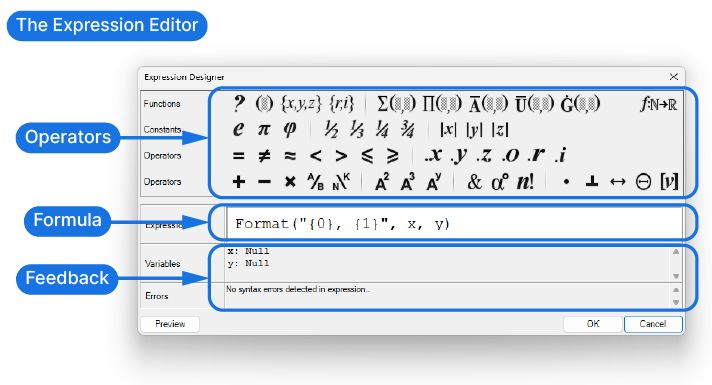
Besides formula, you can also join two strings of text, convert radians to degrees, compare two values and get a ‘True or False’ output and much more.
But let’s stick to the formulas for now!
Simply type your formula in the expression field. You can use the operators above the field to help you type the formula, for example you can select part of the formula and hit the ‘( )’ button, the second button from the top, to put your selection into brackets.
But typing the formula directly with your keyboard works just as well.
As you type in the formula, the component will give you live-feedback whether the formula is valid or not. Any Errors are shown in the bottom field. If your formula is clean, you’ll see a message saying “No syntax errors detected in expression…”.
Application Example of the Expression Editor in Grasshopper
In the below example, I start with a simple square, flat surface, and then generate a grid of points on the surface. I deconstruct the resulting points into their x,y,-and z components, and use the expression editor to use the following formula:
cos(x)*sin(y)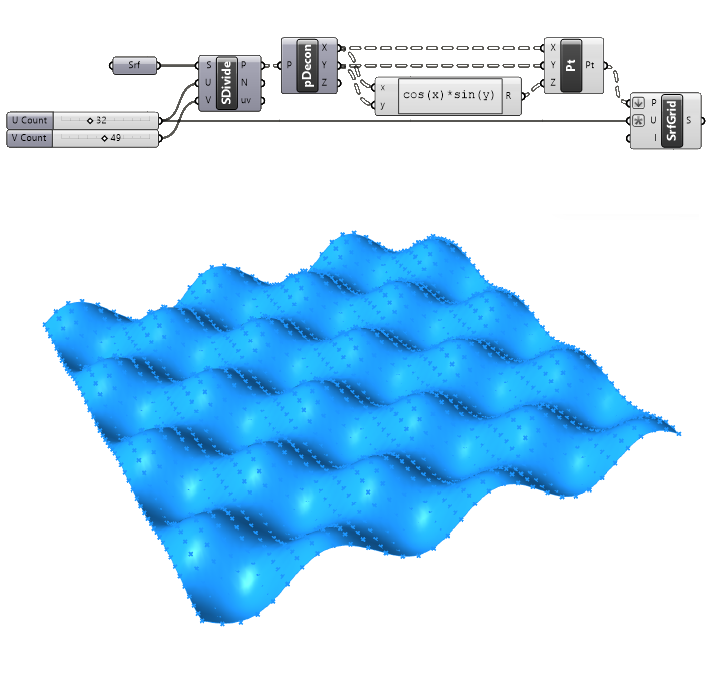
By using the Sine and Cosine of the x and y coordinates of the points, I generate a value between 1 and -1 for each point, that I then use as the z-coordinate of the points. Finally I use the Surface From Points component to turn the grid of points back into a surface. As a result, we get a wave-patterned surface, pretty cool!
Using Custom Variable Names
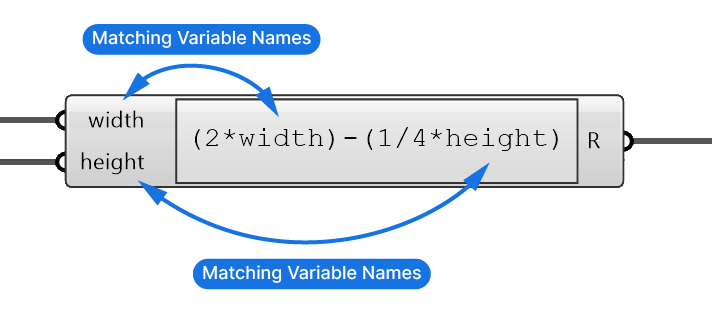
In real-life scripts, x and y will only get you so far. Once you need more variables or you have several formulas in your script, having more descriptive variable names can be helpful. Luckily we don’t have to stick to the default x and y names, we can change any input name by right-clicking on the input, going to the top field and typing our desired name.
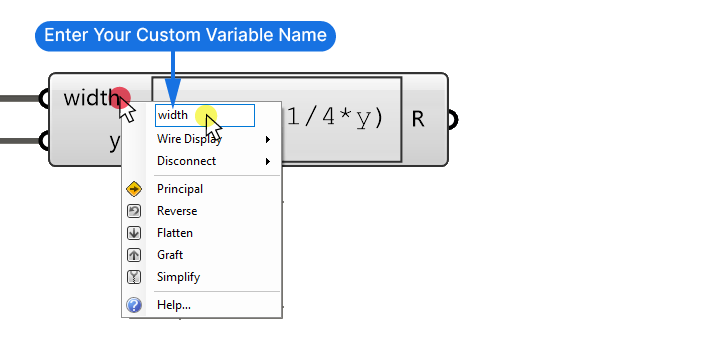
Note: Custom variable names shouldn’t contain spaces or begin with a number.
After renaming the variables, ensure the formula mirrors these changes; the names must match! Sometimes the component needs a ‘refresh’ before the variable name is recognized, simply reconnect one of the inputs and the component will update.
Adding Mathematical Formulas Inside Components
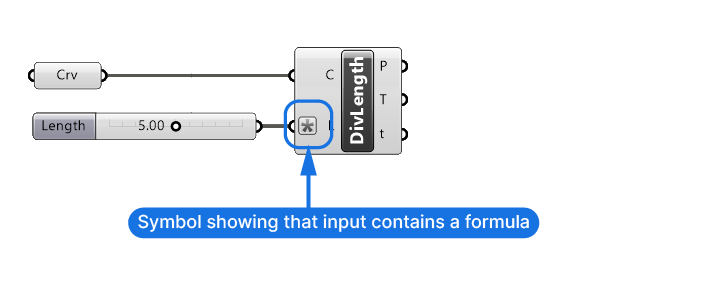
In some cases, you just want to quickly apply a mathematical formula to an input in Grasshopper, and you know that you won’t have to change it later. For example if you just quickly want to get half of a value. For that scenario, Grasshopper offers the option to add mathematical expressions directly inside any numerical component input.
To add an expression to an input, right-click on the input you want to change and go to ‘Expression‘. Type your formula into the text field and confirm with ‘Commit Changes’.
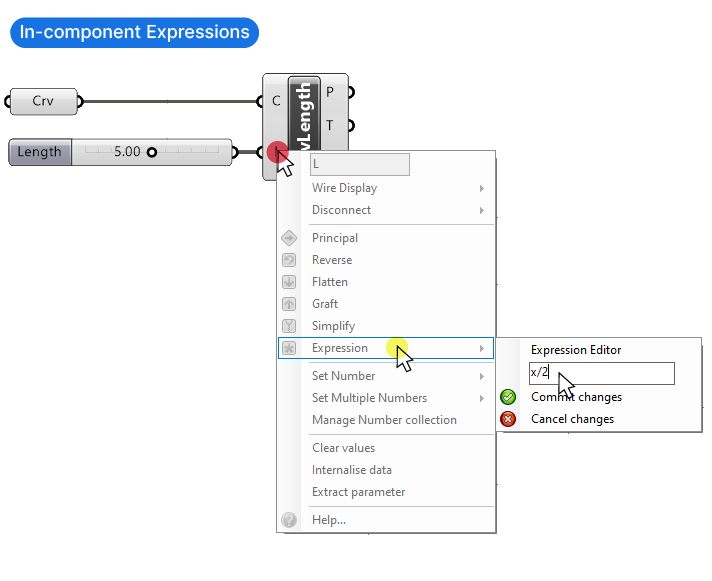
Tip: We can use these in-component expressions for both numbers and vectors.
Grasshopper marks inputs that contain expressions with a ‘*’ sign, so we can keep track of our edits.
Here’s an example illustrating how this might be used:
Application Example of In-Component Formulas
Let’s say we have a surface and we want to extrude it, but to both sides. We could create two separate extrusions, one with a positive and one with a negative value, but then we end up with two separate objects. Instead, we’ll extrude it to the total height we want, and then move it down by half the extrusion height. That will center the extrusion on its origin.
In the example below I referenced a surface and extruded it along the Z-axis using a Z-Unit component and a Number Slider to define the extrusion distance. This extrudes the surface up by 2 units. Then, I’m using a ‘Move’ component to move the extruded surface down by half the extrusion amount, and in the opposite direction. To do that, I added the formula ‘-x/2‘ into the translation vector input. This will first invert the extrusion direction, and then half it.
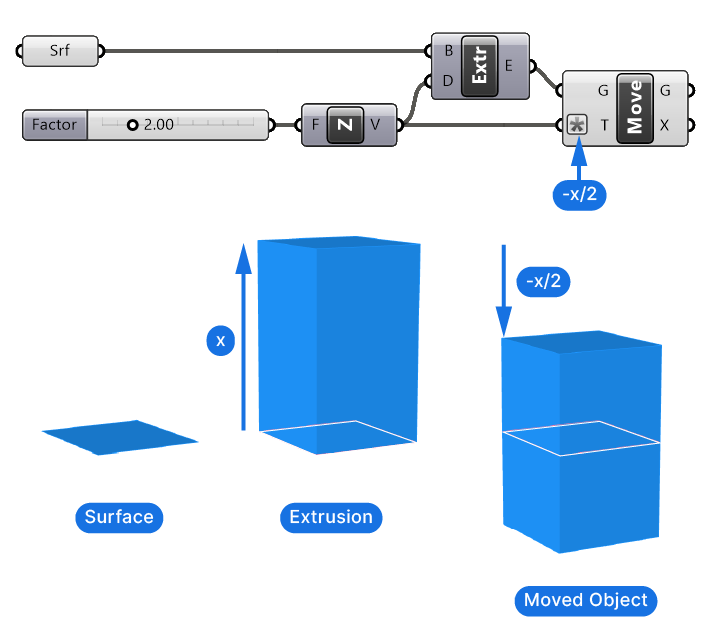
As a result, I get a box extruded ‘to both sides’ of the base surface.
Final Thoughts
We’ve walked through using mathematical formulas in Grasshopper, from basic operations to crafting complex expressions, all to enhance our design workflows. I hope this guide enables you to seamlessly weave math into your architectural and design projects!
If you’ve found this guide helpful, and you want to explore deeper into Grasshopper’s advanced functionalities, check out our Grasshopper Pro online course, tailored for professional practice architects. This course equips you to navigate complex design challenges by enhancing your computational design knowledge and skill in Grasshopper, unlocking further possibilities in your projects. Join us to continue your journey towards mastering Grasshopper!
Happy designing!