Offsetting curves is a fundamental command in any design software. While Grasshopper has an offset curve component, it doesn’t come with one to offset to both sides. In this step-by-step tutorial I’ll show you how to build a script sequence that offsets a curve to both sides.
Let’s dive in!
Step 1: Preparing the Referenced Geometry
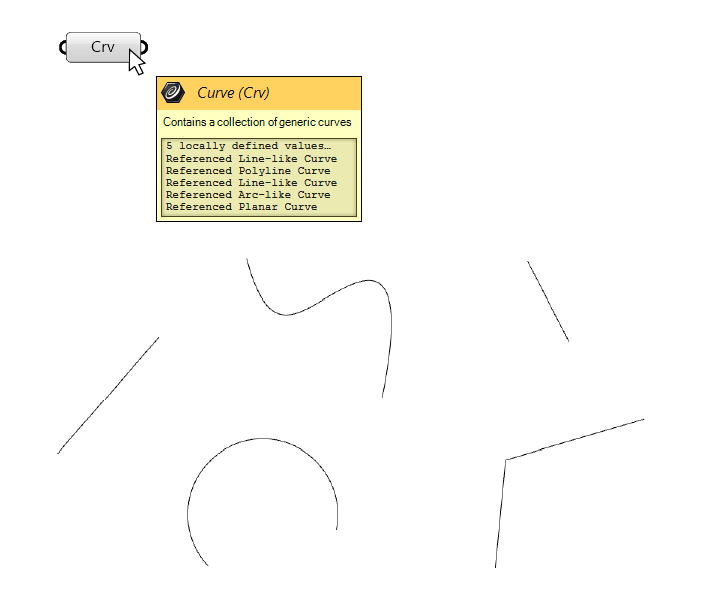
Start by drawing a few different types of curves in Rhino. These will be the curves we’ll test our script on as we develop it. It’s good to use a variety of curves to ensure our script works for as many scenarios as possible.
Go ahead and reference the curves to a Curve (Crv) container component.
Step 2: Adding the Offset Curve Components
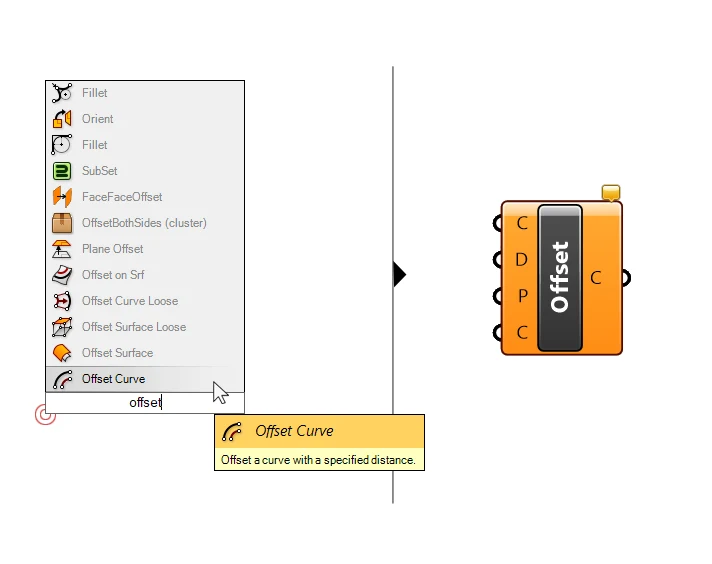
Next, add two Offset Curve components. To add the component, double-click onto an empty spot on the Grasshopper canvas and type ‘Offset’. The ‘Offset Curve’ component will be the first result.
Select it to drop it to the canvas.
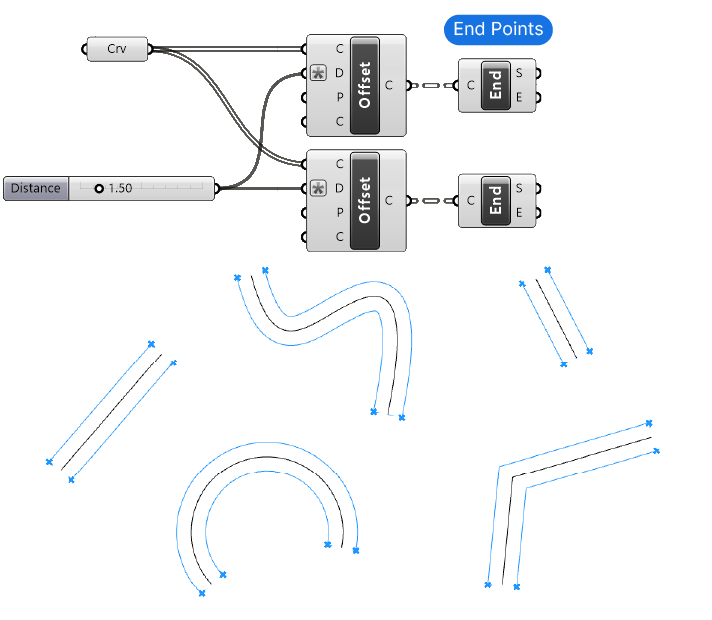
Now let’s connect the referenced curves to the first Curve (C) input of both ‘Offset Curve’ components.
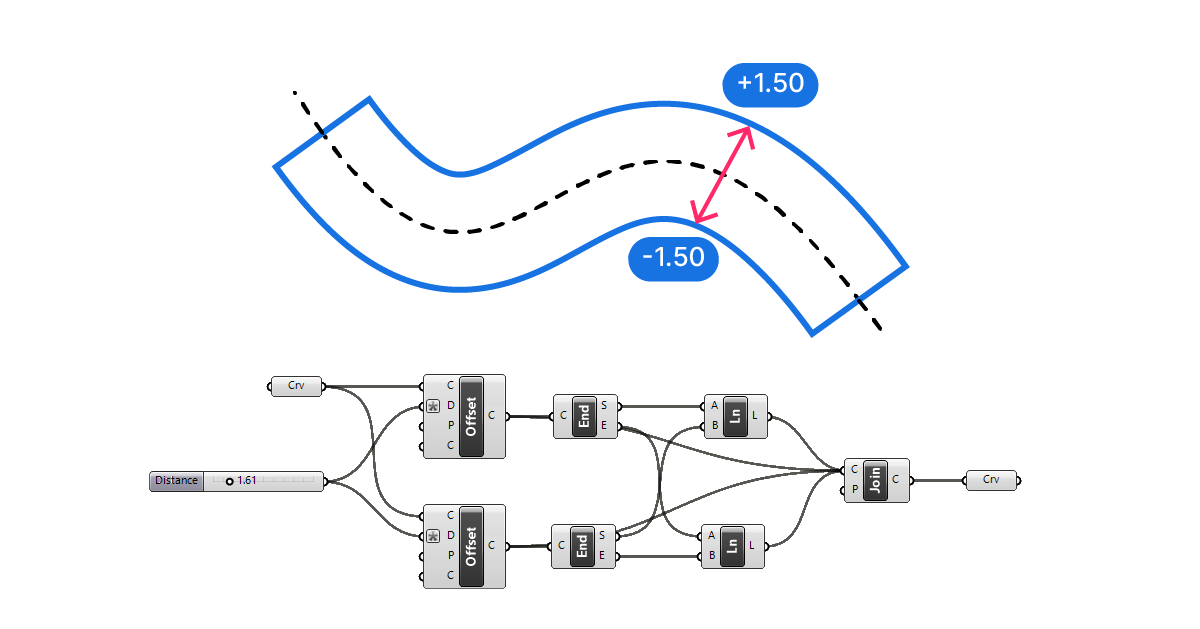
Add a Number Slider to define the offset distance. To add a Number Slider with a value of 1.5, double-click onto the canvas and type “1.50“, and hit ‘Enter’. That way Grasshopper will create a Number Slider with the value 1.50 ready to go.
We’ll connect this value to the Distance (D) input of both our ‘Offset Curve’ components.
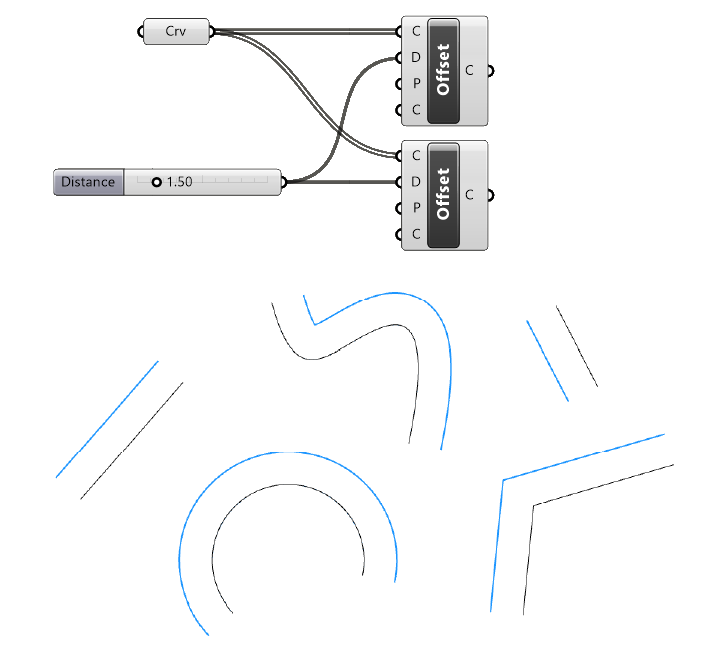
So far, we’ve basically created two overlapping offsets to the same side of the curve. Let’s invert the offset direction of one of the components next.
Step 3: Inverting the Offset Direction of One Offset Component
To invert the offset direction, we’ll add an expression to change the Number Slider input value to a negative number. And instead of adding the Expression Editor component, we’ll use an in-component expression.
Right-click on the Distance (D) input of the second Offset Curve component and go to ‘Expression’.
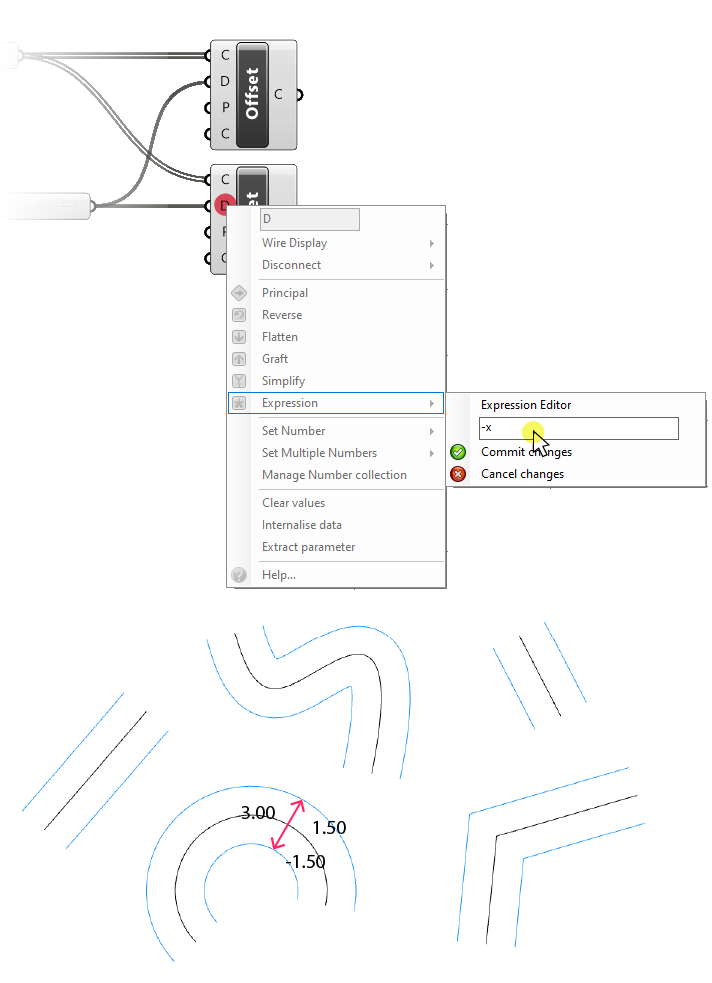
Type “-x” into the blank field.
“x” is a placeholder for any numerical input in Grasshopper components. This means that our Number Slider value of 1.50 will become -1.50.
As soon as we confirm with ‘Commit Changes‘, the preview will show the two offsets to both sides of the curve.
Before we continue, let’s take a moment to consider what we want to control with the Number Slider parameter.
For an offset to one side, a simple number slider makes sense, it describes the offset distance from the original curve to the offset curve.
But since we offsetting in both directions, the “thickness” of our offset is now double that: 2 x 1.50 = 3.00!
It makes more sense to use the Number Slider to specify the total width of the offset curve.
Step 4: Using Expressions to Define the Width of the Double-Sided Offset
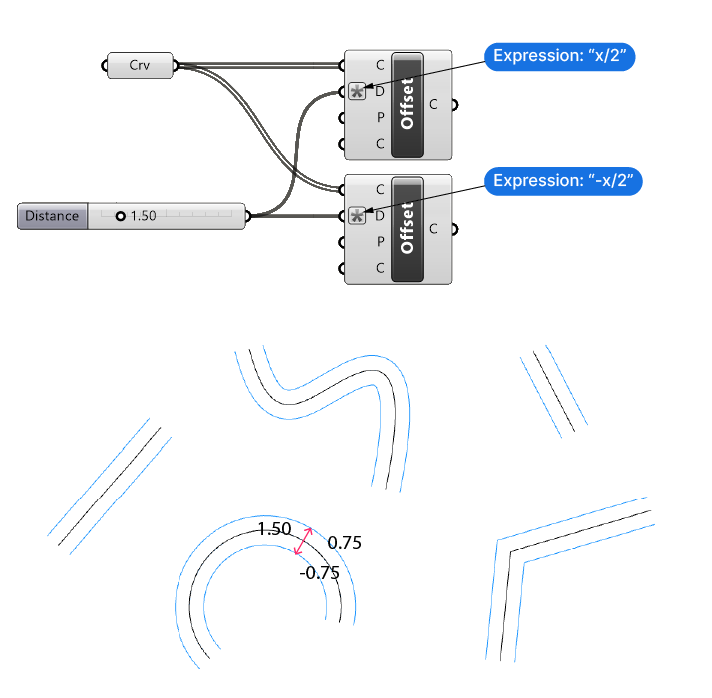
If the Number Slider value represents the total width of the offset, we need to offset the curve by half that amount to each side. Let’s edit the in-component input expression of both components.
Right-click on the Distance (D) input of the first Offset Curve component, go to Expression, and type in “x/2“.
Then edit the expression of the second Offset Curve component to “-x/2“.
Now the Number Slider value of 1.50 defines the total offset width.
Let’s connect the ends of our two offset curves to create a closed curve. We’ll create simple lines between the start and endpoints of the curves.
Step 5: Connecting the Curve Ends to Create a Closed Curve
To connect the ends we’ll add two simple line segments at each end. To create them we’ll first need the points at those ends.
Type ‘End Points’ into the component search bar and add the ‘End Points’ component. This component will simply output the start and end points of the input curve in the separate outputs: S (Start) and E (End).
We’ll need two of these, one for each offset curve.
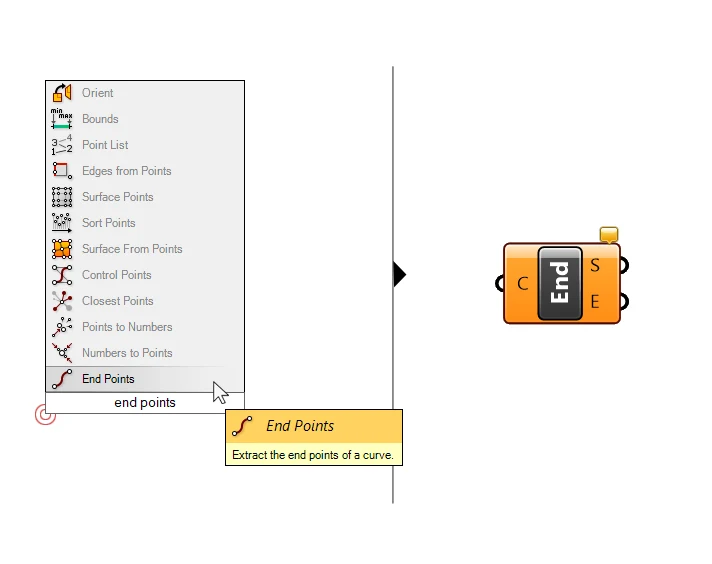
The points will be highlighted in the preview. Now let’s connect them.
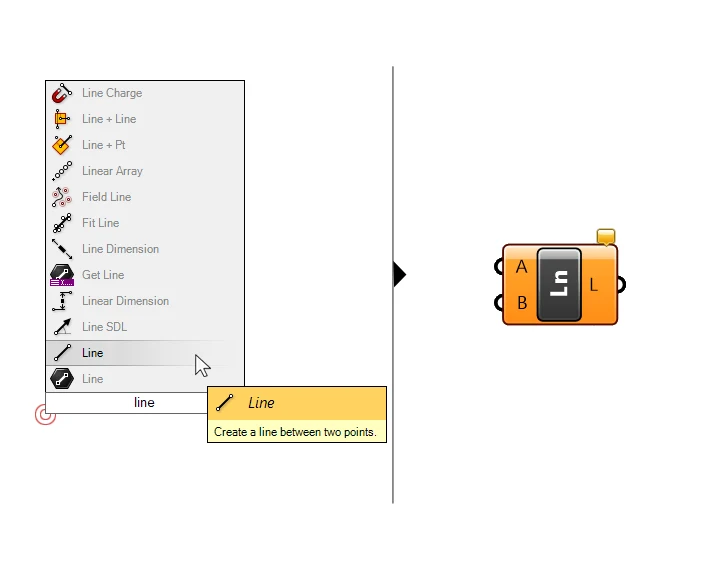
Add a ‘Line (Ln)’ component. Double-click on the canvas to open the component search bar and type “line”. Make sure to pick the result that says “Create a line between two points” when you hover over it. (The first result is also called ‘Line’ but it’s just a data container.)
We’ll need two of these, so click and drag on the ‘Line’ component and tap ‘ALT’ on the keyboard to create a copy. Or simply Ctrl+C, Ctrl+V.
The ‘Line (Ln)‘ component is straight-forward: it will create a line by connecting two points we feed it in the ‘A’ and ‘B’ inputs.
We want to connect both start points and both end points, so we need to connect both ‘S’ outputs of the ‘End Points’ components to the ‘A’ and ‘B’ inputs of the ‘Line’ component respectively. This creates crossing wires as shown below.
The line will appear in the preview, connecting one side of the offset curves. Repeat the same for the end points ‘E’.
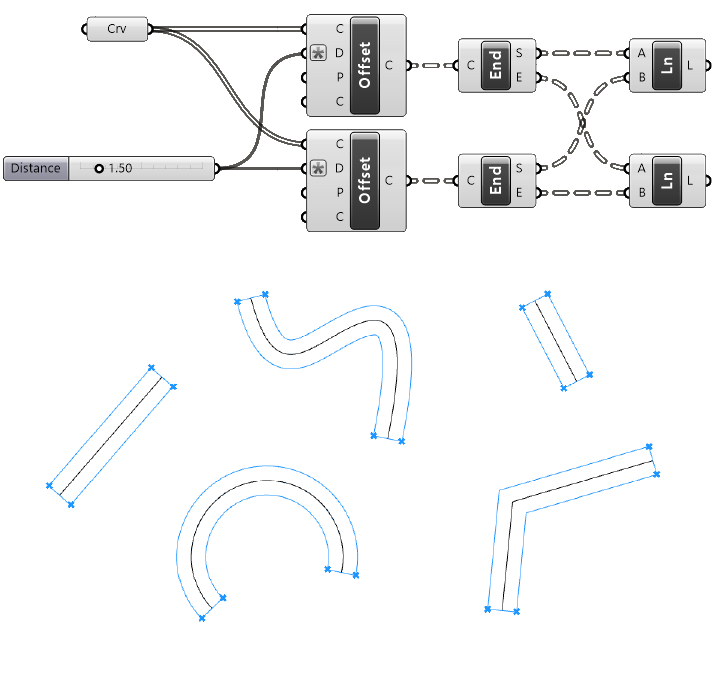
We now have every element in place, and the preview in the Rhino viewport shows a closed curve!
But the preview can be misleading: in Grasshopper we are still dealing with four separate curves (per input curve): the two offset curves and the two lines at each end.
Let’s join the curves to create a single closed curve.
Step 6: Joining the Curve Segments to Create a Single Closed Curve
Add a ‘Join Curves’ component. Add it through the component search bar as shown below, or by going to the ‘Curve’ component tab. You’ll find it in the ‘Util’ component group.
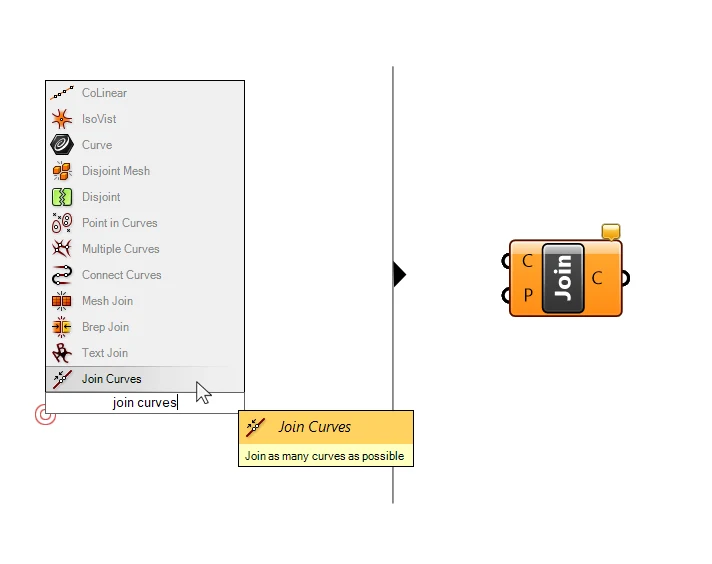
The Join Curves (Join) component will join any curves we feed into its Curves (C) input. Provided of course that they “touch” at the ends and that they are in the same data branch. Both are true in our script.
Start by connecting the two line segments we just created.
Tip: Hold down ‘Shift’ as you create the connection to add multiple data streams without replacing the existing wire connection. A small green arrow and a plus symbol will let you know that the wire will be added to the existing connections, instead of replacing them.
Next, connect the output of both ‘Offset Curve’ components.
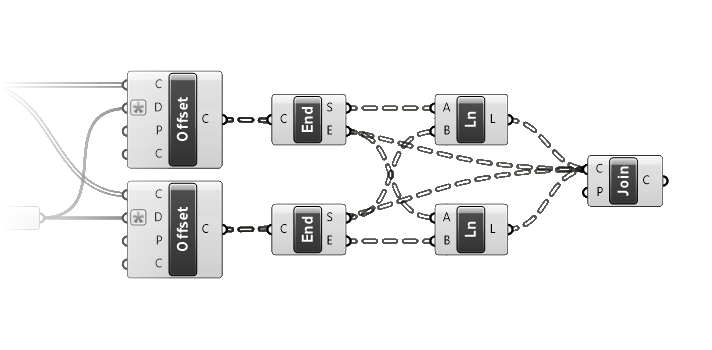
And that’s it! The Join Curves component now contains the joined offset curve.
Concluding Thoughts
You should now have a solid understanding of how to offset a curve to both sides in Grasshopper. You’ll need the double-sided offset more often than you’d think, so remember this component sequence so you can implement it quickly.
Make sure to keep an eye on the data structure if you implement this sequence in a more complex script and make adjustments where needed!
Happy designing!