We’ve all been there: we want to run a boolean difference with two geometries in Grasshopper, but the command fails. In many cases, that’s because one of the two Breps is not closed. In this guide, we’ll cover, three step-by-step methods to turn an open Brep into a closed Brep in Grasshopper.
Let’s dive right in!
Rhino and Grasshopper’s Definition of an Open Brep
For Rhino and Grasshopper, a closed Brep, is set of joined surfaces that describe a fully enclosed 3D volume.
In geometric terms, that means that all edges of the Brep are shared by two surfaces. These ‘shared’ edges are called “manifold edges”. “Non-manifold edges” are edges that are shared by more than two surfaces. Non-manifold edges are best avoided when 3D modelling as they lead to ambiguous geometries.
Now if there are any edges in the Brep that are not shared by two adjoining surfaces, but they are an edge of a single surface, the Brep has what Rhino calls ‘naked edges’.
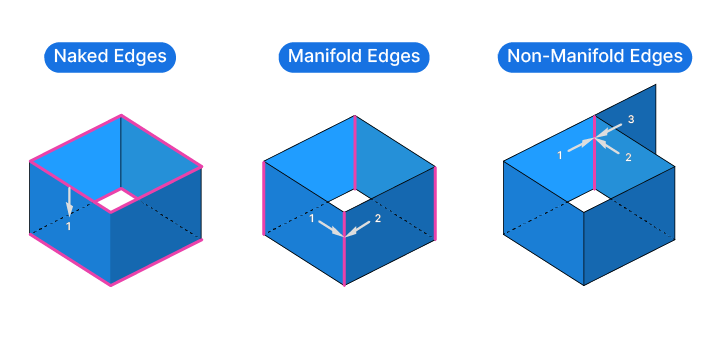
Objects with “Naked Edges” are not uncommon when modelling, any free-standing surface has them. But when it comes to creating a closed Brep, they are a problem.
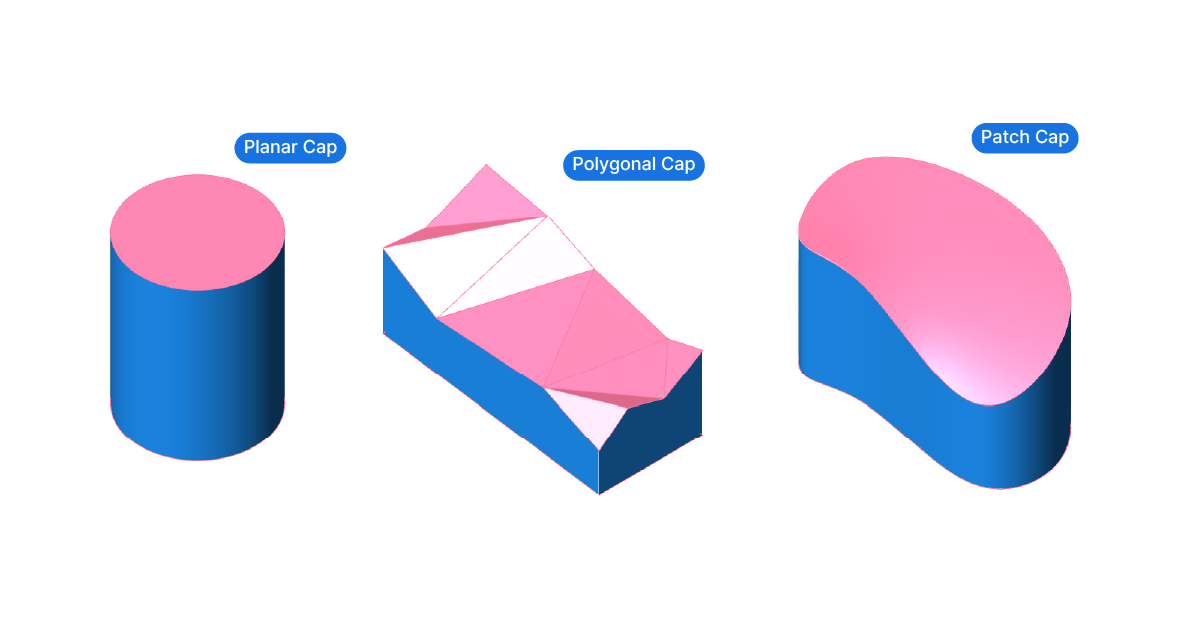
The way to close a Brep is to create surfaces that will “cap” the opening by connecting all the naked edges.
But how can we tell whether a Brep is open or closed?
How to check whether a Brep is open or closed in Rhino and Grasshopper
Nothing is more satisfying when modelling in Rhino and Grasshopper than having a clean, fully closed polysurface, or Brep as Grasshopper calls it. And conversely, few things are more annoying than a Brep that should be closed, but isn’t.
Before we jump into the methods of closing an open Brep, let’s learn how to determine whether a Brep is open or closed to begin with.
Finding Open Breps in Rhino
If you referenced polysurfaces from Rhino into your Grasshopper script, it’s good practice to check their integrity, to ensure they are closed.
Here is the quickest way to find out if you are dealing with an open or closed Brep in Rhino. Simply select the object. In the command bar, Rhino will let you know what you selected as follows:
"1 open polysurface added to selection."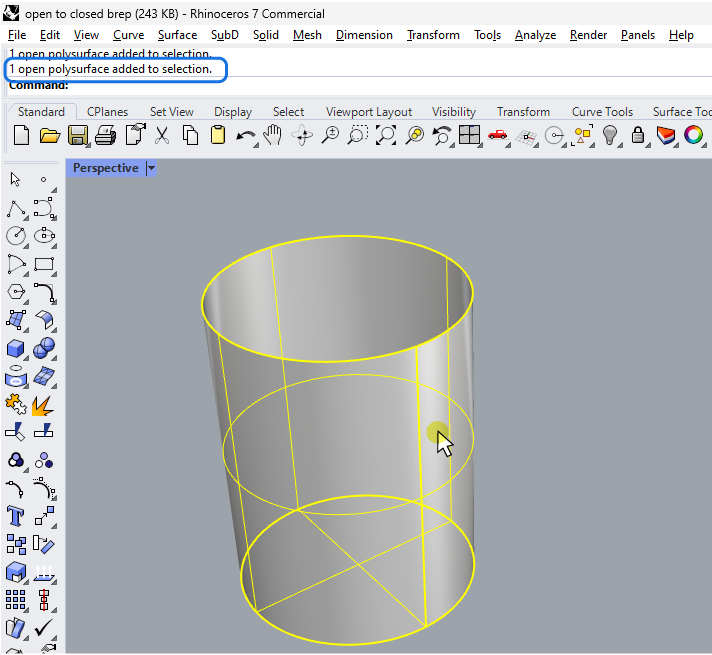
In some cases, it may not be immediately apparent where the opening is, as it may be a small gap in a corner, or two edges that aren’t cleanly joined.
To find where exactly the polysurface is open, we can use the ‘Edge Analysis‘ tool.
Select the object(s) in question, and then go to Analysis > Edge Tools > Show Edges.
A small menu will pop-up.
As we learned above, the edges we need to identify are the “naked edges”, so let’s select them.
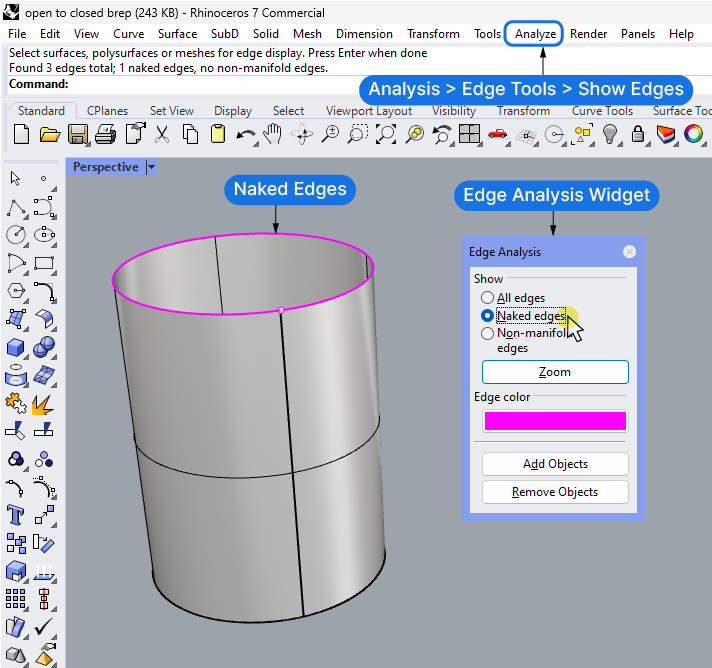
In the Rhino viewport, all naked edges are now highlighted in the color shown in the Edge Analysis widget (purple by default). This makes it easy to spot openings or unclean edges.
If we reference geometry from Rhino, the easiest way to get a closed Brep is to close it in Rhino. Close the openings or rebuild the parts of the polysurface that aren’t clean before proceeding in Grasshopper.
Finding Open Breps in Grasshopper
The simplest way of determining whether a Brep is open or closed in Grasshopper, is to hover over the component that contains the Brep. In the pop-up tooltip, Grasshopper will let us know what kind of geometry we are dealing with. It will either say ‘Open Brep’ or ‘Closed Brep’.
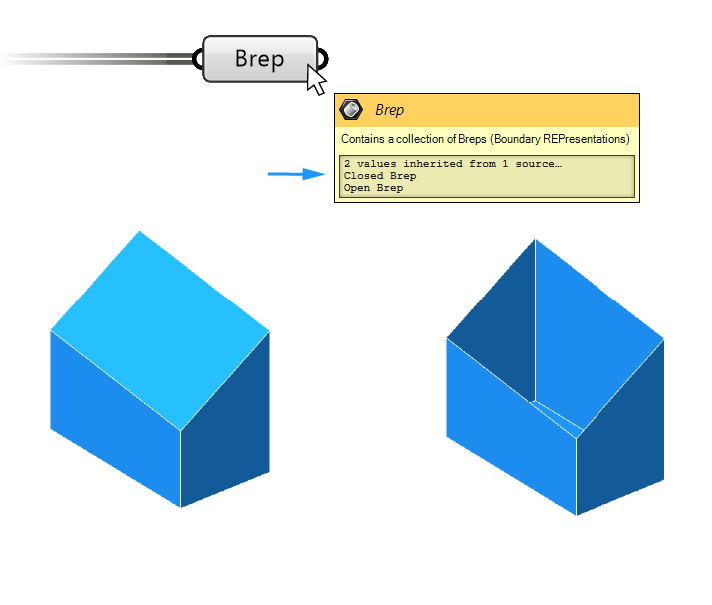
Keep in mind that this doesn’t work for data container components that contain objects referenced from Rhino, in that case the description will just say ‘Referenced Brep’.
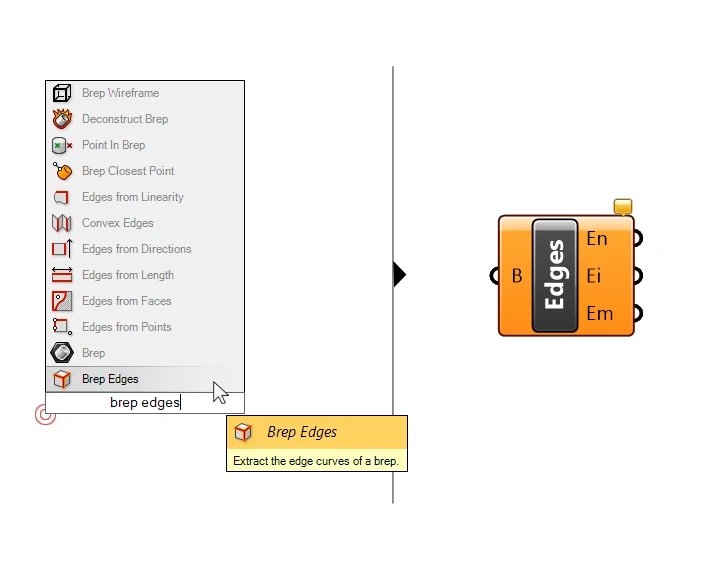
While we don’t have access to the edge analysis tool within Grasshopper, we can still extract the edges of a Brep with the ‘Brep Edges’ component. Double-click on the Grasshopper canvas and type ‘brep edges’, and select it to add it to your script.
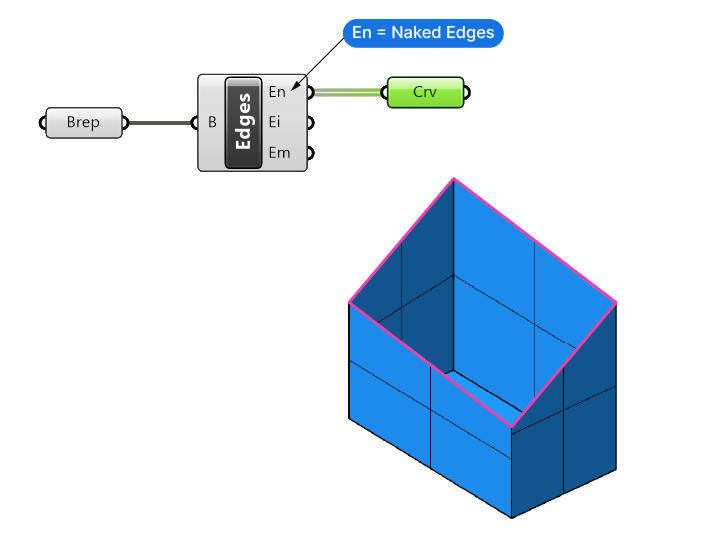
Conveniently, the component outputs the Naked, Manifold-, and Non-manifold edges in three separate outputs. By plugging the naked edges into a dedicated Curve container we can select it to highlight the edges around the Brep opening in the Rhino viewport.
The edge outputs contain a list of all the individual edges, so make sure to join the curves if you want to process them further.
Now let’s move on to closing those pesky Brep openings!
How to Close an Open Brep with Planar Openings in Grasshopper
In most cases, an open Brep in Grasshopper is the result of an extrusion. We have a closed curve, extrude the curve, and now we have an object that has two planar openings on the top and on the bottom.
Grasshopper has a component that allows us to quickly close planar openings, it’s called ‘Cap Holes‘.
Double-click on an empty spot of the Grasshopper canvas and type ‘Cap’ to find it, then click on it to add it to your script.
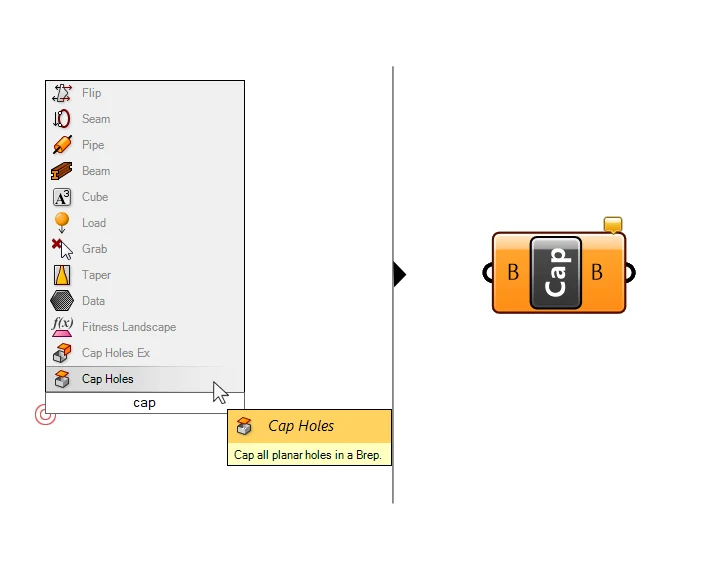
The component is very simple: we feed it open Breps, and if they have planar, closed edges loops, it will “cap” them, in other words create a surfaces to close them. It will close any planar opening it finds, no matter how many the open Brep has!
It doesn’t matter if the curves are not ‘flat’ in terms of being aligned to the X, Y or Z plane. As long as they are truly planar, they will be closed no matter their orientation.
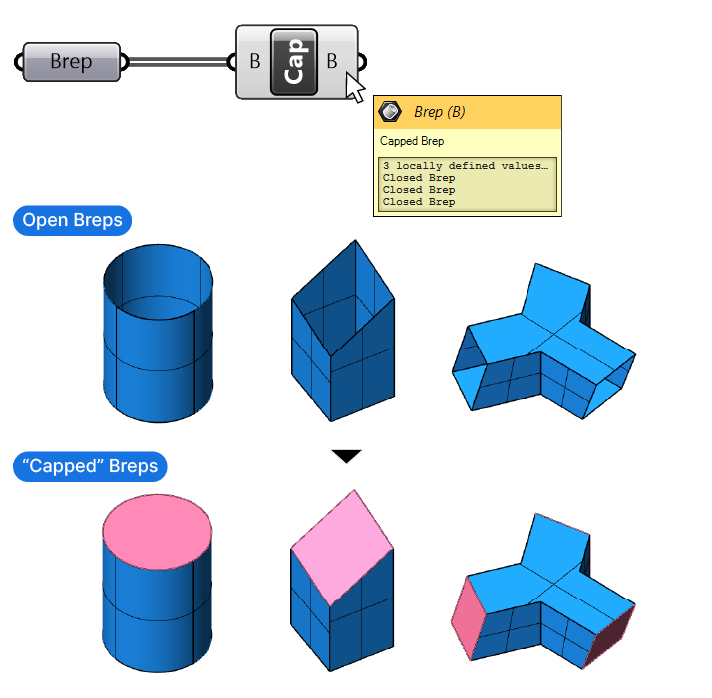
In essence, the ‘Cap Holes’ component extracts the naked edges of the Brep, joins them and turns the closed curves into surfaces. Finally, it will join everything together to create a closed Brep.
Now in 99% of the cases, this component will do the trick. But in some cases we are dealing with non-planar openings. Grasshopper has another component that (might) help with that.
How to Close an Open Brep with Non-Planar, Polygonal Openings in Grasshopper
Non-planar openings are tricky to close with Grasshopper, because they can’t be “capped” with a single surface. Grasshopper’s ‘Cap Holes Ex’ component will try to close the opening anyway.
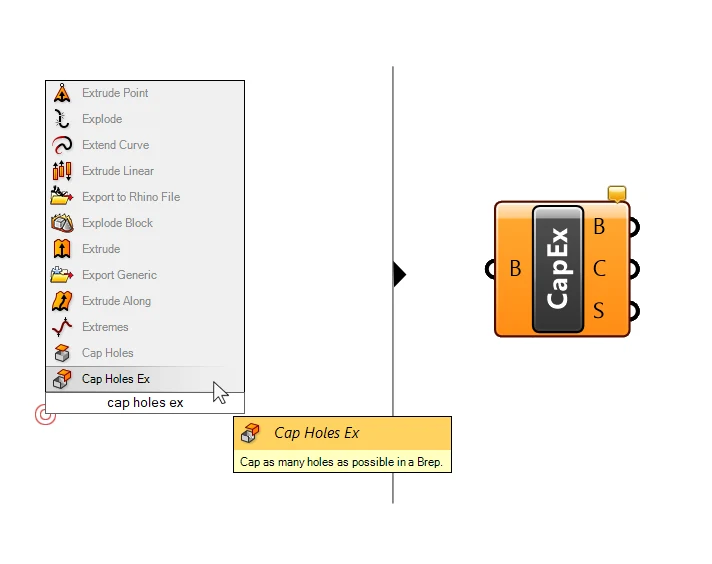
It’s important to note that it will only work if the opening, or the naked edges of the Brep to close are polygonal. The component won’t be able to close curved edges.
As the ‘Ex’ in the name suggests, this component is experimental but once you know its limitations it can be a powerful addition to your design toolkit.
Here is how it works:
The input is the same as the ‘Cap Holes’ component: the open Brep.
In the example below I extruded a simple rectangle and trimmed the top edge with 3-dimensional polyline. Since both the source object and the trim curve are polygonal, I can be sure that the resulting edges are also polygonal – or composed only of linear curves.
The ‘Cap Holes Ex’ component will triangulate between all the end points of the naked edge curves, and create several, triangular, planar surfaces.
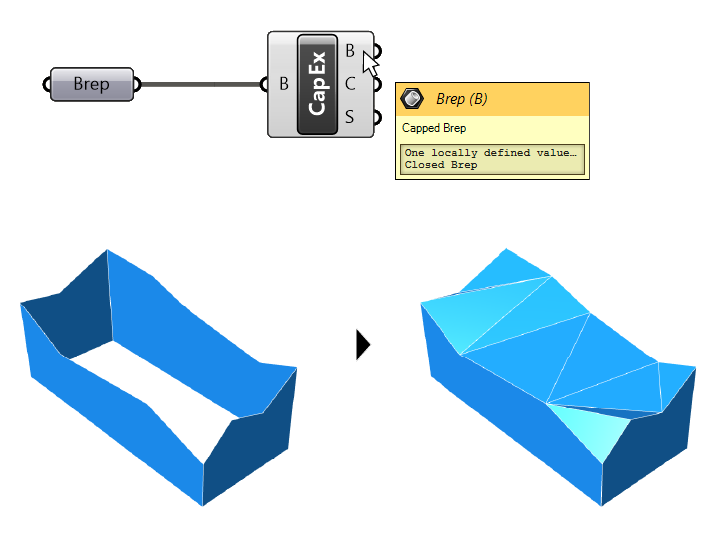
The command works just like the ‘Delauney Mesh’ component, which triangulates points to create a mesh, but with surfaces. A triangle created from three points in 3D-space is always planar, and as a result, all the created surfaces share two edges.
We successfully closed the Brep!
How to close an open Brep with curved, non planar openings
If the openings in the Brep are not planar and not polygonal, the only way to close the Brep is to “manually” generate a surface that closes the opening, and then joining it with the existing surface.
In some cases, the “naked edges” of an open Brep will not be polygonal, let alone planar. It will take a few more components, but there might still be a way to close it.
While the ‘Cap Holes Ex’ component only works for polygonal openings, this approach only works if the naked edges describe a smooth curve with a continuous curvature (without kinks or sudden changes of direction).
Here is how to do it:
- Use the ‘Brep Edges’ component to get the “naked edges”
- Use the ‘Join Curves’ component to join the edges to closed curves
- Add the ‘Patch’ component and connect the “naked edges” output (graft the input first).
- Join the original Brep and the Patch with the ‘Join Brep’ component (flatten the input first).
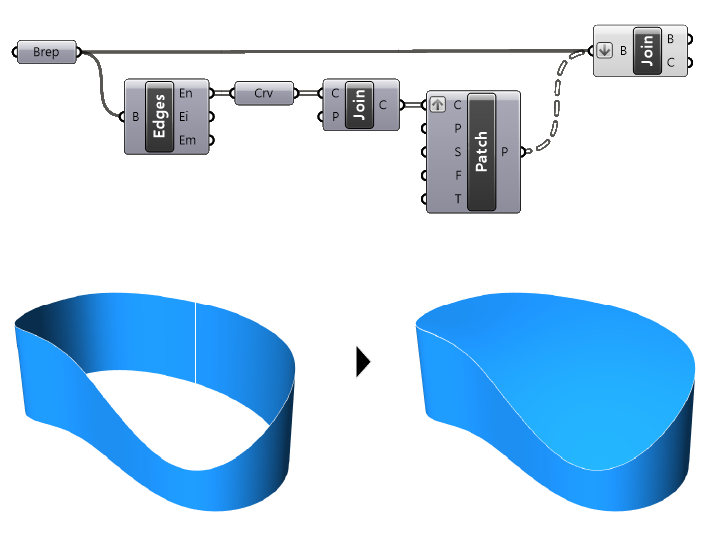
The Patch component is a bit of an unpredictable component. It tries its best to fit a surface through the input curves or input points, but there will always be a slight deviation. If the deviation is smaller than the document tolerance of your Rhino file, Grasshopper will consider the Brep as “closed”.
Remember to graft the curve input of the Patch component, otherwise the component will create a surface that fits through all the opening curves. That will lead to an unpredictable und most likely undesired result.
We’ll want to flatten the input of the ‘Join Brep’ component, so all the surfaces are in a single branch and can be joined together. Depending on your data structure, you may need to manage the data structures differently.
Final thoughts
In this comprehensive guide, we’ve navigated the process of transforming an open Brep to a closed Brep in Grasshopper. We’ve learned that ‘naked edges’ can prevent a Brep from being closed and how to identify them using tools like ‘Edge Analysis’ in Rhino and the ‘Brep Edges’ component in Grasshopper.
We’ve also explored practical solutions for closing Breps. For planar openings, we use the ‘Cap Holes’ component. For non-planar, polygonal openings, the ‘Cap Holes Ex’ component comes in handy. And for curved, non-planar openings, we manually generate a surface using the ‘Patch’ and ‘Join Brep’ components.
In conclusion, understanding and addressing ‘naked edges’ is key to transforming an open Brep to a closed Brep in Grasshopper, ensuring our 3D models are ready for further operations.
Happy designing!