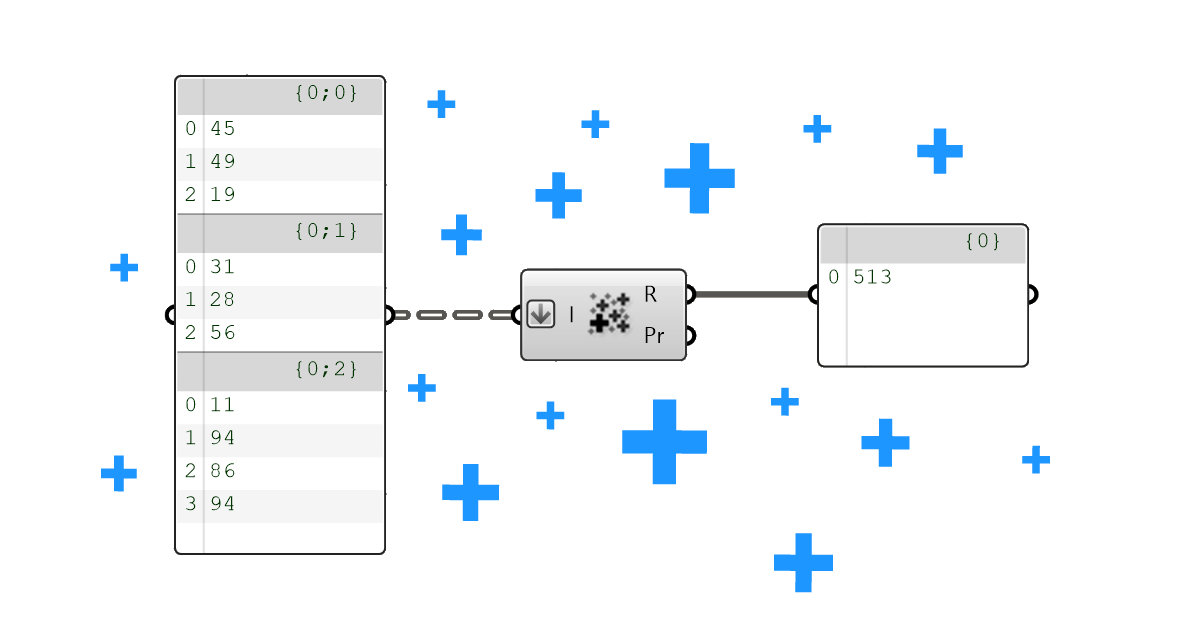
To sum a list of numbers in Grasshopper, use the Mass Addition component: it returns the total in its Result (R) output, and every running total along the way in Partial Results (Pr).
Adding the Mass Addition Component
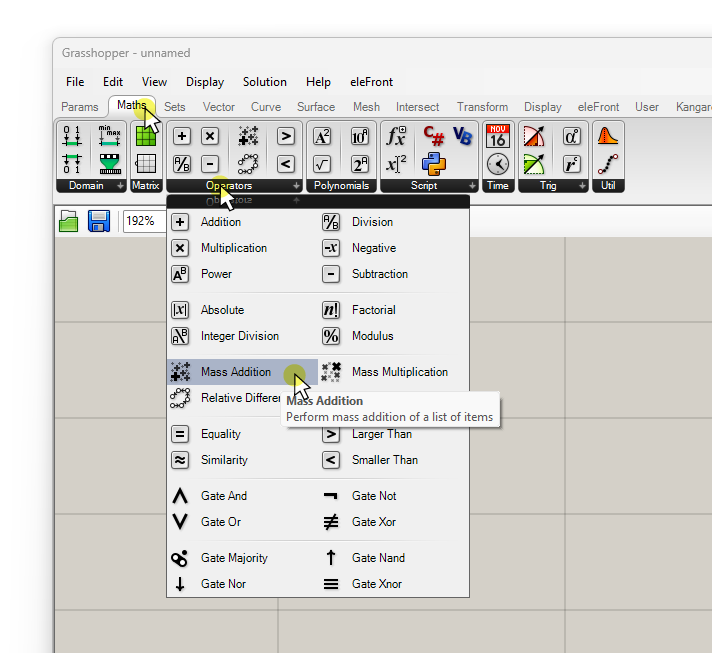
You can find it in the ‘Maths‘ component tab, in the ‘Operators‘ group. Select it and click anywhere on the canvas to add it to your script.
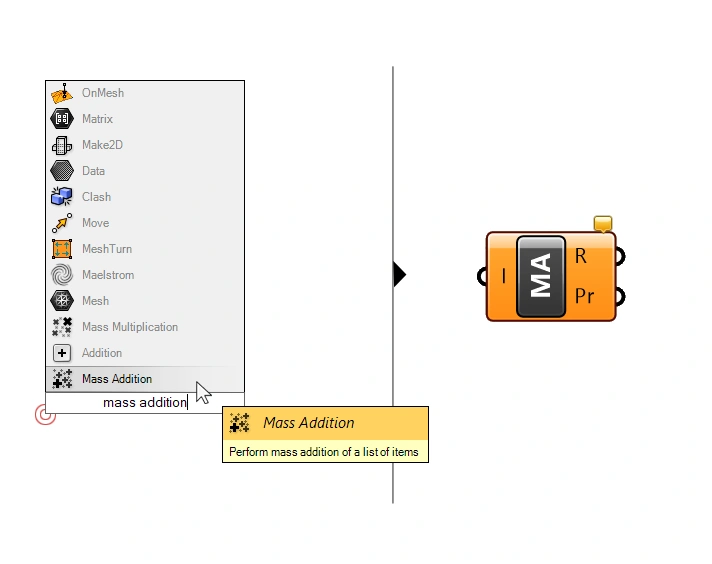
If you prefer to use the component search bar, simply double-click on the Grasshopper canvas where you want the component to be placed, and type “mass addition” into the search bar. Then click on the first result to add the component.
Mass Addition Outputs: Result and Partial Results Explained
Let’s take a look at the component inputs and outputs. The only Input (I) accepts any list of numbers. These will be the numbers the component adds up.
On the right we get two outputs: The Result (R) contains the sum of all the values we provided. Keep in mind that data structures still apply, more on that in a later section. If we provided a single list of numbers, the output will be a single number.
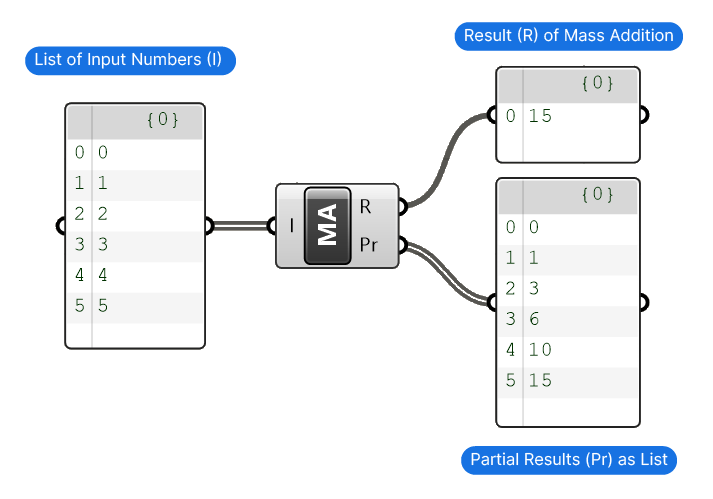
The second result is called ‘Partial Results’ (Pr). It contains a list of all the intermediate steps leading up to the total sum.
Imagine you have a list of ten numbers from 1 to 10. If you were to add them all together, you would start by adding 1 and 2, which results in 3. Then you would add 3 to make it 6. Next you’d add 4 to make it 10. The partial results output contains all the intermediate addition steps that lead up to the final sum. This can be quite useful in some situations.
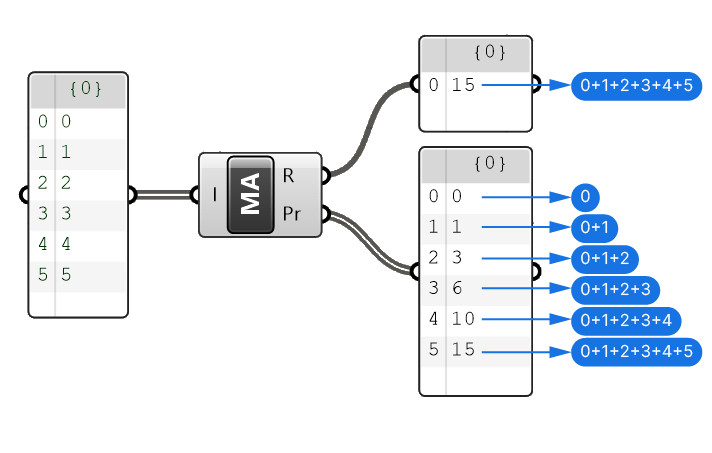
Running totals are how you place objects of different widths side by side, or stack floors of different heights. You can also use it to create a Non-Uniform Curve Subdivision.
How Data Structure Changes the Sum.
When using the Mass Addition component, it’s important to understand that this component sums up the elements of a list. In Grasshopper, a list is not a generic term, it describes a particular type of data structure.
Let me show how different data structures lead to different results:
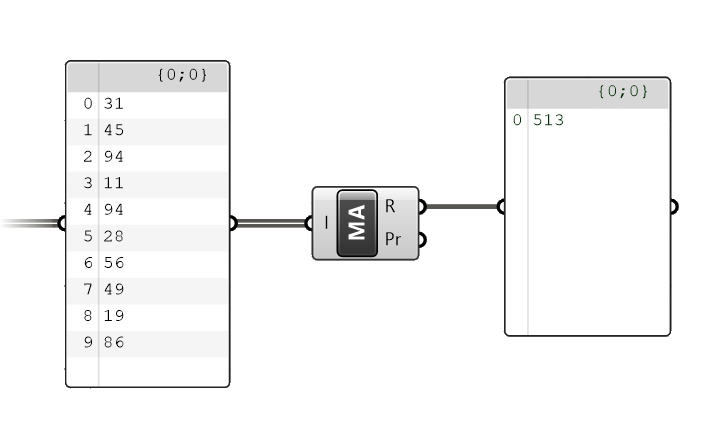
Example 1: Sum of Elements in a List
In the example below I’m using the Panel component to both display the contents and the structure of the data. Here the data is stored in single list or branch, which means the Mass Addition component processes the information as expected.
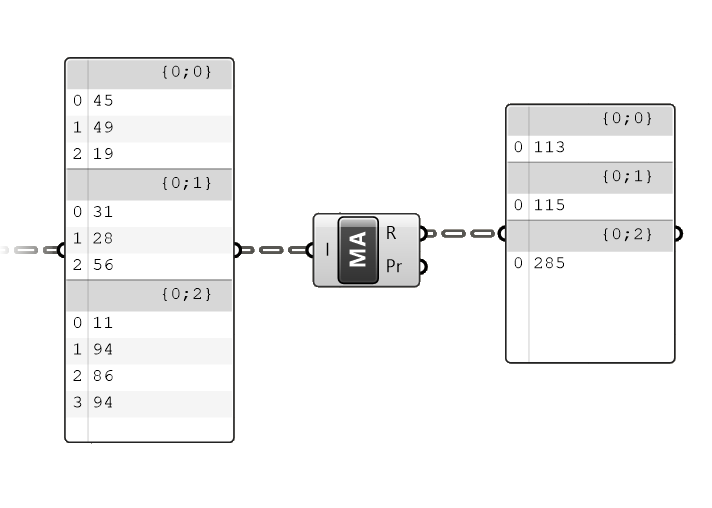
Example 2: Sum of Elements in Separate Data Branches
In this second example we have the same numbers, but they are grouped in three different data branches, making up three separate lists. Data branches exist to keep buckets of data separate. This also means that the Mass Addition component won’t ‘cross’ the line of one branch to the next, which is why it returns three separate sums, one for each list.
Example 3: Getting the Total Sum of Elements Across All Data Branches
Now sometimes we have numbers stored in several data branches, but we still want to get the total sum of all the numbers. To do that, we need to effectively ‘delete’ the data structure information and bring all the numbers back to the same list. To do that in Grasshopper, we have to use the ‘Flatten’ component. Flattening a data tree means that all branch information will be erased, like felling a tree.
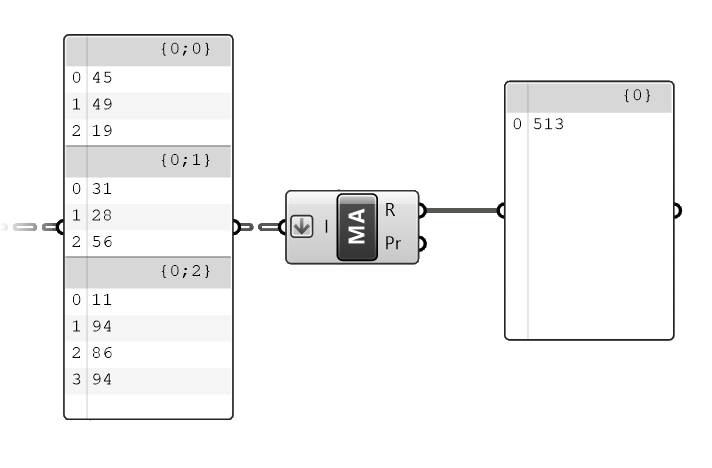
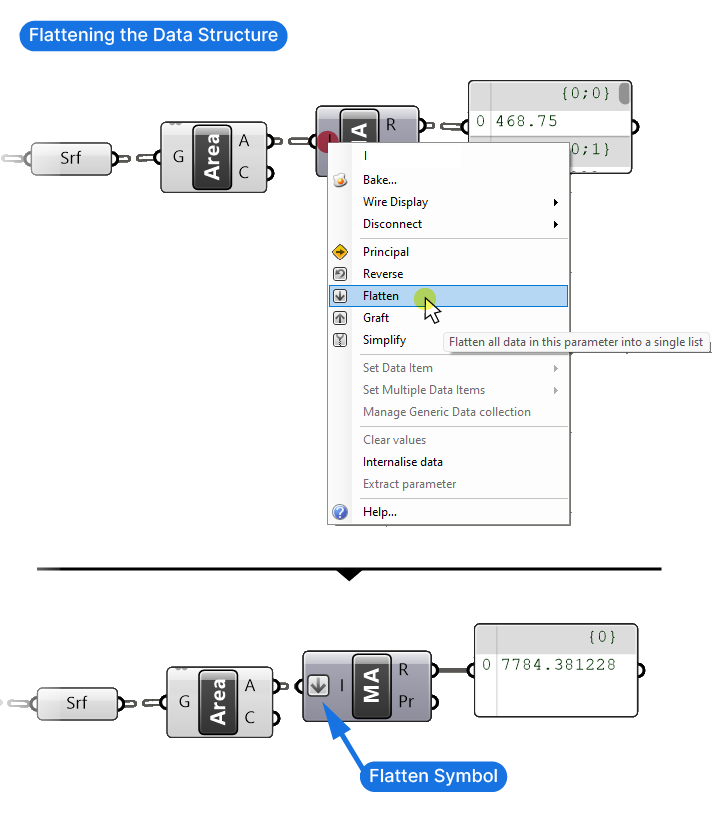
To flatten the input data, right-click on the Input List (I) input of the Mass Addition component, and select ‘Flatten’.
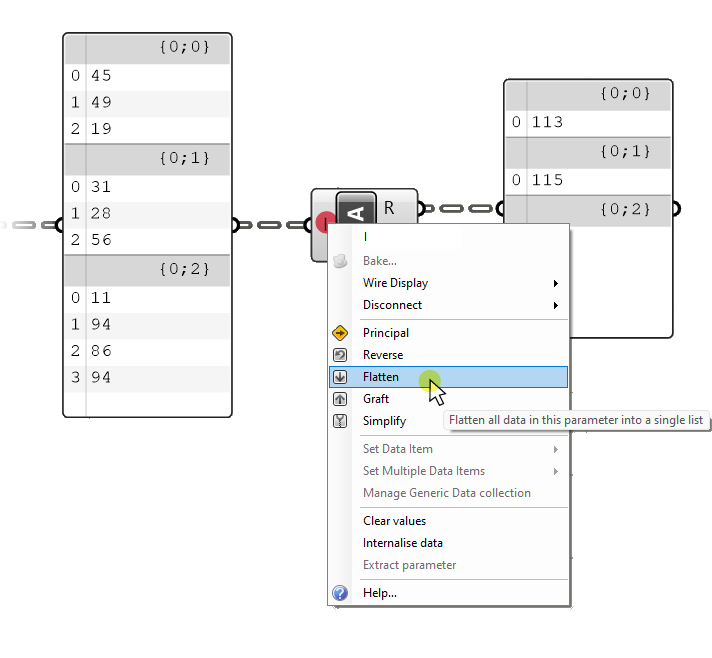
Once we flatten the data, the Mass Addition component will return a single number, representing the sum of all elements in the list.
The small downward pointing arrow on the input give us a visual cue that we flattened the data.
And as expected, we get the total sum of all the numbers across the branches in the Result (R) output.
Step-by-Step Tutorial: Mass Addition of Floor Areas
Let’s say we have a script where we create floor slabs from an irregular massing and we want to know the GFA (Gross Floor Area) of the resulting design. This is a typical mass addition task. Here’s how we can approach it:
Basic Floor Generation Script
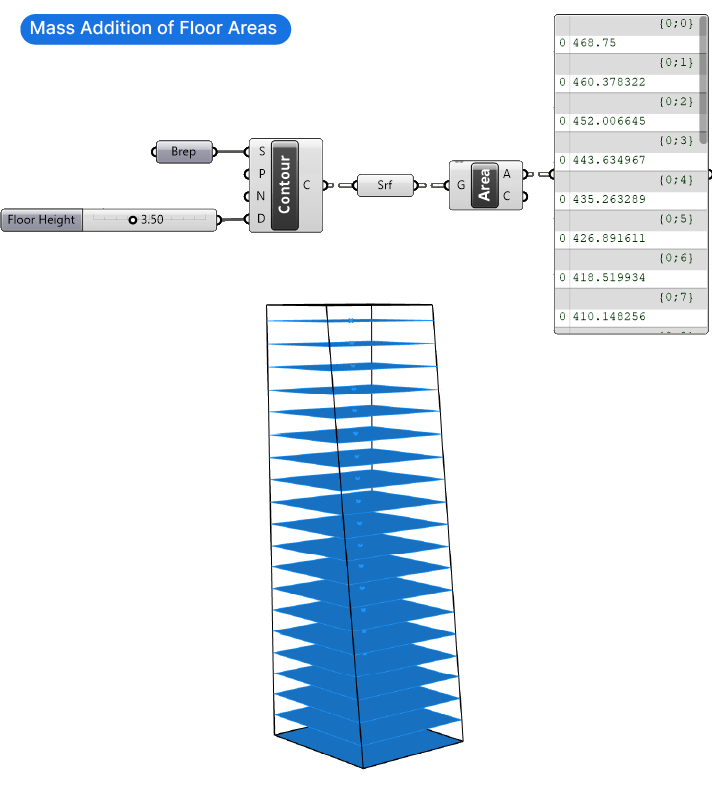
Before we add the floor areas, let’s generate the floors. The following is a basic setup to generate floors with the help of the Contour component:
- We have a referenced Brep (polysurface) from Rhino that we contour with the Contour component. We define a floor height for the contour distance using a Number Slider and stick with the default contour starting location of 0,0,0, and the default contour direction of z (vertical contours).
- We turn these closed, planar curves into surfaces by plugging them into a Surface data container component.
- We use the Area component to calculate the area of the resulting surfaces.
The Panel below displays the output of the Area component. Each floor and floor area is stored in a separate data branch (marked by {0;0}, {0;1} etc. ).
Adjusting the Data Structure for the Mass Addition
To obtain the cumulative sum of all floor areas, we must modify the data structure before inputting it into the Mass Addition component. To erase all data branch information and collect all items in a single branch, we can flatten the input.
To flatten the input, right-click on the Mass Addition input and click on ‘Flatten’. All data is collected in a single branch.
Note: Flattening the data structure worked in this particular case due to the single massing. Depending on the data structure of the numbers you want to get the sum of, you will need to adjust the data structure differently. This may involve trimming the data structure for example. Always check and modify the data structure of the Mass Addition component input to get the sum you want.
Summing values like this is also how you build a fitness value for optimization with Galapagos.
Happy designing!