Welcome to the fascinating world of visual programming with Grasshopper for Rhino! If you’re an architect, designer, or simply a curious mind looking to delve into the realm of advanced architectural designs, you’ve come to the right place. This guide is designed to help beginners understand the foundational concepts of Grasshopper, a visual programming environment that’s transforming the way we approach design.
So, let’s dive in!
Understanding Grasshopper: More Than Just Software
Grasshopper is not just a software, it’s a visual programming environment.
Before you open Grasshopper and build your first script, it’s essential to understand the foundational concepts Grasshopper is built on.
Compared to conventional programming, visual programming allows us to create programs by manipulating program elements graphically rather than by specifying them textually. But in essence, we are building our own programs or algorithms – but without typing any code.

By connecting nodes and creating sequences of components, we are building a program with graphical building blocks. And in those building blocks Grasshopper combines Rhino’s powerful modelling platform with the scalability and control of programming techniques.
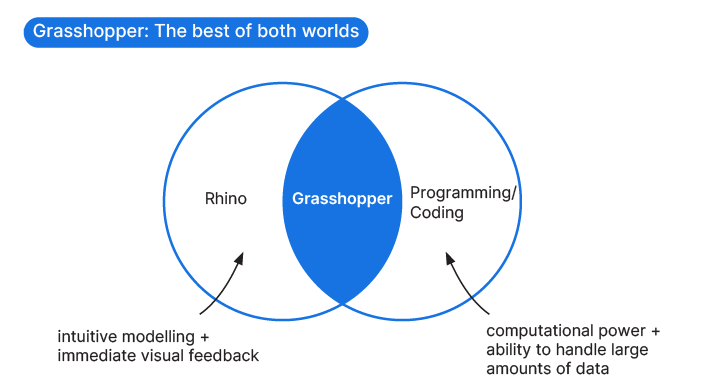
Grasshopper: The Perfect Blend of Rhino and Programming
Grasshopper lives at the intersection between Rhino modelling and programming.
It builds on Rhino’s core command library and allows us to use programming techniques to control and process large amounts of data at once.
Bridging this divide, Grasshopper inherits features from both Rhino as well as from programming.
Almost all commands in Rhino are accessible from within Grasshopper, and, with a few exceptions, the components have the same name.
We can leverage all the core-modelling techniques Rhino has to offer: We can use NURBS Curves, Extrusions, we can Loft, Split, run Boolean Operations and much more.
Grasshopper also takes advantage of the Rhino display pipeline and gives us a live preview of our script in the Rhino viewport itself.
But if Grasshopper just mirrored Rhino’s commands, it wouldn’t be so difficult to learn! As a visual programming interface, it relies on coding logic and programming techniques. While far from actual coding, there are some essential programming concepts to understand when learning Grasshopper.
Essential Programming Concepts for Grasshopper
Thanks to Grasshopper’s graphical interface, we don’t need to write actual code when we write our Grasshopper scripts. Still, there are four essential programming concepts that are important to understand for working with Grasshopper effectively.
The four main concepts are:
- Variables and Functions (or inputs and components)
- Algorithms
- Data Management
- Debugging
Variables and Functions: The Building Blocks of Visual Programming
Any script, visual or not, has two key ingredients: variables and functions. As the name suggests, variables are values that we can alter at any time. In Grasshopper, they represent the geometry we aim to transform.
However, variables alone aren’t enough. They merely represent a static piece of information with no direction. This is where functions come into play.
In programming, functions perform specific operations on the input variables we provide. In Grasshopper, they act as active modifiers of geometry: they enable us to create, scale, rotate, twist, and move objects, among other operations.
While the value of our variables can change, the functions they pass through remain constant. In Grasshopper, these functions are embodied by components. Each component is essentially a ready-to-use function. Regardless of the input we provide, each component always performs the same operation. For instance, the offset curve component will always offset any input curve. The input curve (our variable) can change, but the offset operation (the function) remains the same.
But how do we define which variable to process with which function?
In traditional programming, variables and functions are written in code and are called and matched by using their unique names. By simply referring to “variable A” in code, the variable will be retrieved from memory.
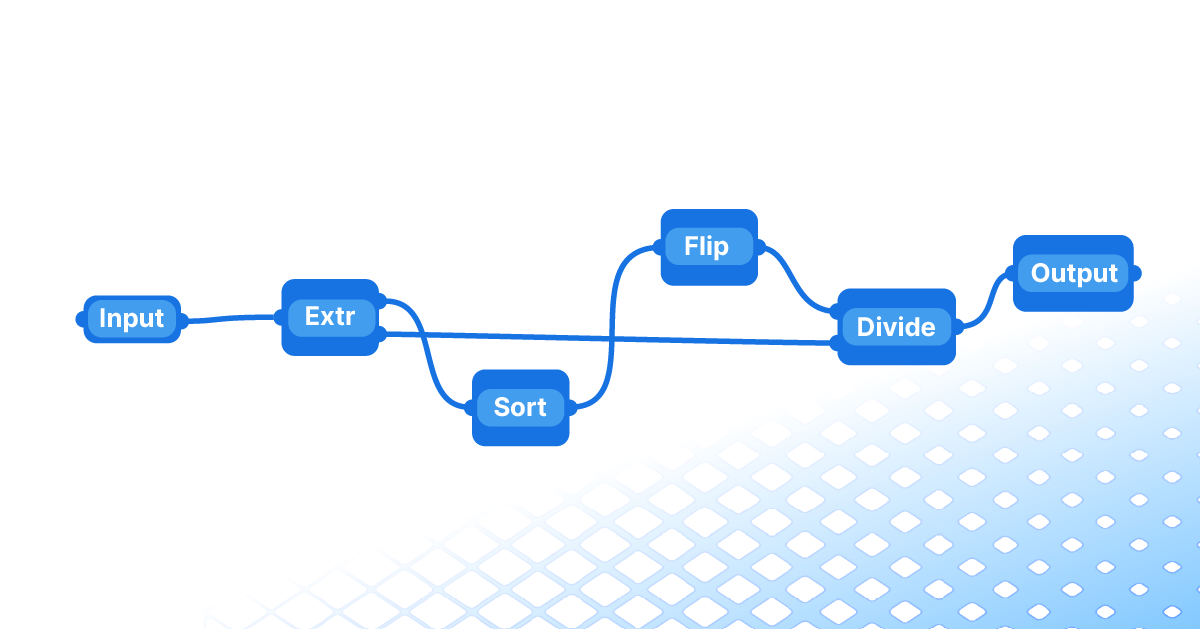
In Visual Programming in Grasshopper for Rhino, variables and functions take on a more tangible form: components.
Instead of remaining abstract lines of code, functions and variables can be located directly on the Grasshopper canvas. By creating wire connections between them, we control which variables are processed with which functions, creating complex chains of commands.
When we adjust a variable or input in Grasshopper, the change ripples down the entire command chain. This flexibility allows us to make fundamental adjustments to a complex design swiftly and efficiently.
Mastering Algorithms: From Basic Building Blocks to Complex Designs
By connecting a sequence of components, we can define a custom set of rules that leads to a specific output. Instead of modelling, we are describing the logic of our design. We outline the procedure that leads to the result. This means that we can easily adjust any of the variables within the script, and the output will be recalculated on the fly.
But there’s more to it than simply recreating the same chain of commands we would use in Rhino. The logic of our design depends on the individual design goal and on which key parameters we want our design to be driven by. We need to define a hierarchy of variables: which variables will determine other variables?
This means that we will need to first carefully craft the logic of our design, and then translate it into component sequences. By doing so, we are building an algorithm.

In order to build our own algorithms, we need to learn to describe a design in terms of the logical steps needed to generate it. Because we can’t select geometry directly in the Rhino viewport, we need to define which objects to modify in relative terms. This ensures that our script works for a wide variety of cases, without our manual intervention.
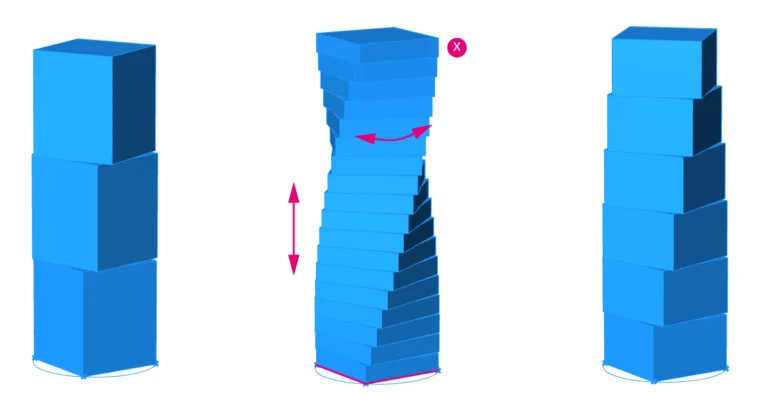
For example, instead of selecting a curve directly, we instruct Grasshopper to select the curve closest to a point, or the longest curve in a given group of curves.
Learning how to break down complex geometries into a series of simple logical operations is an essential skill to master in order to excel at Grasshopper and parametric design.
But knowing the sequence of components is not enough. A component can process a single geometry, or many hundreds of objects at once. This is where Data Management comes in.
Data Management: The Key to Efficient Design in Grasshopper
Because we can’t select geometry in Grasshopper the way we do in Rhino, our selection and object manipulation occurs on a more abstract level: with Lists and Data Trees.
The benefit of this abstraction is that we can access and manipulate data at scale: We can define and select singular items, manage items within a list, and deal with databases containing thousands of items. This allows us to stay in control when processing a lot of geometry at once (and save hours of work!).
For instance, we can rotate hundreds of façade elements at once, each with an individual rotation angle. In Rhino, we would need to rotate each element individually, one by one.
Data Management is at the core of everything we do in Grasshopper. Every single component outputs data. One of our tasks is to manage and control the flow of data through the component sequences we create.
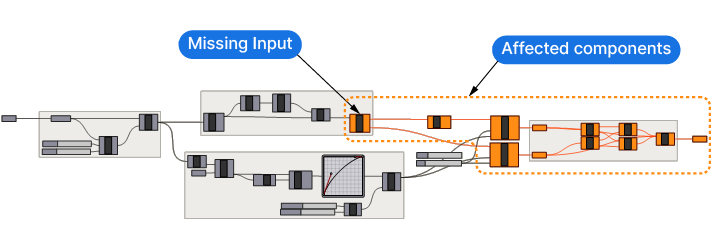
As the number of components in a script grows, so does the likelihood of encountering unexpected results. Our script may fail due to an error in the logic or an unexpected variable. While this is a normal part of the process of writing a script, we need a quick way to find the errors and fix them.
Grasshopper has built-in debugging utilities that help us to find the problem quickly and get on with our design.
Debugging in Grasshopper: Navigating Visual Error Detection
Debugging is a term from the programming world and describes the process of finding the location in a script where something went wrong and resolving it.
There are a few intuitive ways Grasshopper helps us with debugging.
One of them is the live preview in the viewport: we don’t need to write the whole script before we see if it works as desired, we get visual feedback every step of the way directly in the Rhino viewport.
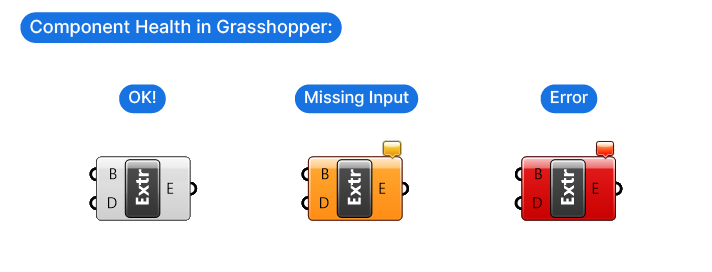
We also get visual cues on the “health” of individual components: when the component is gray – everything’s fine, when it’s orange one or more inputs are missing and when a component turns red – it means something is wrong with our input data, and the component failed.
In addition, tooltip popups when hovering over the component inputs and outputs give us additional information.
There are even special components like the Panel in Grasshopper, that allow us to read the output of components to understand if the data is being processed correctly.
Concluding thoughts
And there you have it! You’ve taken your first step into the world of visual programming with Grasshopper for Rhino. Remember, this is just the beginning of your journey. As you continue to explore and experiment with Grasshopper, you’ll discover new ways to bring your architectural designs to life. So, keep practicing, keep exploring, and most importantly, have fun with it!
If you want to fast-track your Grasshopper journey, check out our online course: Grasshopper for Architects! It’s a comprehensive beginner-to advanced Grasshopper course designed specifically for architectural design.
Happy designing!