Ever wondered how to make your design data work smarter, not harder? Enter the Dispatch component in Grasshopper.
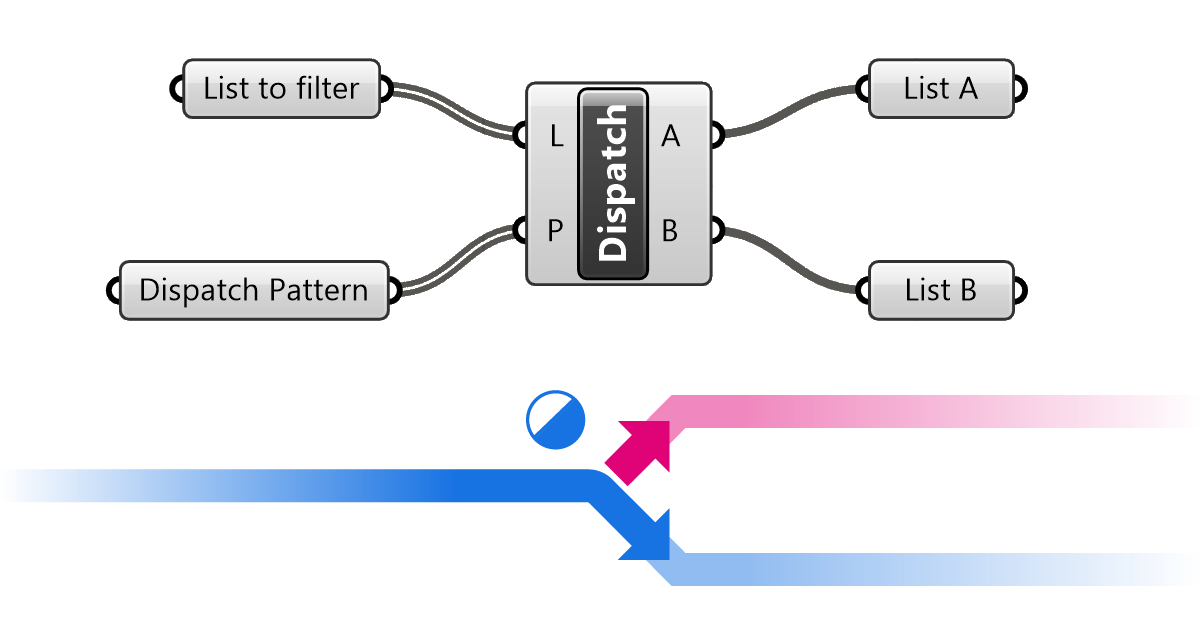
The Dispatch component is a crucial component for any designer looking to streamline their data management. This component elegantly sorts data into two distinct paths, A and B, based on specific conditions, akin to a traffic director at a bustling intersection. Whether you’re new to parametric design or looking to refine your skills, understanding Dispatch is key to unlocking more efficient and creative design solutions. Ready to harness its potential?
Let’s dive in!
Where to find the Dispatch Component in Grasshopper
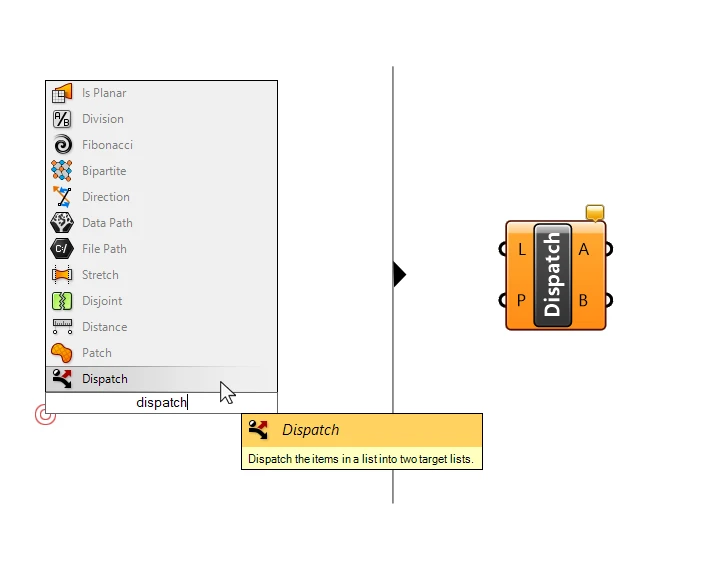
Let’s start by adding the Dispatch component to our canvas. Click on the ‘Sets’ Component tab, then onto the ‘List’ group to display all the contained components. Select ‘Dispatch’ to add it to your canvas.
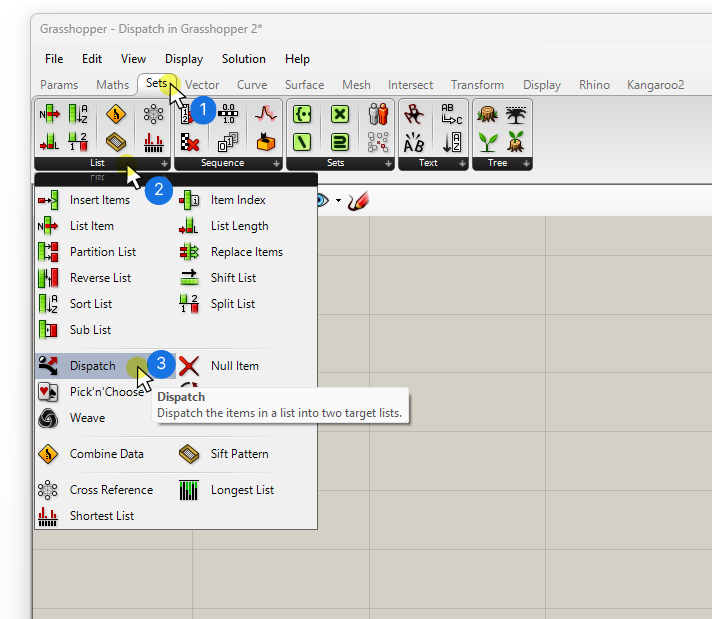
To quickly add it to the canvas, double-click where you want to component to be placed, type ‘dispatch‘ and select the component in the list.
How the Dispatch Component Works
Let’s take a look at the inputs and outputs. The Dispatch component has two inputs:
- the List to filter (L)
- the Dispatch Pattern (P)
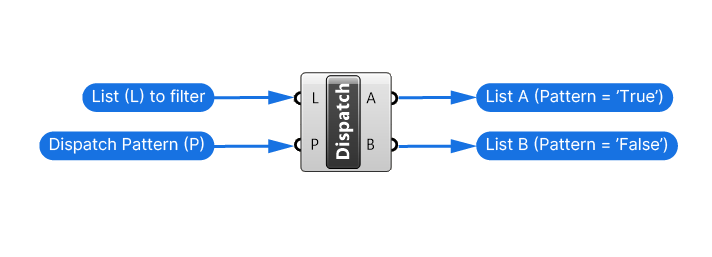
The list to filter can be a list of any datatype, whether it be numbers, curves, or any other data. As long as it is a list, it can be dispatched.
The contents of this list will be split into two lists, reflected by the outputs: List A and List B. And the Dispatch Pattern (P) is going to determine whether an item in the list (L) will be assigned to one list or the other. This input here must be a list of True or False values, so-called ‘Boolean Values’. If the value is True, the item will be assigned to List A, if it’s False, it will land in List B.
Now notice that the input is called ‘Dispatch Pattern‘. The input is called ‘Pattern’ because if we input fewer Boolean Values than the List to Filter (L) contains, these values will be repeated over and over until the end of the list. The values provided are then treated as a repeatable pattern.
Let’s see what this means in a simple example.
The Dispatch Component in Grasshopper – Example
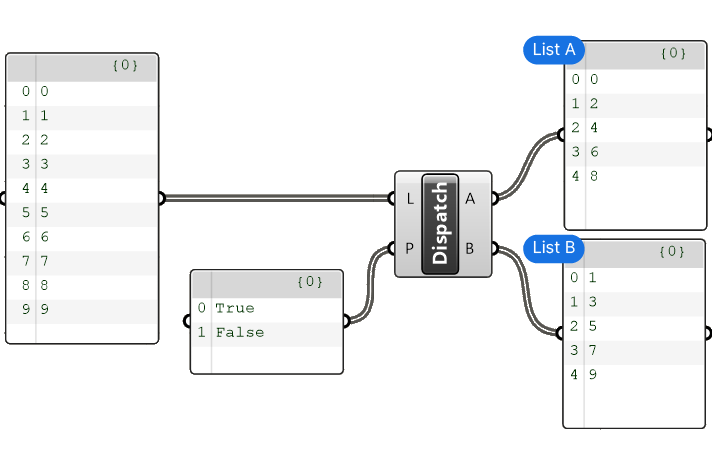
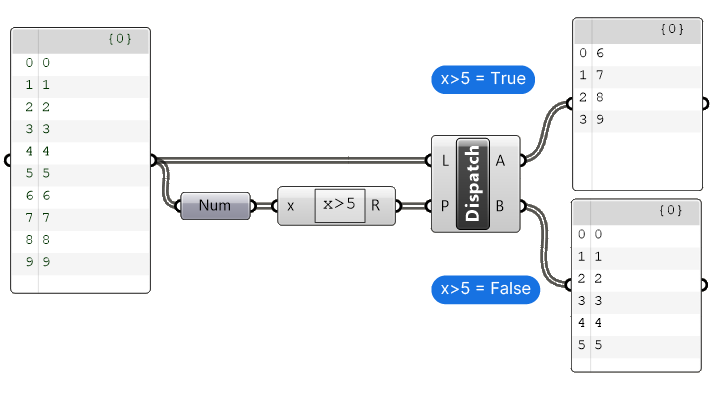
For simplicity, let’s say we have a list of 10 numerical values from 0 to 9 that we typed into a Panel component. We’ll plug this list into the List to Filter (L) input of the Dispatch component.

Now let’s define a Dispatch Pattern. Let’s add another Panel, and type in a True and a False value. Make sure to right-click on the Panel and deactivate ‘Multiline data’. That’s because by default the Panel allows you to insert text over multiple lines. By turning off ‘Multiline data’, every time you hit ‘Enter’ you are creating another item in the list. In other words each line in the panel becomes its own item in the list.
So now we have a list of two Boolean Values: a True and a False value. Let’s connect it to the ‘Dispatch Pattern’ input.
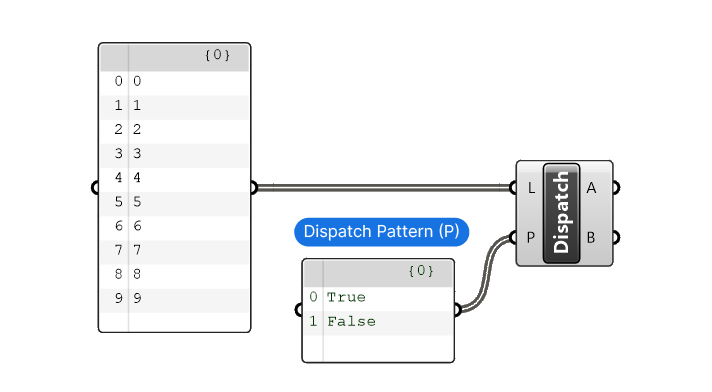
I added another two panels to the A and B output of the Dispatch component. As we can see, the Dispatch Pattern (P) we provided is repeated. The first item in the list to filter (0) matches with the value ‘True’ and is assigned to list A. The second value (1) is matched with ‘False’ and is moved to list B. For the third value (2) the Dispatch Pattern is repeated and is ‘True’ again, which is why it ends up in list A. And so forth.
Using conditions as Dispatch Patterns
Now the beauty of the Dispatch Pattern (P) is that we are not limited to using a repeating pattern, we can create or provide unique True or False values for each value in the List to Filter (L). This allows us to be more specific about which items to keep.
To do so, we can use the Expression Editor.
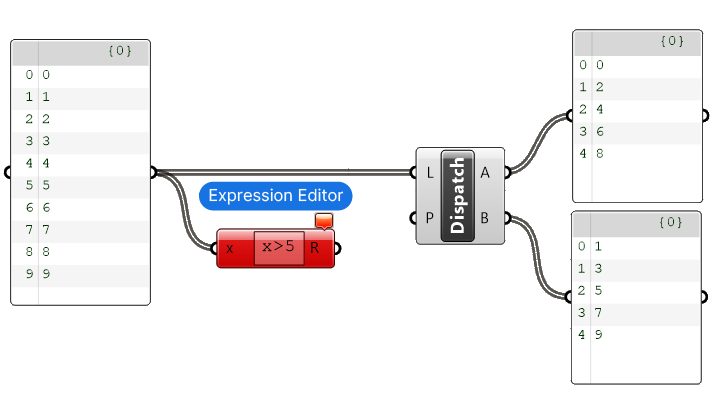
Let’s use the example above and replace the Dispatch Pattern with unique True or False values.
Let’s say we want to keep all the numbers that are larger than 5. We can simply double-click on the Expression Editor component and replace the formula with:
x > 5and connect our original list of values.
Resolving Data Type Issues in the Expression Editor
The Expression Editor component turns red, did we do something wrong? Not really. To check the full error message, right-click on the component and click on ‘Runtime Errors‘. The error message will be displayed there. The error message says: ‘Operator > not defined for string and int’.
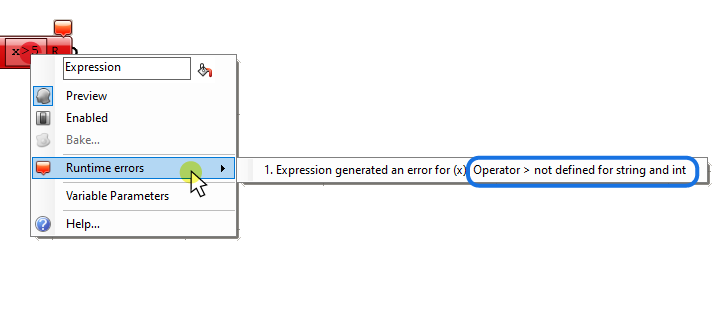
What this means is that the component interprets the list of numbers we entered in the Panel as ‘Strings’ or text instead of numerical values. And Grasshopper can’t compare text with numbers. Now why are our numbers treated as text?
Because anything we type into the Panel, even if its numbers, is treated as a text.
So we need to turn these ‘text’-numbers into actual numbers before the Expression Editor can use them. A simple way to do so is to feed the values through a ‘Number (Num)‘ container component. By running it through the ‘Number (Num)’ component, the text will be converted into a number datatype (as long as it is numbers to begin with!).
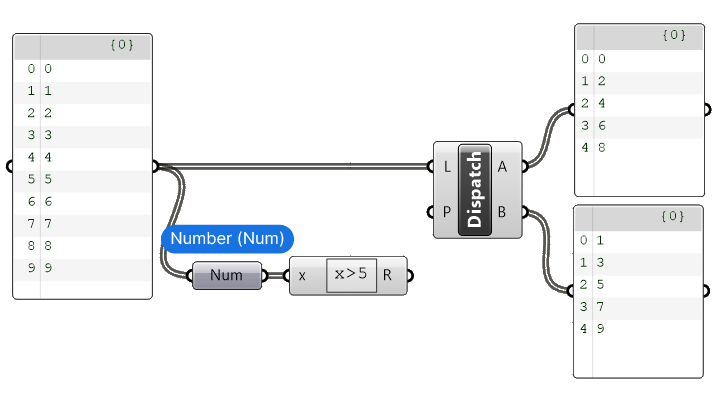
We can add another Panel to visualize the result. The Expression Editor returns a list of True and False values that react to each individual value in our list!
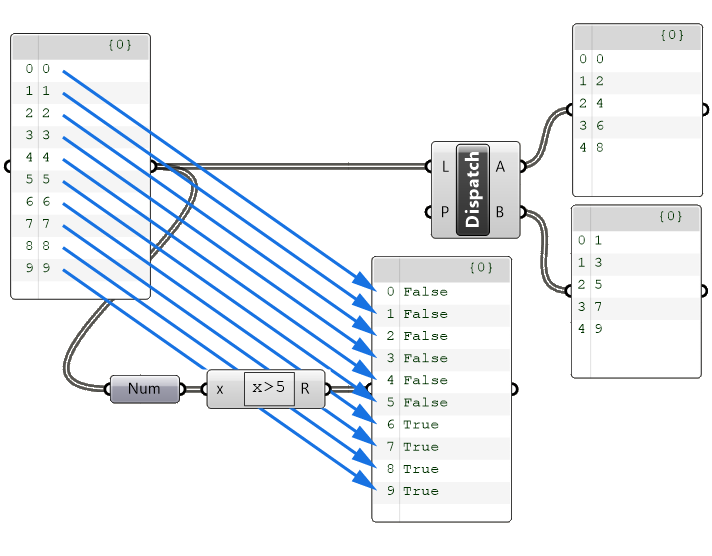
Once we connect this ‘Dispatch Pattern’, the Dispatch Component’s output lists reflects our selection: all the numbers larger than 5 are in List A, and all the remaining in list B.
Differences between Cull Pattern and Dispatch in Grasshopper
When it comes to selecting data from a list, the Dispatch and Cull Pattern components are the most common component. While the seem to do similar things, they are different.
Let’s start with what they have in common: they both need a list of data to process, and they also both need a list of True or False values to process the data. The difference lies in their outputs.
Unlike the ‘Cull Pattern‘ component, which only keeps the items in the list that have the value ‘True’, the Dispatch component also outputs the remaining items.
We can actually recreate the functionality of the ‘Dispatch’ component with two Cull Pattern components. To do so first select the values that are assigned the value ‘True’. The create a copy of the Cull Pattern component by pressing Alt and dragging it. Finally right-click on the Cull Pattern (P) input and select ‘Invert Pattern’. What this does is to turn all the input values that are ‘True’ to ‘False’ and vice-versa.
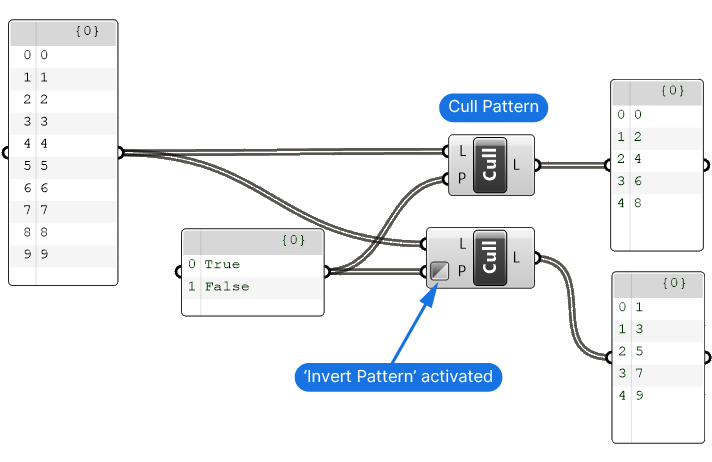
We now have the equivalent of the A and B output of the Dispatch component, albeit in two components instead of one.
Both components get the job done. Which method you use comes down to your own preference.
Dispatch in Grasshopper – Concluding Thoughts
In wrapping up our beginner’s guide to the Dispatch component in Grasshopper, it’s clear that this component is a gateway to optimizing and refining your data management processes in design projects. The ability to precisely control and manipulate data streams opens up a world of possibilities for architects and designers, enabling the creation of more sophisticated and dynamic models.
As you continue to explore and experiment with Dispatch, remember that this is just the tip of the iceberg in terms of what Grasshopper has to offer. If you’re eager to dive deeper and truly harness the full potential of parametric design, consider elevating your skills with Grasshopper Pro – our comprehensive online course designed specifically for architects. The course will fast-track your learning journey, transforming you from a beginner to a proficient user, capable of bringing your most complex architectural visions to life with ease and precision.
Join us on this exciting journey and unlock a new realm of possibilities in your architectural designs!
Happy designing!