For those diving into parametric design in Grasshopper, understanding the Range component is pivotal. The Range component allows designers to easily generate sequences of numbers between set boundaries. This capability, though seemingly simple, can dramatically enhance the functionality and versatility of your scripts.
In this article, we’ll explore how the Range component works, provide a step-by-step application example, and highlight key nuances every user should know.
Let’s dive in!
Adding the Range component
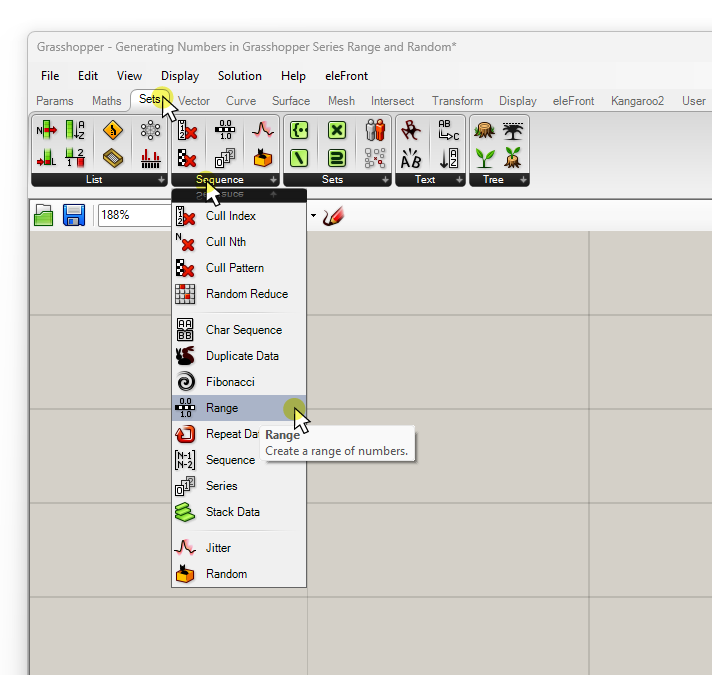
Let’s start with the basics – adding the component to your script. You can find the ‘Range’ component in the ‘Sets‘ component tab, in the ‘Sequence‘ group.
Select it and click anywhere on the canvas to add it to your script.
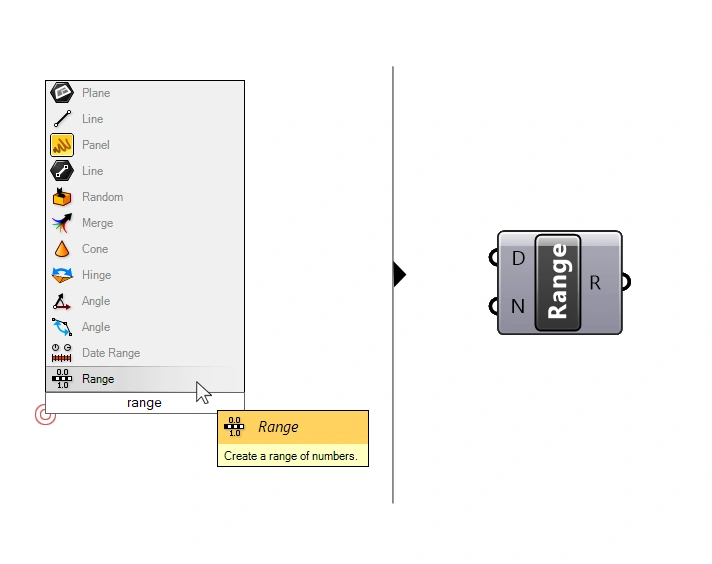
If you prefer to use the component search bar, simply double-click on the Grasshopper canvas where you want the component to be placed, and type “range” into the search bar.
Then click on the first result to add the component.
How it works
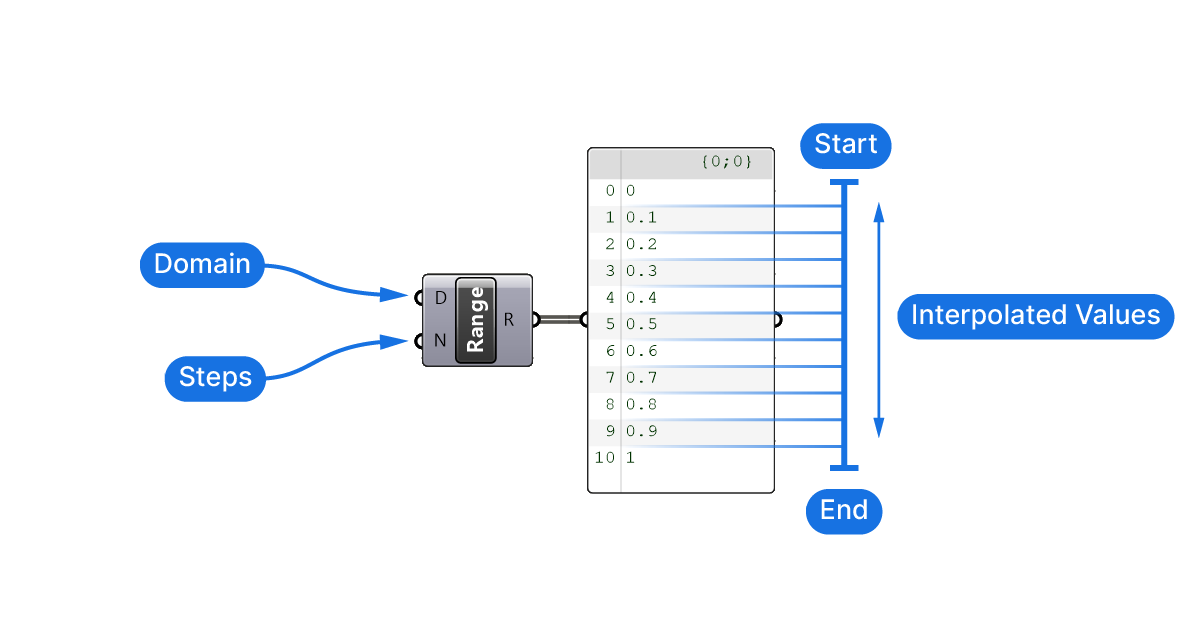
The ‘Range’ component generates a sequence of numbers within a domain.
It comes with two inputs: the Domain (D) and the Number of Steps (N).
We can control the output with these two parameters.
So, what exactly is a domain? A domain is defined by two values which will represent the first and last number of the range. More on that in a second.
The Number of Steps (N) input defines the number of values the component will generate within that domain.
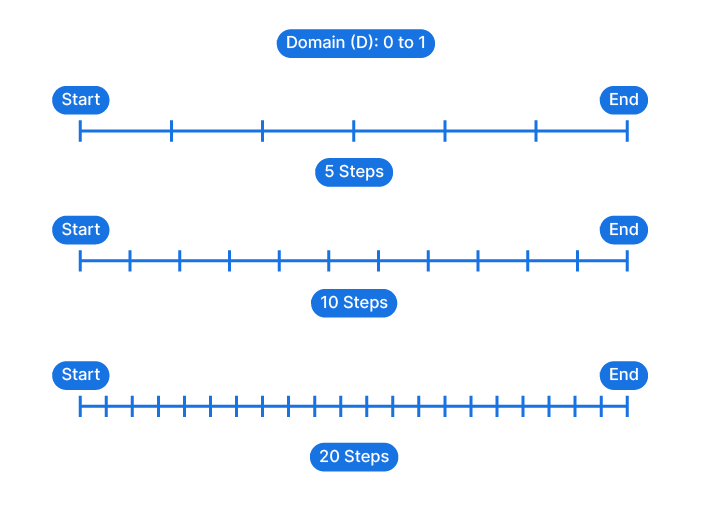
It’s best shown with an example, here’s the default output of the Range component. It comes with a default range of 0 to 1, and a default number of steps of 10.
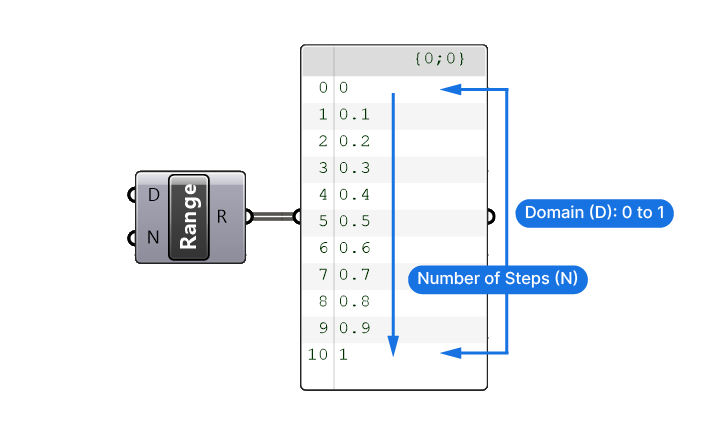
The domain defines the bounds of the numbers that will be generated, and the values of the steps result from an equidistant interpolation. As shown below, 5 steps will result in larger intervals, 10 smaller, and 20 even smaller intervals.
Defining the Domain for the Range Component
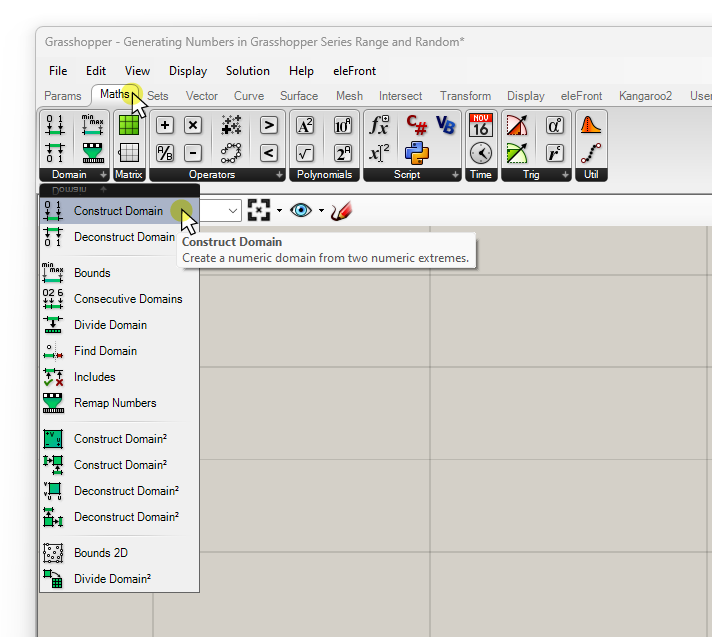
The domain plays a crucial role in defining the numbers generated. But to define a domain, we first need to construct it. To construct a domain, we can use the ‘Construct Domain‘ component. You can find it in the ‘Maths‘ component tab, under the first tab, titled ‘Domain‘.
This component is straightforward: its two inputs represent the domain’s minimum (A) and maximum (B) values. The output is its own filetype, a domain, which is shown as follows in Grasshopper:
0 To 5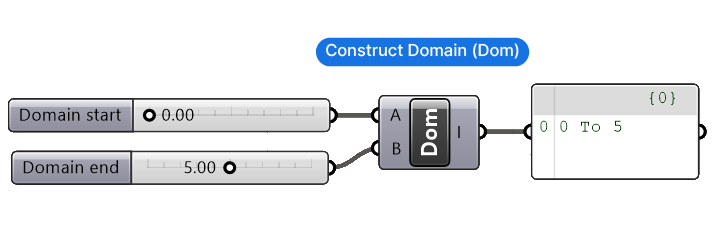
We can connect any numerical values in the Start and End inputs, they don’t necessarily have to be integers (whole numbers).
Once we connect the domain, as well as a Number Slider to define the Number of Steps (N), we’ll get the following output from the Range component.
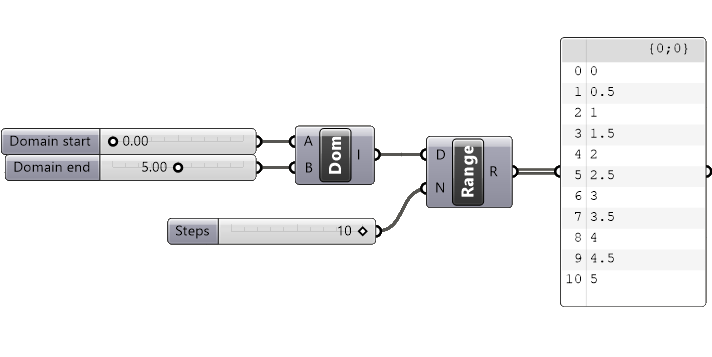
The output increments are determined by dividing the domain length (difference between start and end values) by the number of steps.
We get 10 values, interpolated in an equidistant manner between the Start and End number defined by the Domain input. In this example the domain length (the difference from start to end value) is 5, which, in combination with 10 steps, returns a list of numbers with increments of 0.5.
When to use the Range component
Use the Range component whenever the most important part of the generated numbers is the minimum and maximum value. Let the Range component take care of generating all the values in between.
Common issue:
When you start using the Range component in Grasshopper, you will run into the issue that it creates one more number than you intended. This is not a bug, although it may seem so at first. Here’s what’s behind it:
The Number of Steps (N) input does not equal the number of output values! Think of it this way: if you have a start and end number, and 10 steps, you actually end up with one more value, because you start with the number 0.
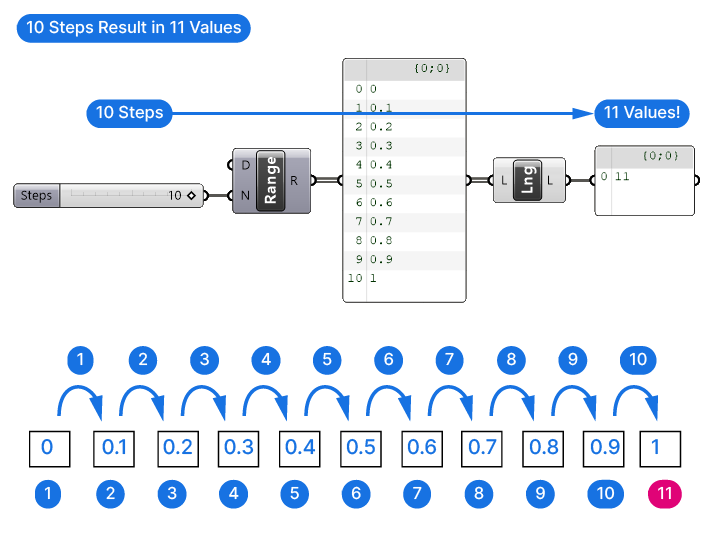
Essentially, it’s the starting number + the number of steps. This results in one more value than specified.
To solve that, we can add an expression inside the Number of Steps (N) input. To do so, right-click on the input, go to ‘Expression‘ and type:
x - 1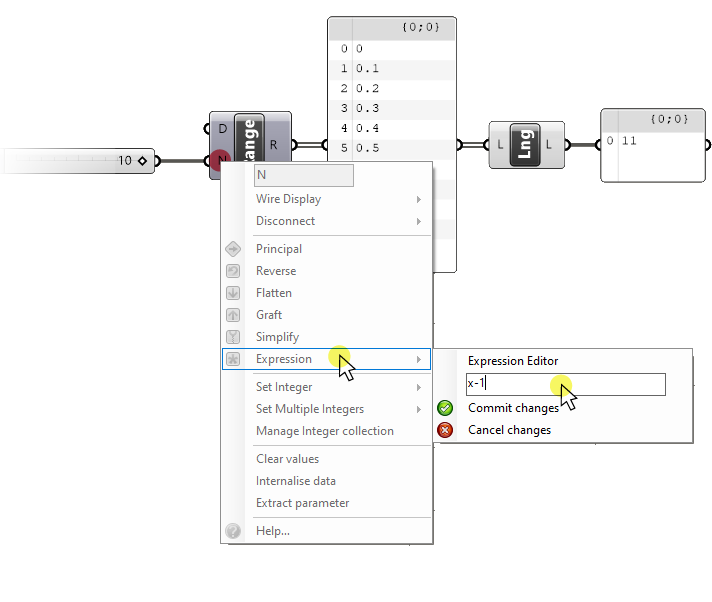
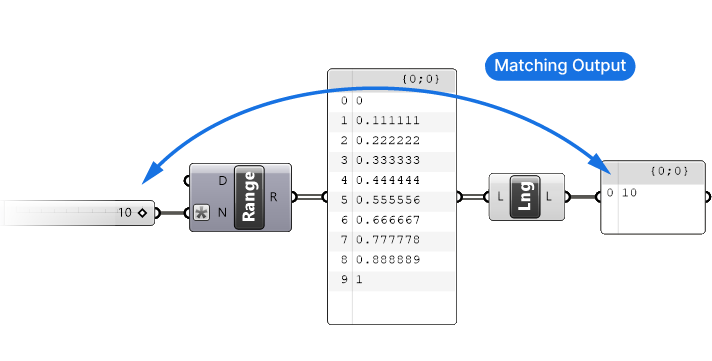
This will remove one step, ensuring you get 10 values including the start and end number.
Step-by-Step Tutorial: Using Range
The most common use case for the Range component involves creating a range between 0 and 1 and defining the necessary steps in between. Here is an example:
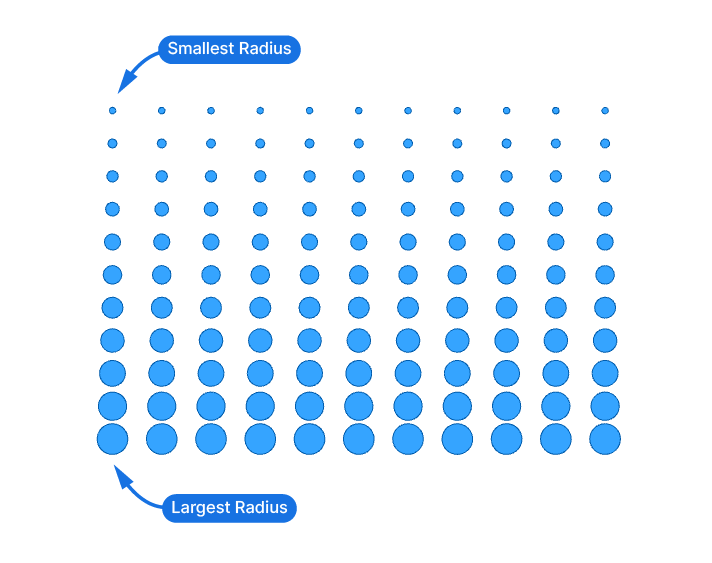
Imagine we want to create the following effect: We want to generate circles in a grid that go from a larger radius on the bottom, to a smaller radius on top. The parameter we want to define is the size of the two extremes – and all the circles in-between should gradually change from one to the other.
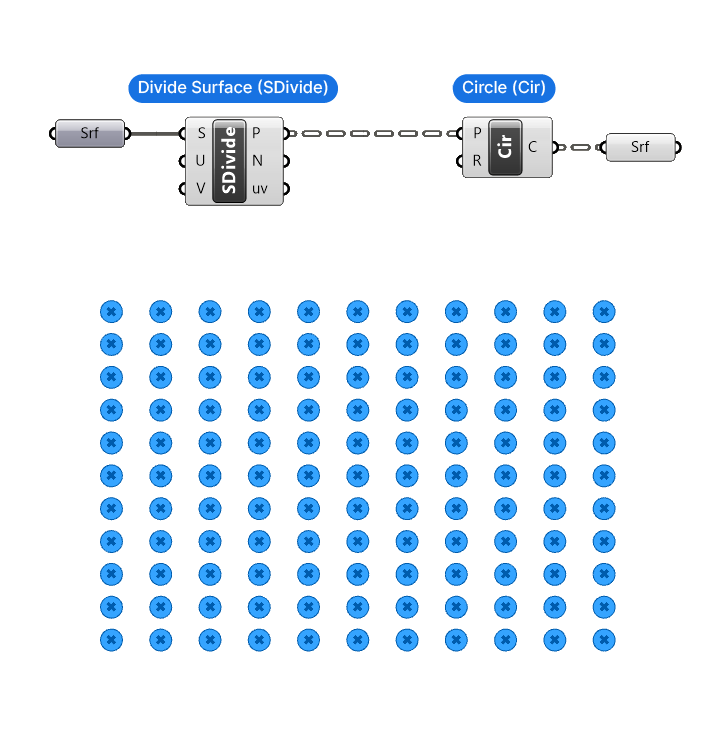
The basic setup could be as follows. The starting point is a referenced, rectangular surface (Srf), in the example 30 units high, and 45 units wide. The surface is then ‘divided’ with the ‘Divide Surface‘ component, which generates a grid of points on the surface. The number of points in the U and V direction can be controlled by a number input in the U and V inputs. For this example I’m sticking with the default value of 10 for both.
The output is a data tree of points (P), specifically 11 lists with 11 points each.(10 divisions lead to 11 points). Next I added a ‘Circle‘ component, which asks for the center point of the circle, and a radius. The grid points will be the center points, and for now the output shows the default radius of 1. Finally I turned the closed planar curves into a surface, by connecting it to a surface data container (to get a shaded circle).
Controlling the Radius with the Range Component
Let’s add a Range component to define the radiuses of these circles. We’ll add a ‘Construct Domain‘ component to define our minimum and maximum values for the radius, which we’ll control with two Number Sliders. We’ll connect this domain to the ‘D’ input of the Range component.
Next we need to define the number of steps to generate. We need as many numbers as there are circles in one data branch (11). To create a parametric relationship between the number of subdivisions and the Range component, let’s use the ‘List Length‘ component and get the list length of the Points (P) output. And connect it to the Number of Steps (N) input of the Range component.
There is one last step we need to do: currently our ‘Range’ component is generating 12 values instead of 11. Unless we fix this irregularity, our final output is going to contain an extra circle – leading to errors in the output. So let’s right-click on the Steps (N) input, and add the expression ‘x-1’ to generate exactly the number of values we need.
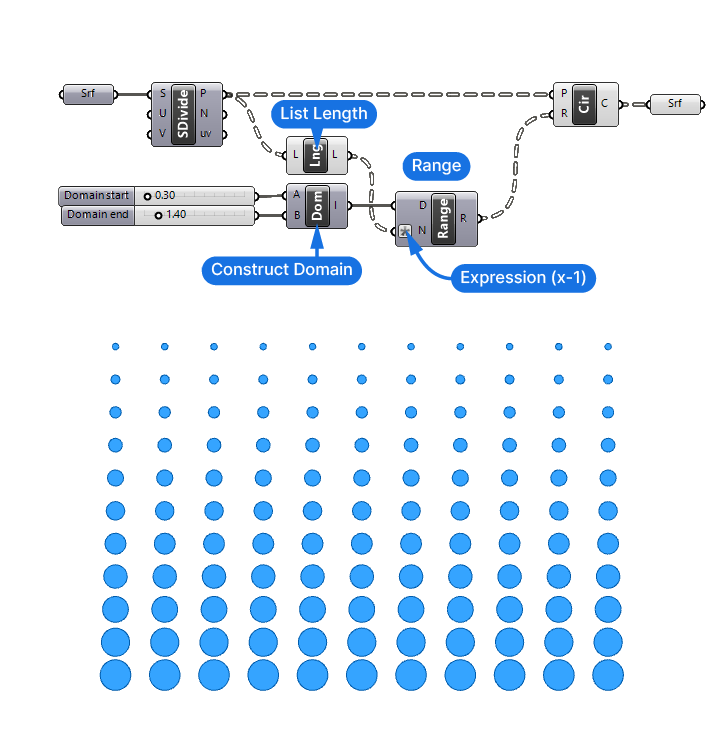
And there we have it! The Range component outputs 11 branches containing 11 values each. And the 11 values all range from 0.30 at the top, to 1.40 at the bottom.
The Range Component in Grasshopper – Final thoughts
Mastering the Range component in Grasshopper is an important step in one’s journey towards mastering parametric design. This seemingly straightforward tool can be the backbone of complex designs, ensuring precision and efficiency in your scripts. As we’ve explored, with the right understanding and application, the possibilities are truly limitless.
Now, if you’re looking to further elevate your skills and dive deeper into the world of Grasshopper, consider enrolling in Grasshopper Pro. It’s a comprehensive online course tailored for architects, designed to fast-track your learnings and set you on the path to becoming a Grasshopper expert.
Happy designing!